XGRIDSDocs
  • 简体中文
  • English
  • 繁體中文
  • 日本語
  • Deutsch
  • Español
  • Italiano
  • Français
  • Русский
  • Polski
  • Nederlands
  • 简体中文
  • English
  • 繁體中文
  • 日本語
  • Deutsch
  • Español
  • Italiano
  • Français
  • Русский
  • Polski
  • Nederlands
  • Lixel PortalCam Series

    • PortalCam P1

      • Product Overview
      • Basic Operation
      • Using the LCC Scan App
      • Maintenance and Care
      • FAQ
  • Lixel K Series

    • Lixel K1

      • Product Overview
      • Basic Operation
      • Device Activation and Connection
      • Scanning Workflow
      • Acquire Point Cloud Data with Absolute Coordinate
      • Map Fusion
      • Route Planning Suggestions for Typical Scenes
      • Precautions
      • FAQ
    • Lixel K2

      • Product Overview
      • Basic Operation
      • Device Activation and Connection
      • Scanning Workflow
      • Acquire Point Cloud Data with Absolute Coordinate
      • Map Fusion
      • Route Planning Suggestions for Typical Scenes
      • Precautions
      • FAQ
  • Lixel L Series

    • Lixel L2 Pro

      • Product Overview
      • Basic Operation
      • Device Activation and Connection
      • Scanning Workflow
      • Acquire Point Cloud Data with Absolute Coordinate
      • Measure Point
      • Appendix
      • FAQ
    • Lixel L3

      • Product Overview
      • Basic Device Functions
      • Device Activation and Connection
      • Data Capture
      • Capturing Absolute Coordinates
      • Appendix
      • FAQ
  • Accessories

    • Stick Light

      • Installation Guide
      • Basic Operation
      • FAQ
  • Lixel Studio

    • Version and Copyright
    • Installation and Activation
    • Software Interface
    • File Operations
    • Project Processing
    • Tools
    • 2D Drawing
    • Applications
    • Settings
    • Device Connection
    • FAQ
    • Usage Tips

      • Data Flow Overview
      • Software Licensing Guide
      • Understanding Scanner Accuracy Specifications
  • Lixel CyberColor

    • LCC Studio

      • Getting Started
      • Version and Updates
      • Download and Installation
      • Interface Overview and Navigation
      • Before Reconstruction
      • Model Reconstruction
      • Single Model Reconstruction
      • Map Fusion
      • Aerial-Ground Fusion
      • Aerial Reconstruction
      • My Models
      • Other Features
      • Settings and Account
      • Converter
      • Publish to Third-Party Platforms
      • Video Reconstruction
      • FAQ
    • LCC Scene Editor

      • Version & Updates
      • Account & Login
      • Product Overview & Home
      • Editor Interface
      • Scene Navigation Modes
      • File
      • Settings
      • Edit Operations
      • Window
      • Global Toolbar
      • Assets & Properties
      • Left Toolbar
      • Viewpoints
      • Portal
      • Skybox
      • Annotations
      • Measurement
      • Flythrough
      • Scene Report
      • 3D Layout
      • Mini-Map
      • Preview Mode (Viewer)
      • Help
      • FAQ
      • Spawn Point
    • LCC Model Editor

      • Version and Updates
      • User Guide
      • Overview and Interface
      • File Operations
      • Selectors
      • Editing Operations
      • Measurement
      • Color Grading
      • Asset Management
      • Settings and Help
      • FAQ
    • Capture Guide

      • Overview
      • Capture Devices Overview
      • General Capture Principles
      • Indoor Scene Capture
      • Outdoor Scene Capture
      • Large-Scale Capture (Map Fusion)
      • Aerial-Ground Map Fusion Capture
      • Object Capture
      • People Capture
      • Video Reconstruction Capture
      • HD Enhancement
      • Control Points (Lixel P1)
      • FAQ and Troubleshooting
    • LCC Studio Linux

      • Product Overview
      • Architecture Guide
      • Installation and Deployment Guide
      • Container Startup Parameters Guide
      • CodeMeter Offline Licensing Deployment Guide
      • API Reference
      • Appendix - Developer Data Guide
      • Appendix - Error Code List
      • Single-Machine Multi-GPU Cluster Deployment QuickStart
    • Best Practices

      • Merging Multiple Large 3DGS Models
      • Aerial-Ground Map Fusion Workflow
      • Data Flow Overview
      • Software Licensing Guide
    • Version History
  • Plugin & SDK

    • Unreal

      • Introduction
      • Quick Start - Windows
      • Quick Start - Linux
      • Quick Start - Quest3
      • Editions and Licensing
      • Rendering
      • Tiled Rasterization (Experimental)
      • Visual Settings
      • Normals and Lighting
      • Scene Editing
      • Performance Parameters
      • Performance Guide
      • Third-party and Engine Plugin Integration
      • Proxy Mesh
      • Loading Animation
      • Collision
      • Navigation System Support
      • Single Layer Water Support
      • Localization
      • FAQ
      • Troubleshooting
      • Logging and Diagnostics
      • Contact Us
      • Best Practices

        • Relighting 3DGS with a LixelStudio Mesh
        • Per-camera Independent Rendering
      • API Reference

        • ALCCActorBase
        • ULCCComponentBase
        • ULCCComponent
        • ULCC2Component
        • SOG / SPZ / PLY Actors
        • ALCC2ProxyMesh
        • ALCCClippingVolume
        • ALCCSectionPlane
        • ALCCLoadVolume
        • ULCCUtilLibrary
        • Enums
        • Structs
      • Changelog

        • v3.5.0
        • v3.4.0
        • v3.3.1
        • v3.0.0
        • v2.2.1
        • v1.0.0
        • v0.9.0
        • v0.8.0
        • v0.7.1
        • v0.6.1
        • v0.5.2
        • v0.4.1
        • v0.4.0
        • v0.3.0
        • v0.0.5
        • v0.0.4
        • v0.0.3
        • v0.0.2
        • v0.0.1
    • Unity

      • Unity SDK Introduction
      • Technical Features
      • Development Environment Requirements
      • PC Quick Start Guide
      • Project Settings Optimization Guide
      • Pico 4 Ultra Development Guide
      • Pico 4 Ultra PC Streaming Guide
      • Quest 3 Development Guide
      • Quest 3 PC Streaming Guide
      • OpenXR Development Guide
      • Pico 4 Ultra Business Streaming Guide
      • Glossary
      • FAQ
      • Contact Us
      • Feature Development Guide

        • Multi-Scene Mixed Rendering Development Guide
        • Shadow Receiving Development Guide
        • Real-Time Lighting Development Guide
        • Multi-Camera Rendering Development Guide
        • High-Resolution Image Rendering Development Guide
        • LCC and LCC2 Data Format Compatibility Development Guide
        • Loading Effect Development Guide
        • Mip Rendering Mode Switching Development Guide
        • Edge and Corner Snapping Development Guide
        • Projected Decal Development Guide
        • Video Projected Decal Development Guide
        • Highlight Development Guide
        • Real-Time Clipping Development Guide
        • Color Adjustment Development Guide
        • Getting Scene Mesh Data Development Guide
        • Editor Mode Development Guide
        • Render Performance Parameter Configuration Guide
        • Application and Data Co-packaging Development Guide
        • Collision System Development Guide
        • macOS Development Permission Issue Guide
        • iOS Device Compilation and Packaging Development Guide
      • API Reference

        • LCCManager
        • Renderer
        • Data Types
      • Changelog

        • v2.3.0
        • v2.2.10
        • v2.2.0
        • v2.1.19
        • v2.0.14
    • Web

      • Introduction
      • Rendering Performance Optimization Guide
      • Graphics Configuration
      • WebGPU Development Guide
      • FAQ
      • API Reference

        • LCCObject::checkRenderNextFrame
        • LCCObject::clearRenderNextFrame
        • LCCObject::ecef2Prj
        • LCCObject::getBounds
        • LCCObject::getEnvInstancedMesh
        • LCCObject::getInstancedMesh
        • LCCObject::getLodInfos
        • LCCObject::getOriginPosition
        • LCCObject::getProjectionCoordinateSystemInfos
        • LCCObject::hasCollision
        • LCCObject::hasEnvironment
        • LCCObject::hasShcoef
        • LCCObject::intersectsCapsule
        • LCCObject::intersectsRayExt
        • LCCObject::intersectsRayFromOriginExt
        • LCCObject::intersectsSphere
        • LCCObject::lowerToBottom
        • LCCObject::prj2Ecef
        • LCCObject::raiseToTop
        • LCCObject::raycast
        • LCCObject::raycastFromOrigin
        • LCCObject::setAlpha
        • LCCObject::setClipBox
        • LCCObject::setClipPlane
        • LCCObject::setClipPrism
        • LCCObject::setEndLod
        • LCCObject::setLodAutoLevelUp
        • LCCObject::setMaxDistance
        • LCCObject::setMaxNodeSplats
        • LCCObject::setMaxSplats
        • LCCObject::setMipFilter
        • LCCObject::setOriginPosition
        • LCCObject::setPointsColor
        • LCCObject::setRenderState
        • LCCObject::setRotation
        • LCCObject::setScale
        • LCCObject::setSemantic
        • LCCObject::setSemanticColor
        • LCCObject::setSmooth
        • LCCObject::setStartLod
        • LCCObject::setTranslation
        • LCCObject::setVisible
        • LCCObject::togglePointsDisplayMode
        • LCCObject::useEnvironment
        • LCCObject::useShcoef
        • LCCRender::clearIndexDB
        • LCCRender::dispose
        • LCCRender::load
        • LCCRender::setCamera
        • LCCRender::unload
        • LCCRender::update
      • Changelog

        • v0.6.4
        • v0.6.3
        • v0.6.2
        • v0.6.1
        • v0.6.0
        • v0.5.5
        • v0.5.4
        • v0.5.3
        • v0.5.2
        • v0.5.1
        • v0.5.0
        • v0.4.1
        • v0.4.0
        • v0.3.1
        • v0.3.0
        • v0.2.0
    • Lixel OpenAPI

      • Overview
      • Connection & Authentication
      • Message Model & Codec
      • Interface Catalog
      • Real-time Data
      • Project File Access
      • Error Codes
      • Python

        • Quick Start
        • Client Wrapper & Tools
        • FAQ
      • C++

        • Quick Start
        • Client & Examples
        • FAQ
  • API

    • Structured Spatial Modeling

      • Access Guide
      • Modeling Workflow
      • API Reference
      • Temporary Upload Credentials
      • Error Codes

Measurement

Model Editor includes measurement tools for obtaining coordinates, distances, and area data in model space.
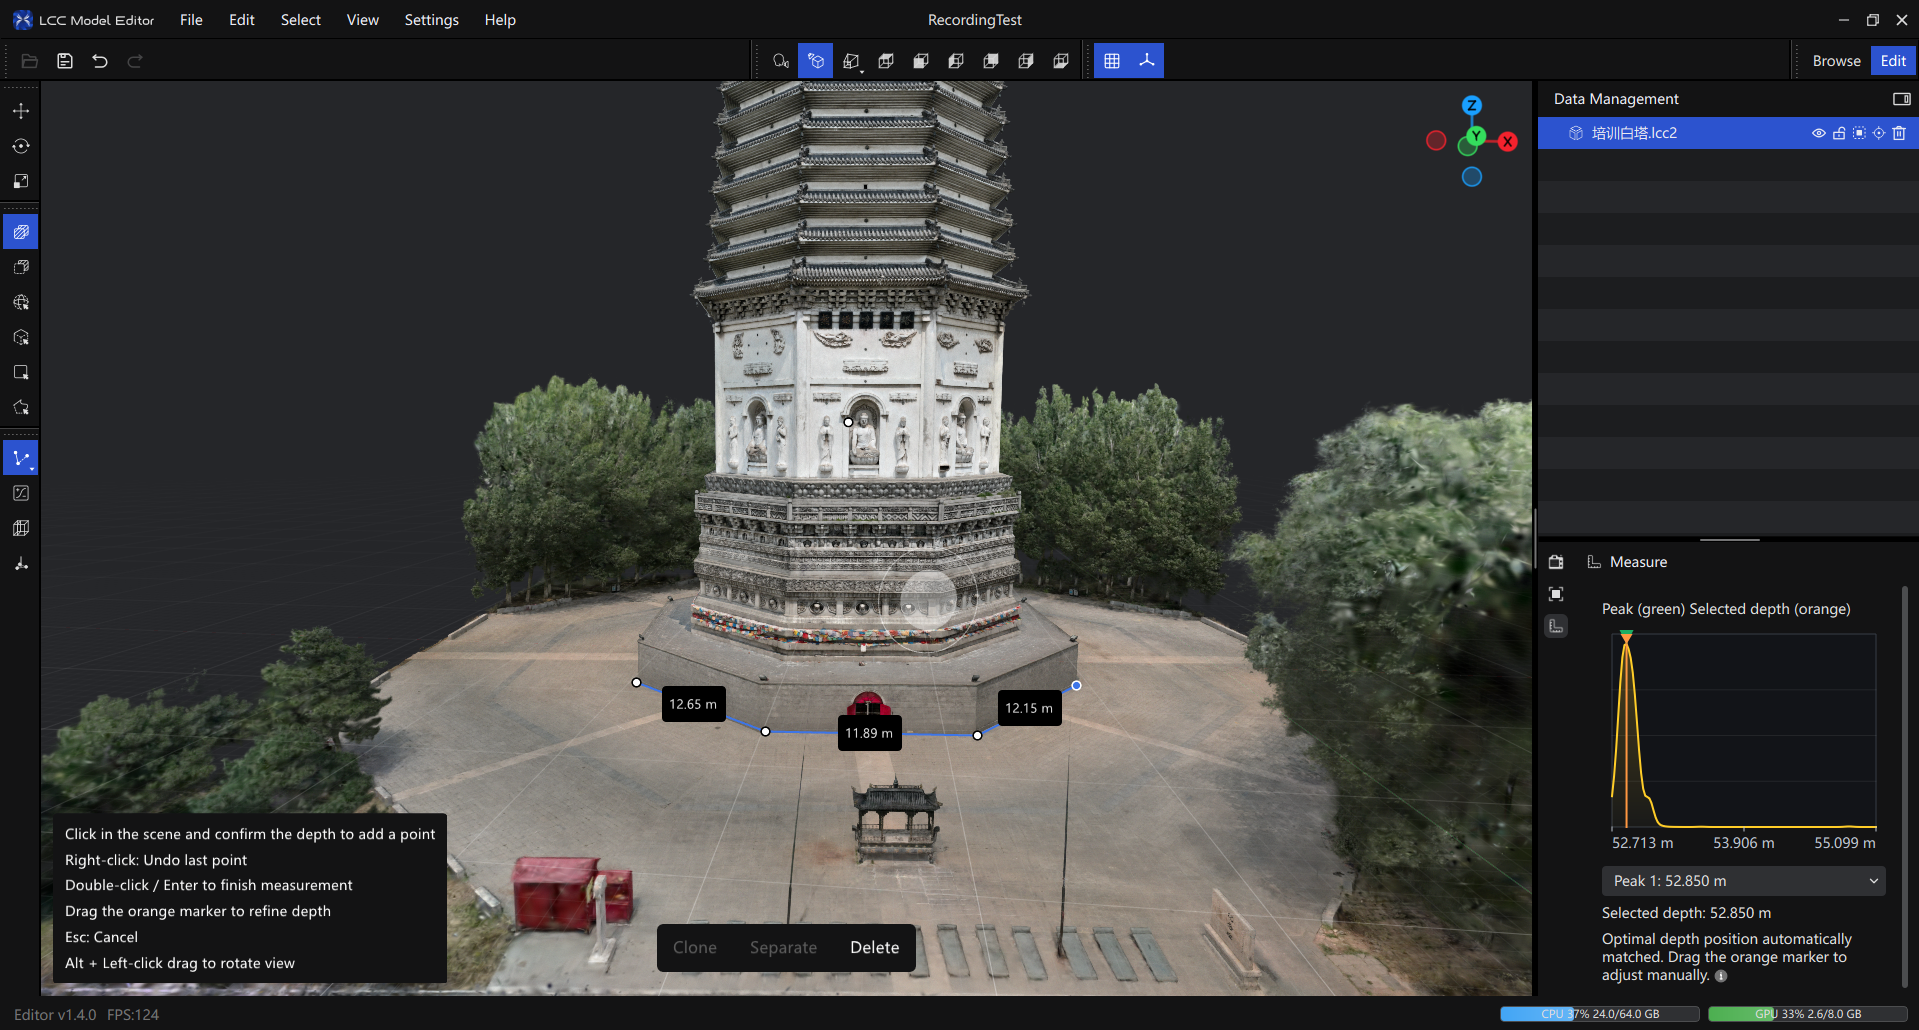
Measurement tools

Measurement tools

Note: Measurement data is kept only while the editor is open. Closing the editor clears the measurement history.

Measurement Types

Coordinate Measurement

Obtains the absolute coordinates (X, Y, Z) of a point in the scene.

How to use: Click Coordinate Measurement in the toolbar → click the target point on the model surface → view the coordinate values.

Note: Before Coordinate Measurement is used, the system checks whether every model in the current scene contains RTK data. All models must have RTK data for Coordinate Measurement to work.

Distance Measurement

Measures the straight-line distance between two points.

How to use:

  1. Click Distance Measurement in the toolbar.
  2. Click the first measurement point.
  3. Move the mouse to display the distance in real time.
  4. Click the second measurement point to finish.

Area Measurement

Measures the area of a closed polygon.

How to use:

  1. Click Area Measurement in the toolbar.
  2. Click multiple measurement points in sequence, with at least three points.
  3. Click the start point to close the polygon, or double-click to finish.

Note: The area measurement result displays only the area. Hover over a segment to display its length.

Snapping Aids

Surface Snapping

When measurement is active, the cursor becomes a crosshair with a surface patch that automatically snaps to the model surface. It is enabled by default.

Use case: Keeps measurement points precisely on the model surface and prevents accidental clicks in empty space.

Drag to Adjust

Line and area measurements support dragging existing points to adjust their positions. The measurement result updates in real time.

Use case: Fine-tune an imprecise measurement point without measuring again.

Selecting a Measurement Point from a Depth Profile

When the same screen position corresponds to multiple model surfaces, such as a wall behind a foreground object or another model, the system analyzes candidate surfaces at different depths along the current viewing direction and helps you select the desired measurement point.

This feature does not modify the model or select a batch of points by depth. It selects a measurement depth along the viewing direction at the clicked screen position. The selected depth is converted into a position in model space and used to create or adjust the measurement point.
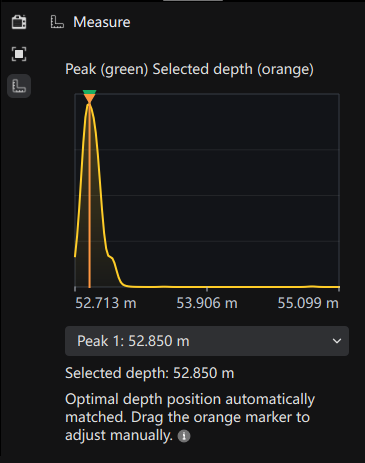
Depth selection panel

Depth selection panel

Panel Markers

After opening the depth selection panel, you can see a depth curve:

  • Yellow curve: Shows the candidate likelihood at different depths along the current viewing direction. A higher curve indicates that the depth is more likely to correspond to a visible model surface.
  • Green triangles: Show candidate depth peaks identified by the system. Multiple green markers usually correspond to multiple model surfaces along the viewing direction.
  • Orange line and marker: Show the depth currently selected for measurement. The measurement point is placed on the surface corresponding to the orange marker.
  • Peak drop-down: Lists the candidate peaks. Select another peak to move the measurement point to another depth layer.
  • Selected depth: Shows the currently selected depth. The depth is calculated from the current camera view and is not the model's global Z coordinate or elevation.

Automatic Depth Selection

When a new measurement point is added, the system automatically selects the clearest candidate peak and places the orange marker there. In most cases, this corresponds to the clearest and most visible model surface along the current viewing direction.

The message The best depth position has been matched automatically indicates that automatic matching is complete.

Switching Depth Manually

If the automatically selected surface is not the target surface:

  1. Click a green triangle to switch to the corresponding candidate depth.
  2. Use the Peak drop-down to select another candidate peak.
  3. Drag the orange marker directly on the depth curve to fine-tune the depth.

After adjustment, the measurement point moves to the new depth along the current viewing direction. Distance, area, or coordinate results update accordingly. The curve itself does not change; only the position of the current measurement point changes.

Recommendations

  • When foreground and background models overlap, use the green peaks or the Peak drop-down to switch surfaces.
  • When measuring thin walls, doors, windows, railings, or dense models, enlarge the depth curve before dragging the orange marker to reduce incorrect selections.
  • When reopening the depth panel for an existing measurement point, the orange marker initially remains at the point's current position. The measurement point changes only after you select another peak or drag the marker.
  • If the clicked position has no valid depth sample, the system uses ordinary model-surface snapping or indicates that it cannot obtain a valid measurement point.

Delete a Measurement

Hover over a measurement result. A delete icon appears below it. Click the icon to delete the corresponding measurement data.