
FAQ
1. When should I use Model Editor?
Model Editor is an editing tool for 3D Gaussian models. It supports selection, deletion, cropping, separation, cloning, color grading, and model transformation. You can import a model exported from LCC Studio, edit it, and export a new model.
Use Scene Editor when you need to overlay Mesh assets (FBX, OBJ, or GLB) or publish a scene containing assets. Assets in Model Editor cannot be published online directly. Projects containing assets must be exported as a project before they can be shared.
2. What is the difference between a project file and a model file?
A project file saves the current editing workspace, model list, and editing state. A model file is LCC, LCC2, PLY, SOG, or SPZ data that can be imported, edited, and exported.
Use File → Save to save the project. Use File → Export → Export Model to output model data. Do not use the project save function as a substitute for model export.
3. Why can't I import a model after entering Edit mode?
In Edit mode, entry points that replace the current workspace, such as opening a project, importing data, and opening recent files, are disabled. Exit the current editing state before importing a model or opening a project.
4. What is the Depth option in the selectors used for?
Depth limits how far the Rectangle Selector and Mixed Lasso Selector penetrate along the current viewing direction. The initial state is Global, which means there is no depth limit. After switching to limited-depth mode, a larger depth makes the selection penetrate farther along the viewing direction.
5. What is depth-profile selection?
When the same screen position corresponds to multiple model surfaces, the system analyzes candidate surfaces at different depths along the current viewing direction and automatically selects the most suitable depth. Green markers indicate candidate peaks, and the orange marker indicates the current measurement depth. Click a green peak or drag the orange marker to adjust the measurement point.
6. Why is the measurement point not on the surface I want?
When foreground and background models overlap, the system may automatically select the front surface. Open the depth selection panel, click another green peak, or drag the orange marker to switch the measurement point to the target surface.
7. Why is color grading not written to the model immediately?
Color grading uses a real-time preview. Moving a parameter slider shows only a preview. Click Apply to write the result to the model. Click Reset to discard the current preview and restore the default parameters.
If you save, export, undo, redo, or switch tools while an unapplied preview exists, the system asks you to choose Apply or Reset.
8. Why is the Color Grading panel unavailable?
The following cannot be color grading targets:
- Multiple valid models are selected.
- The selected model is locked.
- The model is empty, or all Gaussian points have been deleted.
- The selected group has no editable child model.
If an editable selection exists, Color Grading applies to the selection before the model selected in the asset list.
9. Can I edit a locked model?
A locked model is protected from editing. After it is locked, it cannot be the target of color grading, transformation, or other modification operations. Click the lock icon to unlock it before editing.
10. Why can an empty model only be deleted?
After all Gaussian points in a model have been deleted, the editor marks it as an empty model. An empty model cannot continue to participate in display, locating, bounding-box, or locking operations, but you can still remove it from the asset list with the Delete button.
11. Why do the Clone and Separate shortcuts have no effect?
In the current version, the Clone and Separate menu buttons work, but the Ctrl + D and Ctrl + Shift + D shortcuts are not enabled. Use the Edit menu or the corresponding button.
12. Why can't I see the expected result after cropping?
Confirm the following:
- You are in Edit mode.
- The crop box covers the target area.
- You used the correct crop mode (Razor or Keep Inside).
- The current model is not locked.
- You exported the result through File → Export → Export Model after cropping.
If there is similar texture nearby, you can use Model Editor to repair a gap. Adjust the model view first, choose an appropriate crop boundary, and try to cut in an area with a smooth or inconspicuous texture.
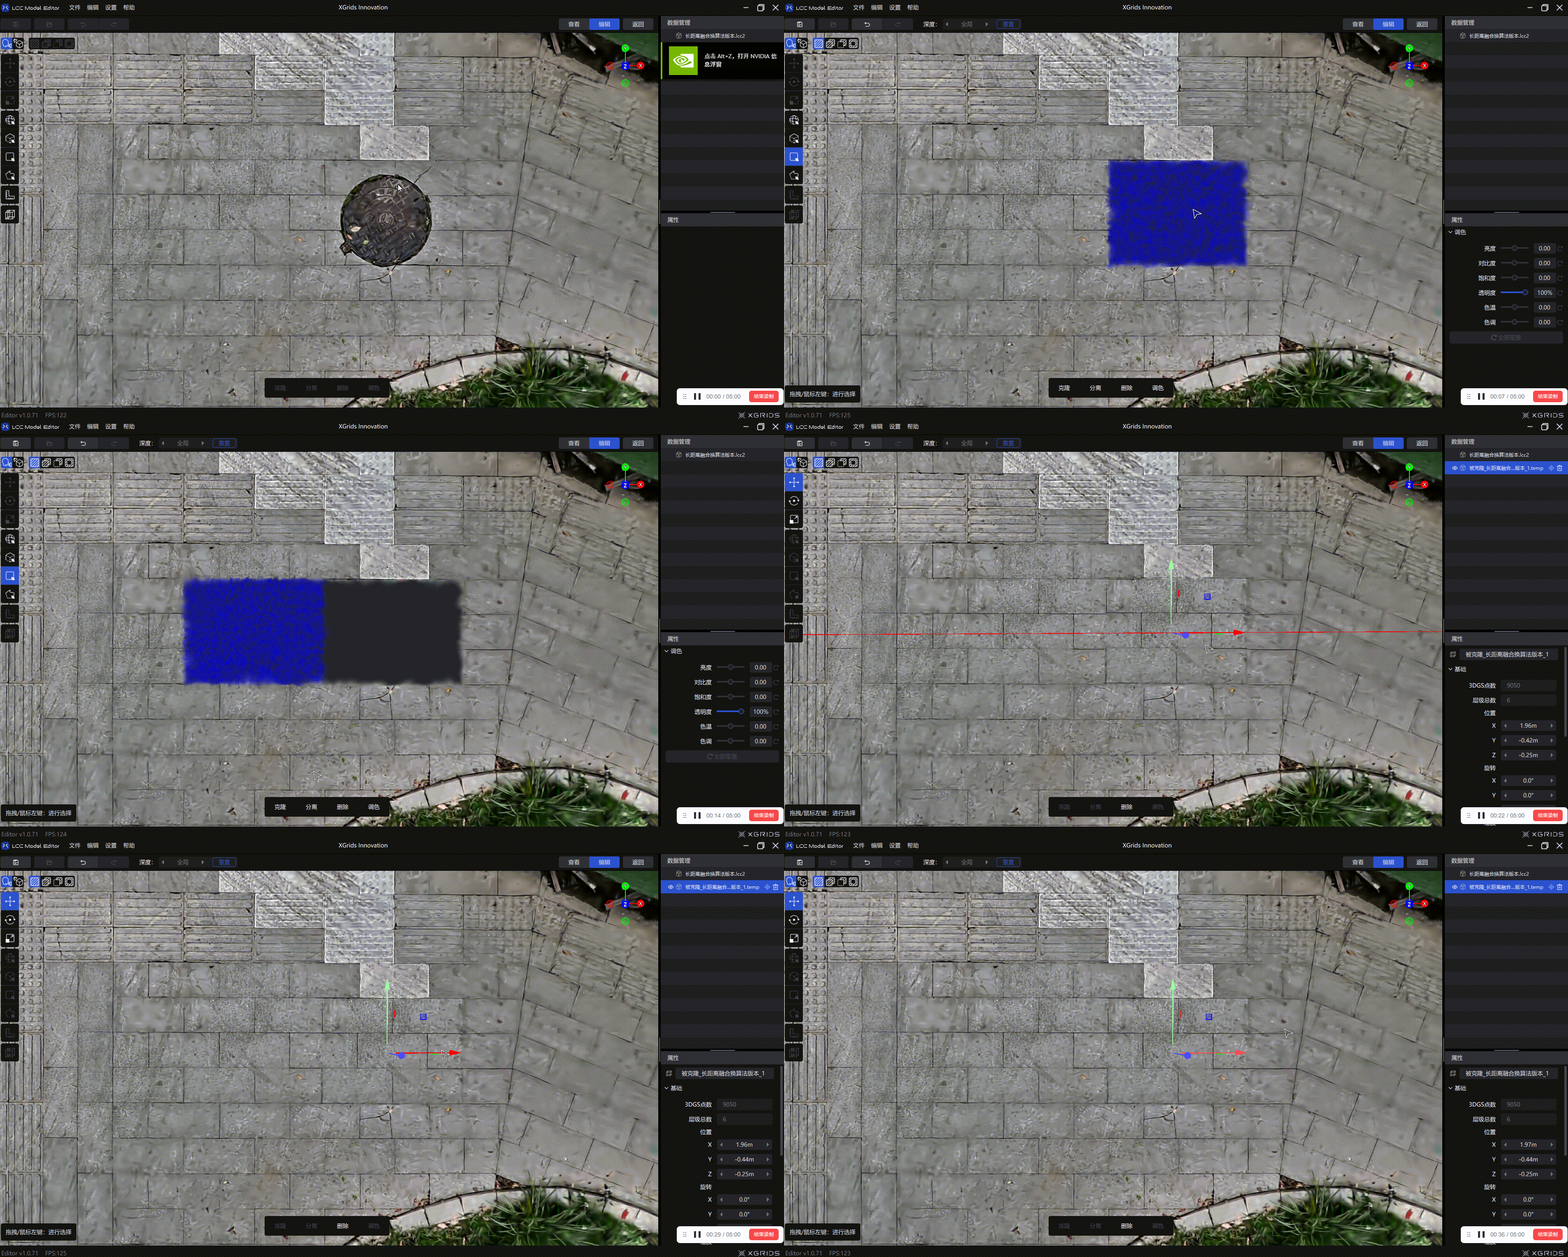
Cropping repair demonstration
13. Why can't I click Apply in Three-Point Alignment?
Confirm that you selected a Target model and selected three points on the model surface. After selecting the points, choose a target plane (XY, XZ, or YZ). Apply becomes available only after these steps are complete.
14. Does Three-Point Alignment modify the original model?
Alignment changes the model transform in the current project. Save the project before aligning. To preserve the original state, select File → Save As first to create a copy of the project.
15. Why does the exported model look as if the edits were not applied?
Confirm that the editing operation is complete and select File → Export → Export Model to export model data. File → Save saves only the current editing workspace; it does not export a new model file.
If color grading has not been applied, click Apply before exporting.
16. Why can't I use Coordinate Measurement?
Coordinate Measurement requires the models in the scene to contain valid RTK coordinate information. Confirm that all models in the scene contain valid RTK data and that the current model format supports Coordinate Measurement.
17. How can I view the logs?
Select Help → Open Log Directory to open the editor's local log directory. If the editor crashes or import, export, or measurement problems occur, provide the relevant logs to technical support.