XGRIDSDocs
  • 简体中文
  • English
  • 繁體中文
  • 日本語
  • Deutsch
  • Español
  • Italiano
  • Français
  • Русский
  • Polski
  • Nederlands
  • 简体中文
  • English
  • 繁體中文
  • 日本語
  • Deutsch
  • Español
  • Italiano
  • Français
  • Русский
  • Polski
  • Nederlands
  • Lixel PortalCam Series

    • PortalCam P1

      • Product Overview
      • Basic Operation
      • Using the LCC Scan App
      • Maintenance and Care
      • FAQ
  • Lixel K Series

    • Lixel K1

      • Product Overview
      • Basic Operation
      • Device Activation and Connection
      • Scanning Workflow
      • Acquire Point Cloud Data with Absolute Coordinate
      • Map Fusion
      • Route Planning Suggestions for Typical Scenes
      • Precautions
      • FAQ
    • Lixel K2

      • Product Overview
      • Basic Operation
      • Device Activation and Connection
      • Scanning Workflow
      • Acquire Point Cloud Data with Absolute Coordinate
      • Map Fusion
      • Route Planning Suggestions for Typical Scenes
      • Precautions
      • FAQ
  • Lixel L Series

    • Lixel L2 Pro

      • Product Overview
      • Basic Operation
      • Device Activation and Connection
      • Scanning Workflow
      • Acquire Point Cloud Data with Absolute Coordinate
      • Measure Point
      • Appendix
      • FAQ
    • Lixel L3

      • Product Overview
      • Basic Device Functions
      • Device Activation and Connection
      • Data Capture
      • Capturing Absolute Coordinates
      • Appendix
      • FAQ
  • Accessories

    • Stick Light

      • Installation Guide
      • Basic Operation
      • FAQ
  • Lixel Studio

    • Version and Copyright
    • Installation and Activation
    • Software Interface
    • File Operations
    • Project Processing
    • Tools
    • 2D Drawing
    • Applications
    • Settings
    • Device Connection
    • FAQ
    • Usage Tips

      • Data Flow Overview
      • Software Licensing Guide
      • Understanding Scanner Accuracy Specifications
  • Lixel CyberColor

    • LCC Studio

      • Getting Started
      • Version and Updates
      • Download and Installation
      • Interface Overview and Navigation
      • Before Reconstruction
      • Model Reconstruction
      • Single Model Reconstruction
      • Map Fusion
      • Aerial-Ground Fusion
      • Aerial Reconstruction
      • My Models
      • Other Features
      • Settings and Account
      • Converter
      • Publish to Third-Party Platforms
      • Video Reconstruction
      • FAQ
    • LCC Scene Editor

      • Version & Updates
      • Account & Login
      • Product Overview & Home
      • Editor Interface
      • Scene Navigation Modes
      • File
      • Settings
      • Edit Operations
      • Window
      • Global Toolbar
      • Assets & Properties
      • Left Toolbar
      • Viewpoints
      • Portal
      • Skybox
      • Annotations
      • Measurement
      • Flythrough
      • Scene Report
      • 3D Layout
      • Mini-Map
      • Preview Mode (Viewer)
      • Help
      • FAQ
      • Spawn Point
    • LCC Model Editor

      • Version and Updates
      • User Guide
      • Overview and Interface
      • File Operations
      • Selectors
      • Editing Operations
      • Measurement
      • Color Grading
      • Asset Management
      • Settings and Help
      • FAQ
    • Capture Guide

      • Overview
      • Capture Devices Overview
      • General Capture Principles
      • Indoor Scene Capture
      • Outdoor Scene Capture
      • Large-Scale Capture (Map Fusion)
      • Aerial-Ground Map Fusion Capture
      • Object Capture
      • People Capture
      • Video Reconstruction Capture
      • HD Enhancement
      • Control Points (Lixel P1)
      • FAQ and Troubleshooting
    • LCC Studio Linux

      • Product Overview
      • Architecture Guide
      • Installation and Deployment Guide
      • Container Startup Parameters Guide
      • CodeMeter Offline Licensing Deployment Guide
      • API Reference
      • Appendix - Developer Data Guide
      • Appendix - Error Code List
      • Single-Machine Multi-GPU Cluster Deployment QuickStart
    • Best Practices

      • Merging Multiple Large 3DGS Models
      • Aerial-Ground Map Fusion Workflow
      • Data Flow Overview
      • Software Licensing Guide
    • Version History
  • Plugin & SDK

    • Unreal

      • Introduction
      • Quick Start - Windows
      • Quick Start - Linux
      • Quick Start - Quest3
      • Editions and Licensing
      • Rendering
      • Tiled Rasterization (Experimental)
      • Visual Settings
      • Normals and Lighting
      • Scene Editing
      • Performance Parameters
      • Performance Guide
      • Third-party and Engine Plugin Integration
      • Proxy Mesh
      • Loading Animation
      • Collision
      • Navigation System Support
      • Single Layer Water Support
      • Localization
      • FAQ
      • Troubleshooting
      • Logging and Diagnostics
      • Contact Us
      • Best Practices

        • Relighting 3DGS with a LixelStudio Mesh
        • Per-camera Independent Rendering
      • API Reference

        • ALCCActorBase
        • ULCCComponentBase
        • ULCCComponent
        • ULCC2Component
        • SOG / SPZ / PLY Actors
        • ALCC2ProxyMesh
        • ALCCClippingVolume
        • ALCCSectionPlane
        • ALCCLoadVolume
        • ULCCUtilLibrary
        • Enums
        • Structs
      • Changelog

        • v3.5.0
        • v3.4.0
        • v3.3.1
        • v3.0.0
        • v2.2.1
        • v1.0.0
        • v0.9.0
        • v0.8.0
        • v0.7.1
        • v0.6.1
        • v0.5.2
        • v0.4.1
        • v0.4.0
        • v0.3.0
        • v0.0.5
        • v0.0.4
        • v0.0.3
        • v0.0.2
        • v0.0.1
    • Unity

      • Unity SDK Introduction
      • Technical Features
      • Development Environment Requirements
      • PC Quick Start Guide
      • Project Settings Optimization Guide
      • Pico 4 Ultra Development Guide
      • Pico 4 Ultra PC Streaming Guide
      • Quest 3 Development Guide
      • Quest 3 PC Streaming Guide
      • OpenXR Development Guide
      • Pico 4 Ultra Business Streaming Guide
      • Glossary
      • FAQ
      • Contact Us
      • Feature Development Guide

        • Multi-Scene Mixed Rendering Development Guide
        • Shadow Receiving Development Guide
        • Real-Time Lighting Development Guide
        • Multi-Camera Rendering Development Guide
        • High-Resolution Image Rendering Development Guide
        • LCC and LCC2 Data Format Compatibility Development Guide
        • Loading Effect Development Guide
        • Mip Rendering Mode Switching Development Guide
        • Edge and Corner Snapping Development Guide
        • Projected Decal Development Guide
        • Video Projected Decal Development Guide
        • Highlight Development Guide
        • Real-Time Clipping Development Guide
        • Color Adjustment Development Guide
        • Getting Scene Mesh Data Development Guide
        • Editor Mode Development Guide
        • Render Performance Parameter Configuration Guide
        • Application and Data Co-packaging Development Guide
        • Collision System Development Guide
        • macOS Development Permission Issue Guide
        • iOS Device Compilation and Packaging Development Guide
      • API Reference

        • LCCManager
        • Renderer
        • Data Types
      • Changelog

        • v2.3.0
        • v2.2.10
        • v2.2.0
        • v2.1.19
        • v2.0.14
    • Web

      • Introduction
      • Rendering Performance Optimization Guide
      • Graphics Configuration
      • WebGPU Development Guide
      • FAQ
      • API Reference

        • LCCObject::checkRenderNextFrame
        • LCCObject::clearRenderNextFrame
        • LCCObject::ecef2Prj
        • LCCObject::getBounds
        • LCCObject::getEnvInstancedMesh
        • LCCObject::getInstancedMesh
        • LCCObject::getLodInfos
        • LCCObject::getOriginPosition
        • LCCObject::getProjectionCoordinateSystemInfos
        • LCCObject::hasCollision
        • LCCObject::hasEnvironment
        • LCCObject::hasShcoef
        • LCCObject::intersectsCapsule
        • LCCObject::intersectsRayExt
        • LCCObject::intersectsRayFromOriginExt
        • LCCObject::intersectsSphere
        • LCCObject::lowerToBottom
        • LCCObject::prj2Ecef
        • LCCObject::raiseToTop
        • LCCObject::raycast
        • LCCObject::raycastFromOrigin
        • LCCObject::setAlpha
        • LCCObject::setClipBox
        • LCCObject::setClipPlane
        • LCCObject::setClipPrism
        • LCCObject::setEndLod
        • LCCObject::setLodAutoLevelUp
        • LCCObject::setMaxDistance
        • LCCObject::setMaxNodeSplats
        • LCCObject::setMaxSplats
        • LCCObject::setMipFilter
        • LCCObject::setOriginPosition
        • LCCObject::setPointsColor
        • LCCObject::setRenderState
        • LCCObject::setRotation
        • LCCObject::setScale
        • LCCObject::setSemantic
        • LCCObject::setSemanticColor
        • LCCObject::setSmooth
        • LCCObject::setStartLod
        • LCCObject::setTranslation
        • LCCObject::setVisible
        • LCCObject::togglePointsDisplayMode
        • LCCObject::useEnvironment
        • LCCObject::useShcoef
        • LCCRender::clearIndexDB
        • LCCRender::dispose
        • LCCRender::load
        • LCCRender::setCamera
        • LCCRender::unload
        • LCCRender::update
      • Changelog

        • v0.6.4
        • v0.6.3
        • v0.6.2
        • v0.6.1
        • v0.6.0
        • v0.5.5
        • v0.5.4
        • v0.5.3
        • v0.5.2
        • v0.5.1
        • v0.5.0
        • v0.4.1
        • v0.4.0
        • v0.3.1
        • v0.3.0
        • v0.2.0
    • Lixel OpenAPI

      • Overview
      • Connection & Authentication
      • Message Model & Codec
      • Interface Catalog
      • Real-time Data
      • Project File Access
      • Error Codes
      • Python

        • Quick Start
        • Client Wrapper & Tools
        • FAQ
      • C++

        • Quick Start
        • Client & Examples
        • FAQ
  • API

    • Structured Spatial Modeling

      • Access Guide
      • Modeling Workflow
      • API Reference
      • Temporary Upload Credentials
      • Error Codes

Applications

This chapter covers industry applications such as volume calculation, volume comparison, enclosed volume calculation, Mesh generation, remote transfer, and uploading to Trimble Connect.

Volume Calculation

Measure and calculate the volume of stockpile point cloud data.

  1. Select the point cloud, then click Volume Calculation Volume Calculation. The Volume Calculation panel opens on the right.

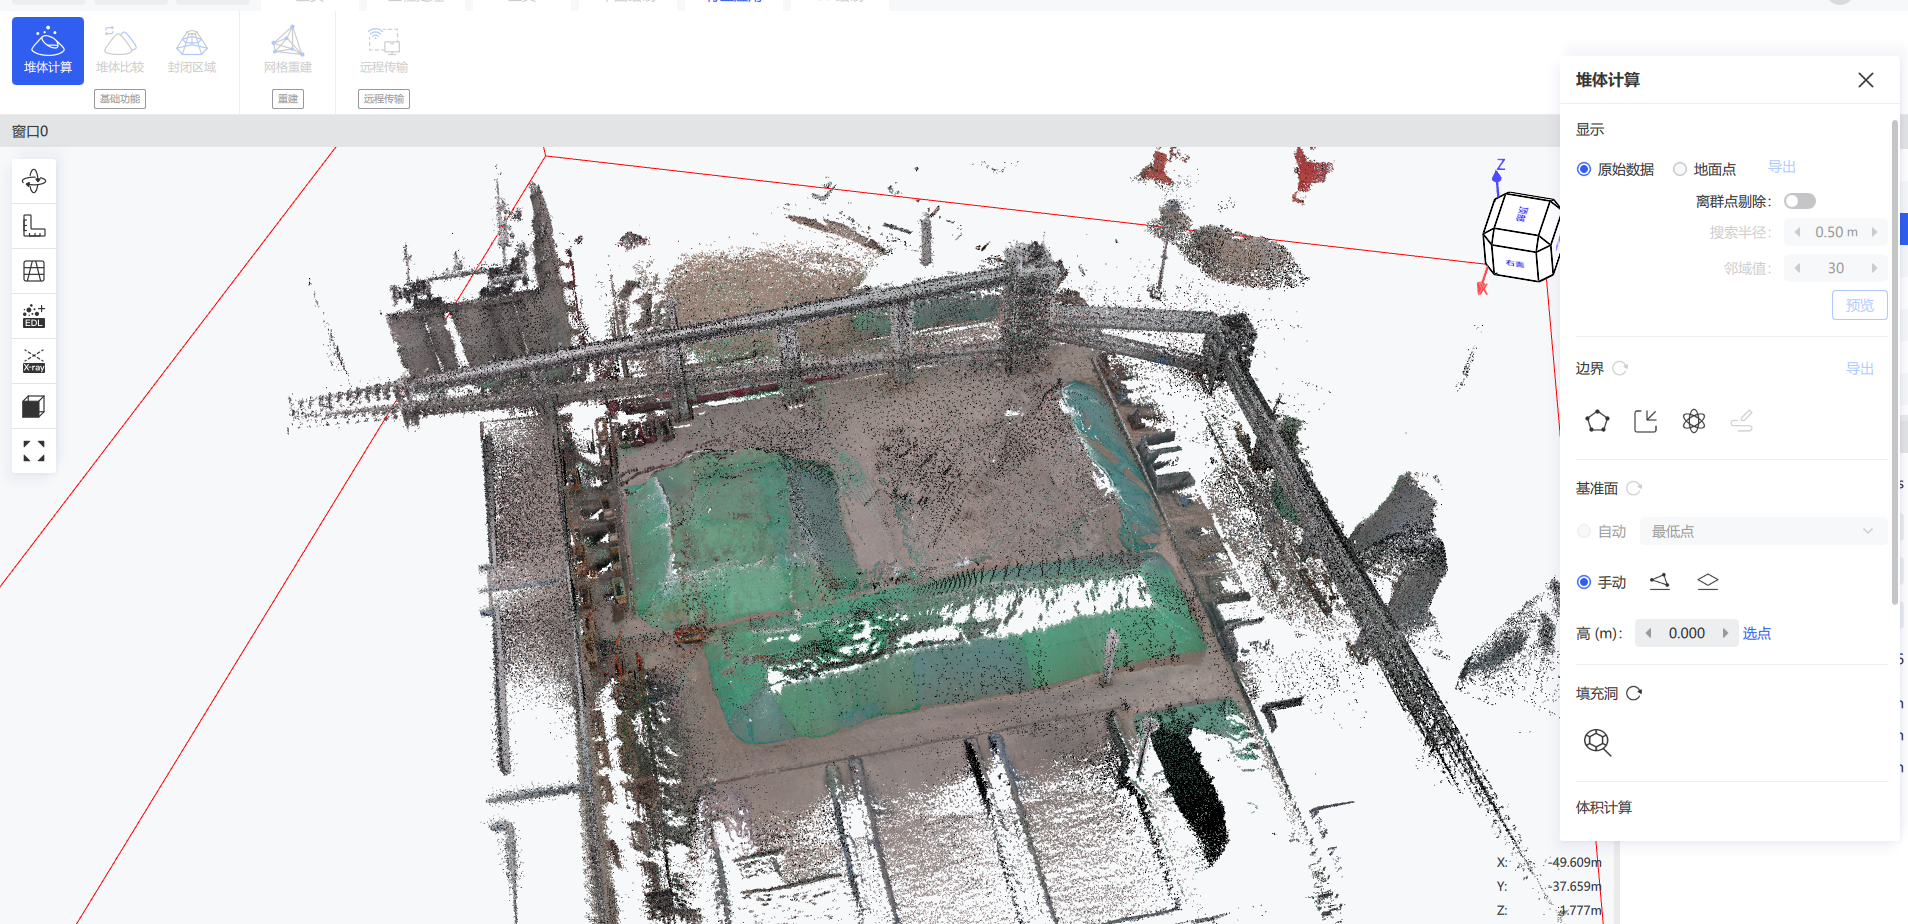
Volume Calculation panel
  1. After enabling Show Ground Points, the software automatically extracts the ground points. If noise remains in the result, enable Outlier Removal to clear it. You can switch between the original point cloud and the ground points at any time.
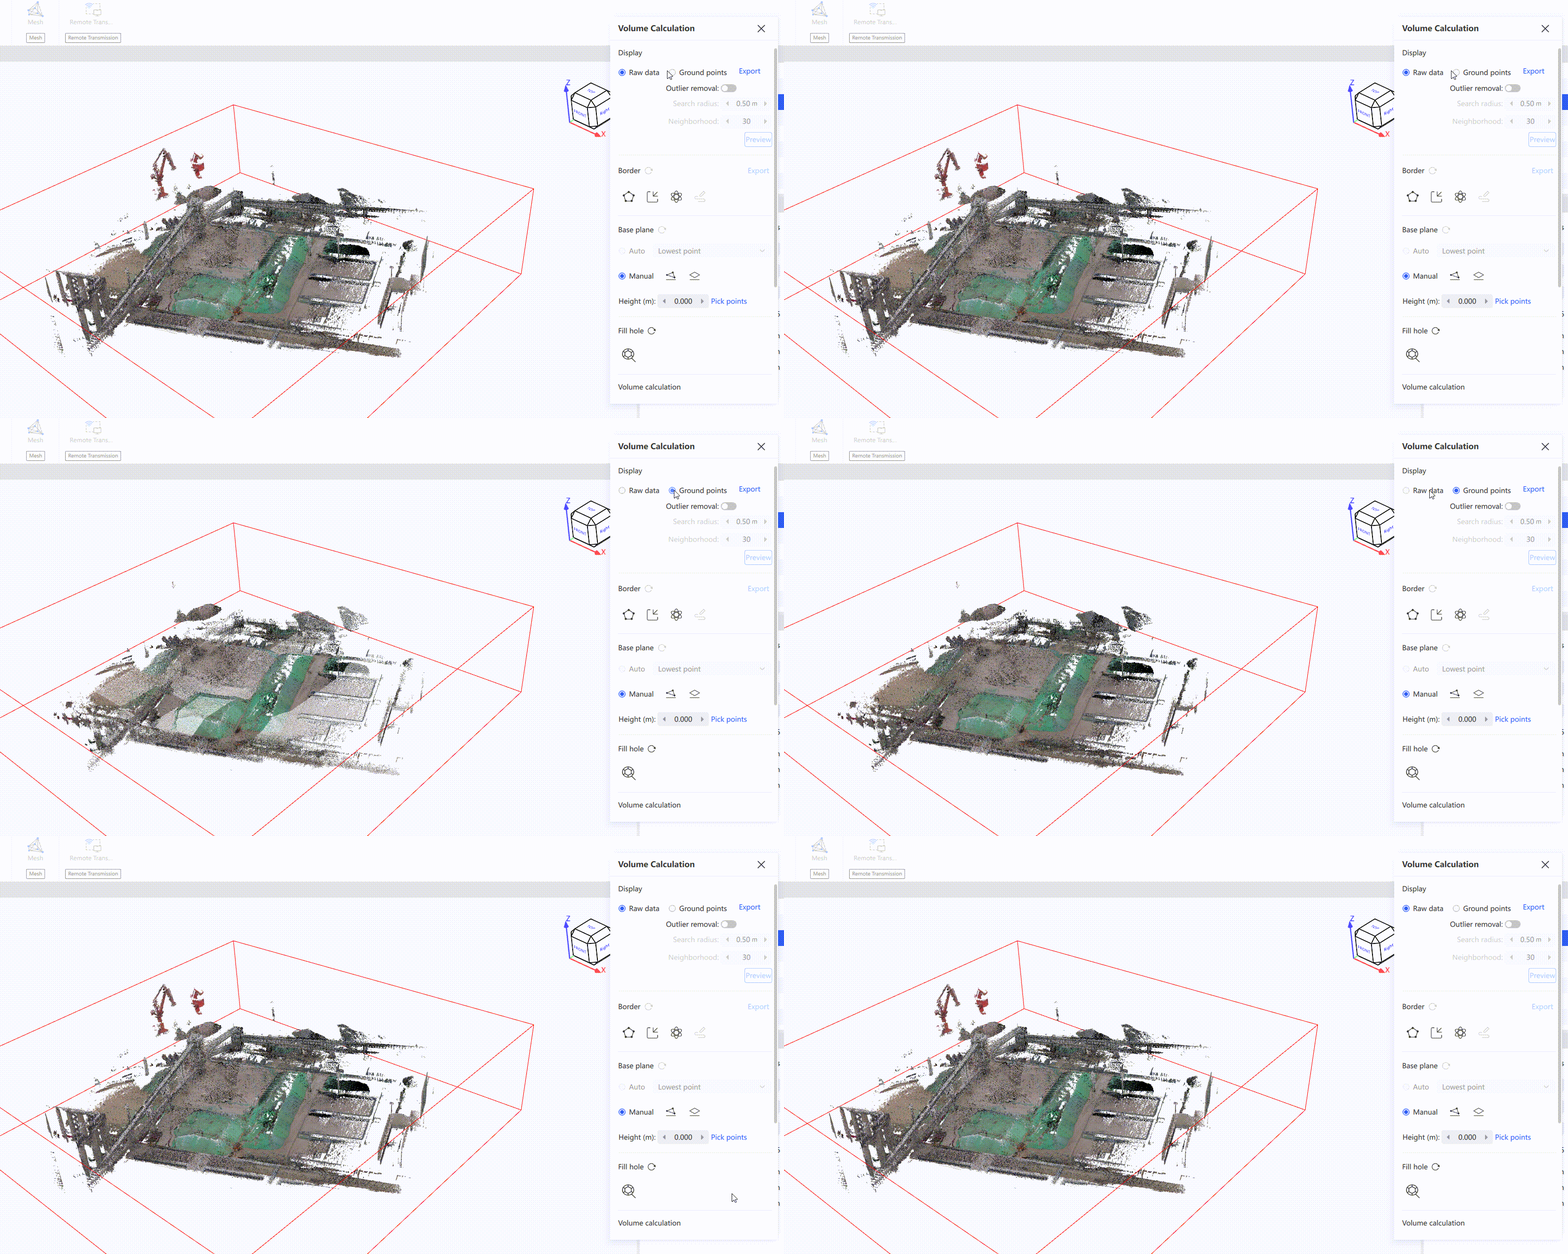
Show ground points and outlier removal
  1. There are three ways to define the boundary for volume calculation: draw it manually, import a boundary, or auto-detect the stockpile range Auto-detect stockpile range. Once the boundary is confirmed, you can enter edit mode to adjust it, either deleting an entire boundary line or modifying individual nodes.
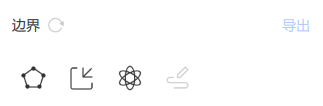
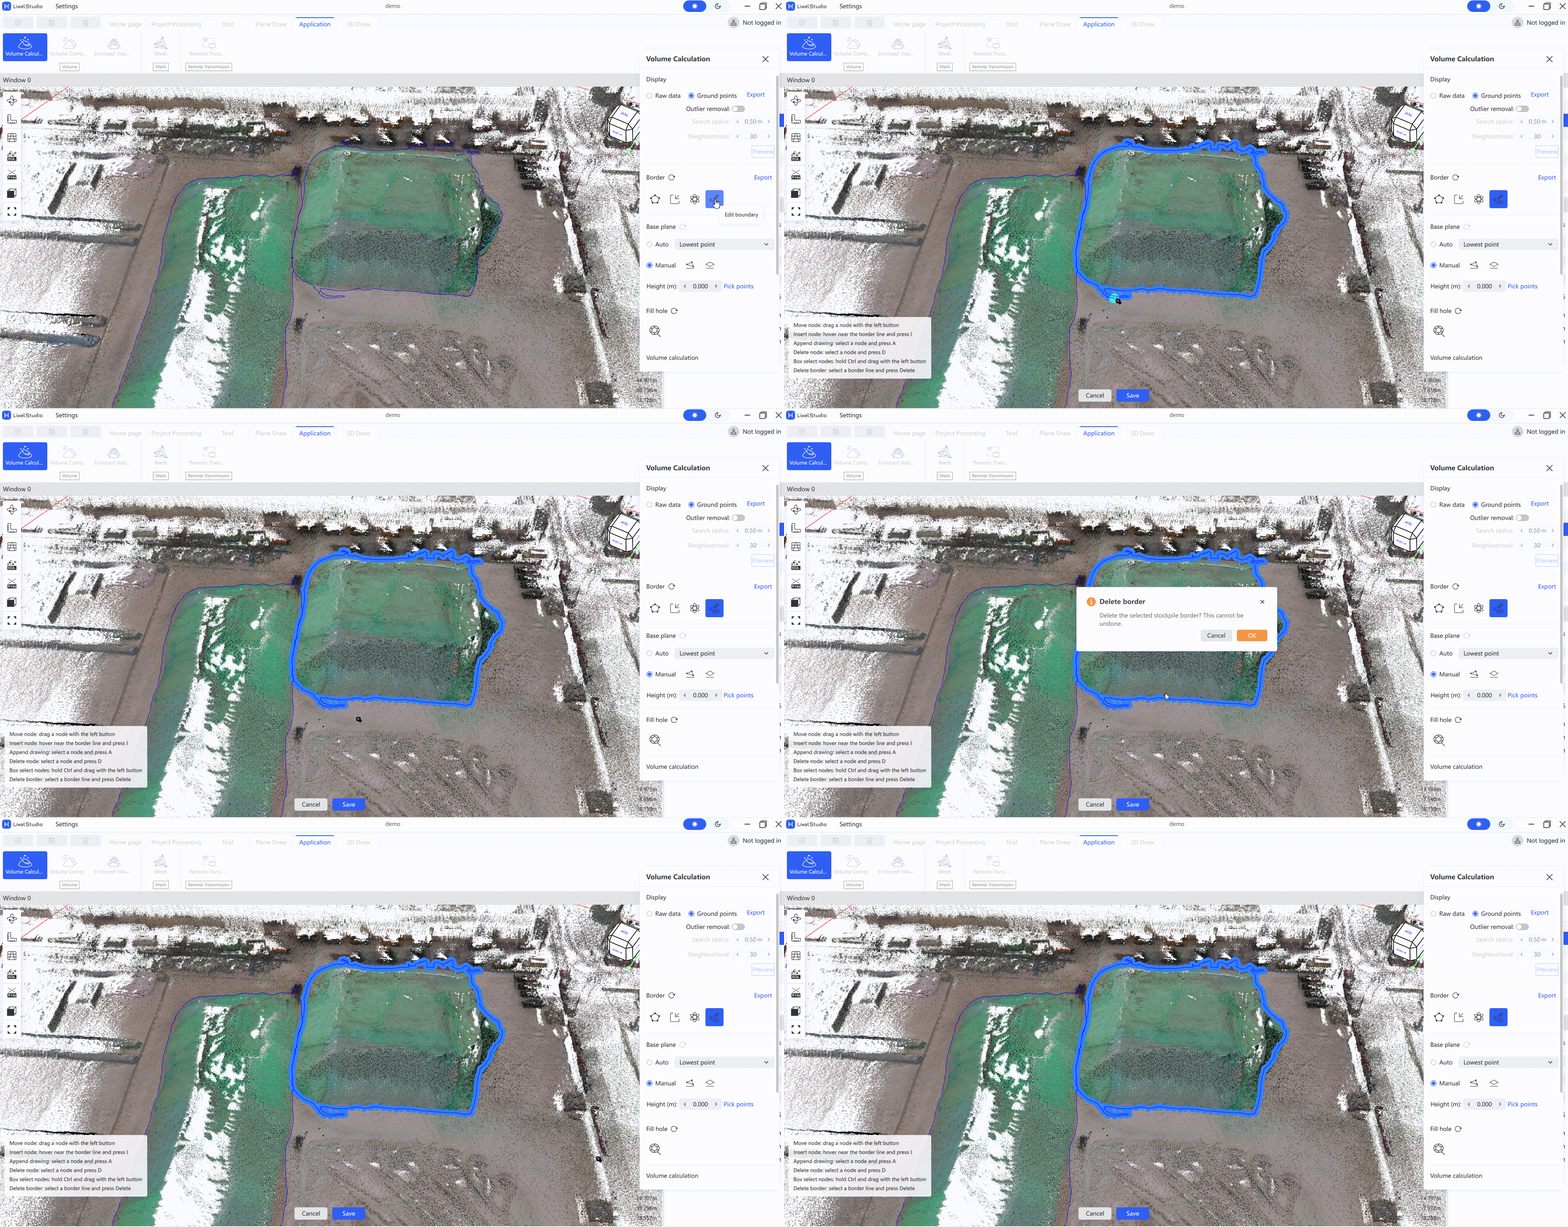
Edit boundary
  1. Select the base plane. The following three modes are available.
Base Plane ModeDescription
Auto SelectThe software automatically determines the base plane from the nodes of the boundary line
Three-Point PlaneClick the point selection button below the base plane, then click three points around the stockpile to draw the base plane
Horizontal PlaneEnter the base plane height in the popup, and the base plane is automatically generated in the model
  1. Click Fill Holes Fill Holes to fill the point cloud holes in the stockpile. Left-click to select points, and right-click to end. To reset, click the reset button to the right of Fill Holes.
  2. Set the mesh building parameters in the right panel. The mesh density represents the point cloud mesh grid size; generally, the default parameters are sufficient.
  3. Click Calculate to start the stockpile volume calculation. When it finishes, the results are displayed below.
  4. Click Export Report to export the result report. Choose the save path and filename yourself.
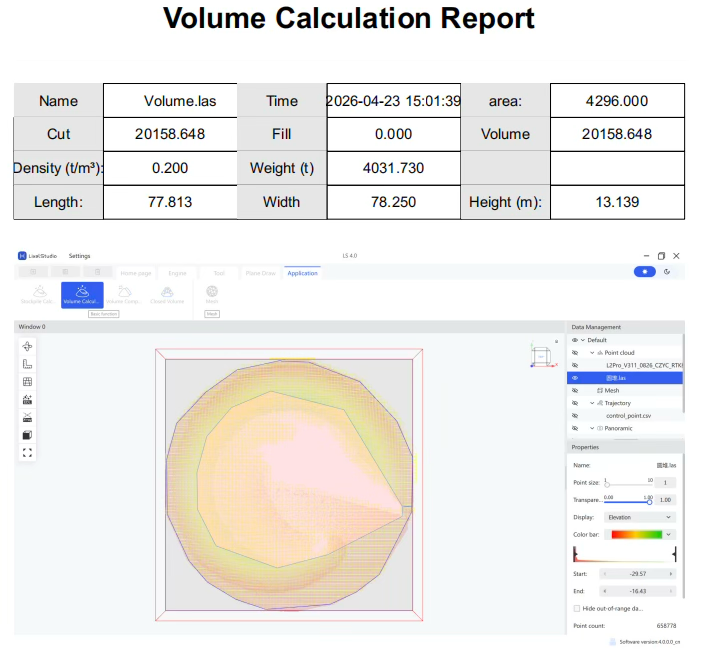
Volume calculation report

Volume Comparison

Compare two periods of stockpile data.

Note: The two periods of point cloud must maintain a consistent base plane. Registration is recommended.

  1. Select the point clouds.
  2. Click Volume Comparison Volume comparison.
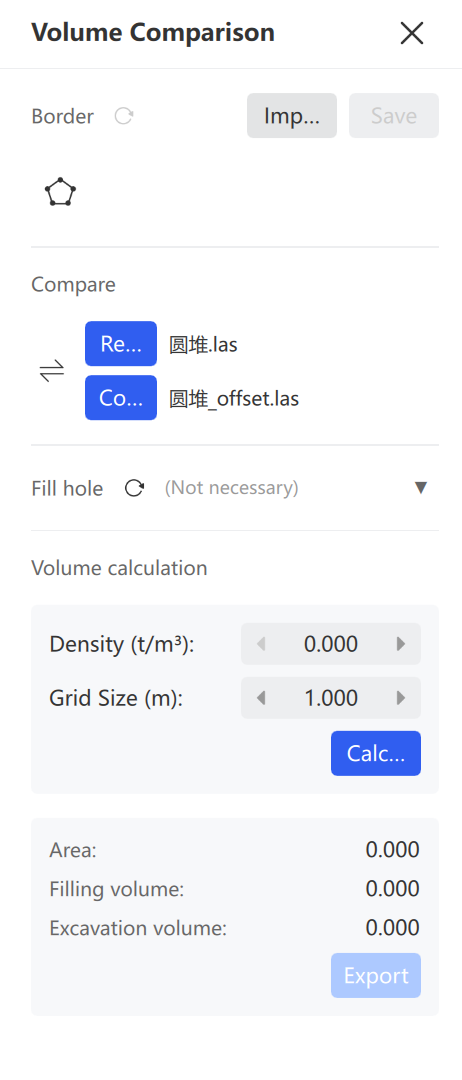
Volume comparison interface
  1. Draw Border: Click Draw Border Draw border, left-click the boundary, and right-click to end. Click the save button to save the border.
  2. Confirm Base and Change: Identify which dataset is the base and which is the change. Click Switch Switch to adjust if needed.
  3. Fill Holes (Optional): Click the point cloud requiring hole filling and perform the operation.
  4. Set Mesh Parameters: Set the Mesh Density. Generally use the default parameters.
  5. Calculate: Click Calculate and view the comparison results.
  6. Export Report: Click Export Report, then select the save path and filename.
Enclosed Volume Calculation

Calculate the volumes of enclosed areas such as mine tunnels and cabins.

Note: For accurate results, denoise and resample the point cloud first so that it is clean and contains only the area to be calculated.

  1. Select the point cloud.
  2. Click Enclosed Volume Enclosed volume.
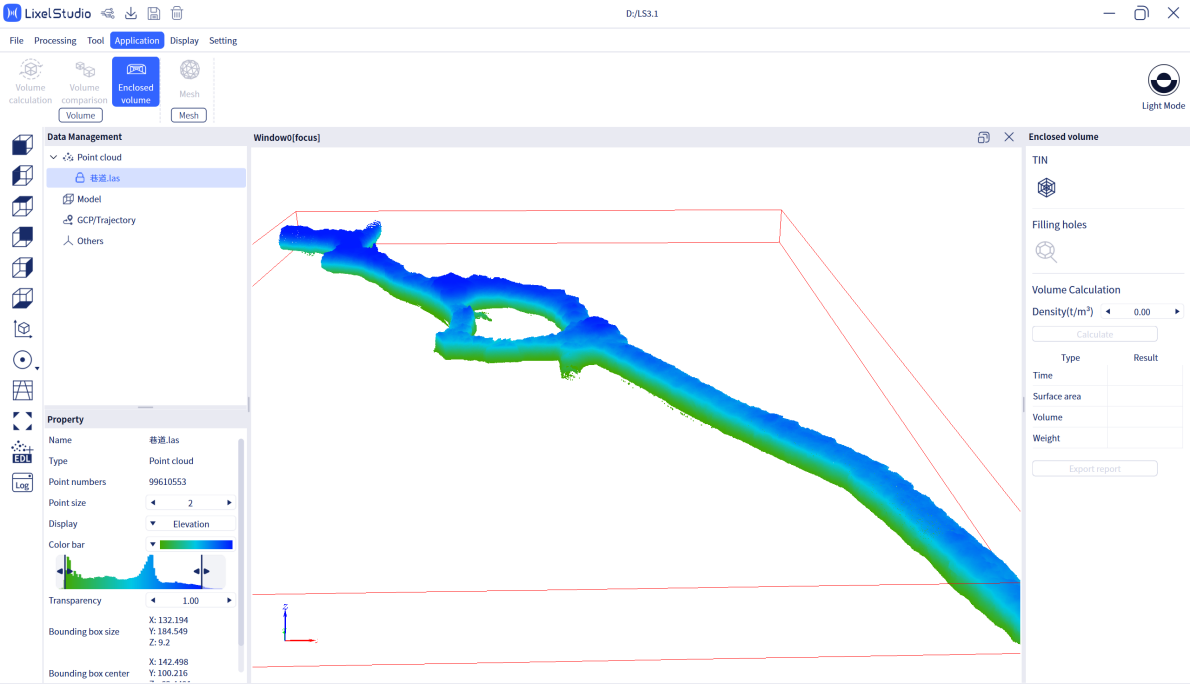
Enclosed volume interface
  1. Create Mesh: Click Mesh Mesh and wait for the TIN (Triangulated Irregular Network) to be built.
  2. Fill Holes: Click Fill Holes Fill holes. The software auto-fills mesh holes to obtain a complete enclosed model.
  3. Modify Density (Optional): Adjust if weight calculation is not needed.
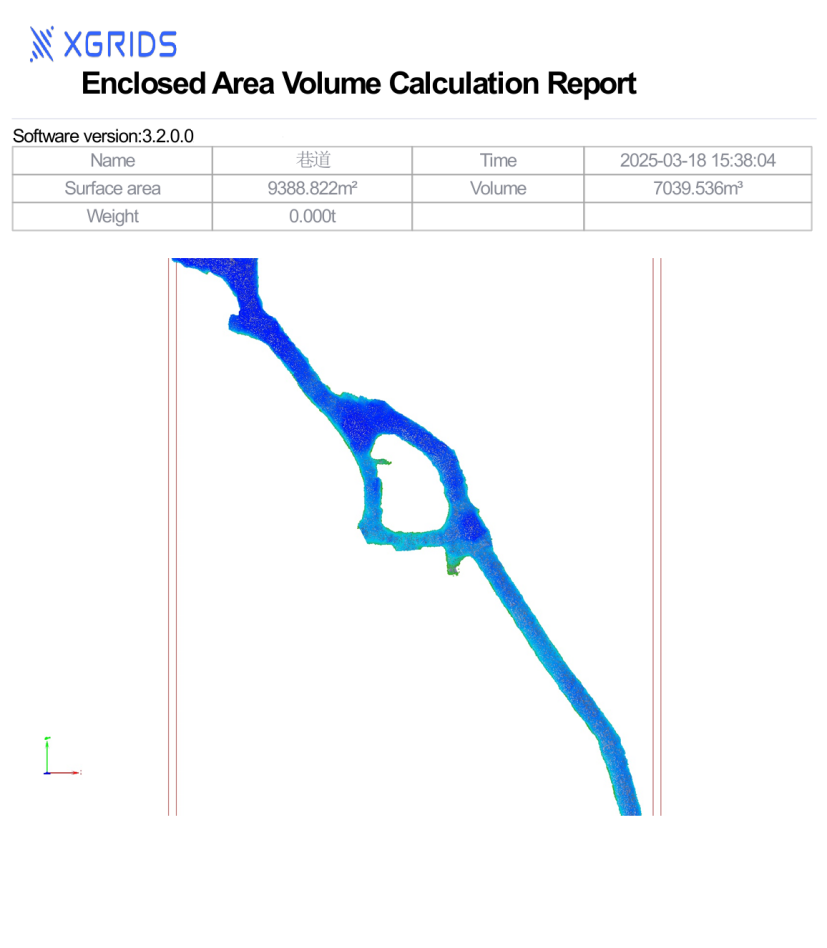
  4. Calculate: Click Calculate, select the XXX_tinflXXXX.ply file, and view the volume and surface area data.
  5. Export Report: Click Export Report, then select the save path and filename.
Enclosed volume report
  1. Exit: Click Enclosed Volume in the menu to exit.

Mesh

Generate a textured 3D model from Project Processing results with one click.

  1. Click Mesh.
  2. Input the scanned result data folder (after panoramic coloring).
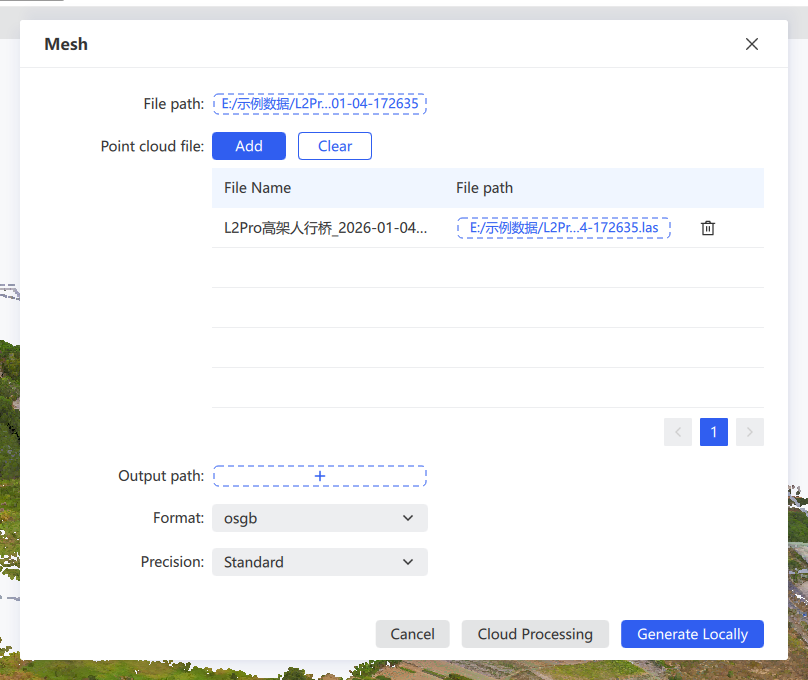
Mesh
  1. Choose the precision, export path, and export format. Precision can be set to Low, Medium, or High, and the model can be exported as .obj or .osgb.
  2. The software generates the textured 3D model. The file list shows all point cloud files in the selected path, and these files are used together to generate a single Mesh model. To use a manually cleaned point cloud, replace the corresponding file in the list.

Note: Mesh currently supports K1, K2, L2 Pro, and L3 result data with onboard colorization and panoramic photo output. The point cloud files and the photo data must be aligned in both time and position.

Remote Transfer

Stream a handheld device's working data to LixelStudio in real time over a mobile network. Use it to remotely monitor operators and devices, start or stop scanning remotely and generate data in real time, and store the device's real-time discrete data as structured data for post-processing and other operations.

Note: Remote Transfer only supports K1 and L2 Pro devices with firmware 3.0 or later.

  1. Click Remote Transfer Remote transfer in the menu bar to open the feature.
  2. Choose a connection method.
  3. Click the target device to enter the live view.
Remote transfer interface

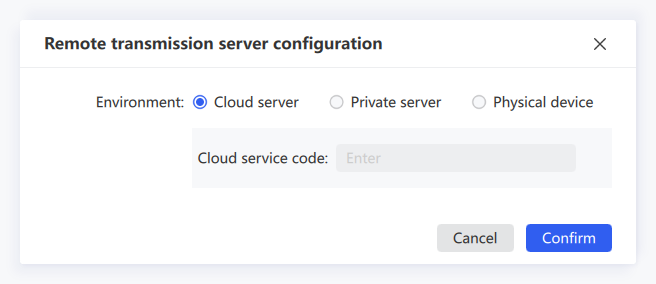
Remote Transfer offers three connection methods: Cloud Service Code, Private Server, and Physical Device.

Cloud Service Code

A cloud service provided by XGRIDS. Register and apply for a service code before use. Users sharing the same service code can see all cloud-connected devices under that code. Using the cloud service requires no self-hosted server; it handles data transfer, storage, and forwarding. Obtain the service code in advance by contacting your sales representative.

  1. Configure the mobile App: set the network transfer type to Cloud Service Code and enter the service code. For details, see the K1 and L2 Pro user manuals.
  2. After configuring the App, select Cloud Service Code in LixelStudio, enter the same service code as in the App, and click Confirm. The corresponding device is then displayed.
  3. Click the device. Once it starts recording, you can view it in real time.
Cloud service code

Private Server

Use the remote transfer service through a private server address and access key. Contact technical support for private server deployment and access key generation.

Private server

Physical Device

Connect directly to the device via USB or WiFi.
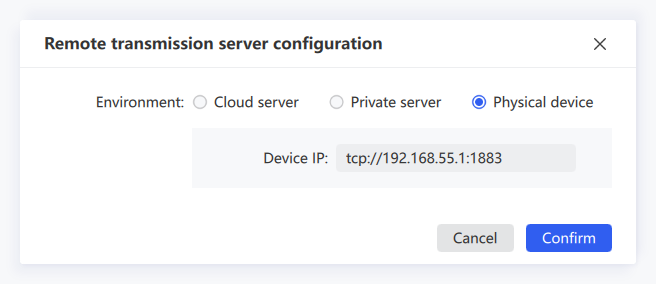
Physical device
  1. For a USB connection, the IP address is usually tcp://192.168.55.1:1883. For a WiFi connection, the computer must first connect to the phone hotspot (the same hotspot the device connects to).
  2. Click Bridge Mode in the App to view the current IP address, then enter that IP on the computer. Once configured correctly, you enter the live view.

Live View Controls

IconControlDescription
Start scanningStart ScanningRemotely starts scanning on the device
Stop ScanningRemotely stops scanning on the device
ReconnectReconnectReconnects after the network is interrupted
Property settingsProperty SettingsSets the point size, rendering mode (elevation, intensity, time, single color), and opacity of the real-time rendered point cloud
Browse modeBrowse ModeSwitches between free browsing and trajectory-following browsing
Pause/Resume transferPause/Resume TransferPauses or resumes point cloud transfer. Click to pause; click again to resume
SaveSaveSaves the point cloud transferred in real time
CloseCloseExits Remote Transfer

Note: Point clouds during a pause are not saved in LixelStudio.

Upload to Trimble

Upload point cloud data to Trimble Connect.

Note: Before uploading, create a project in Trimble Connect.

  1. Click Upload to Trimble Upload to Trimble.
  2. Sign in to your Trimble Connect account. Your project information is then loaded.
  3. Select the point cloud data to upload, either data already loaded in the project or a local point cloud file. Then select the destination folder in your Trimble Connect project and click Upload.
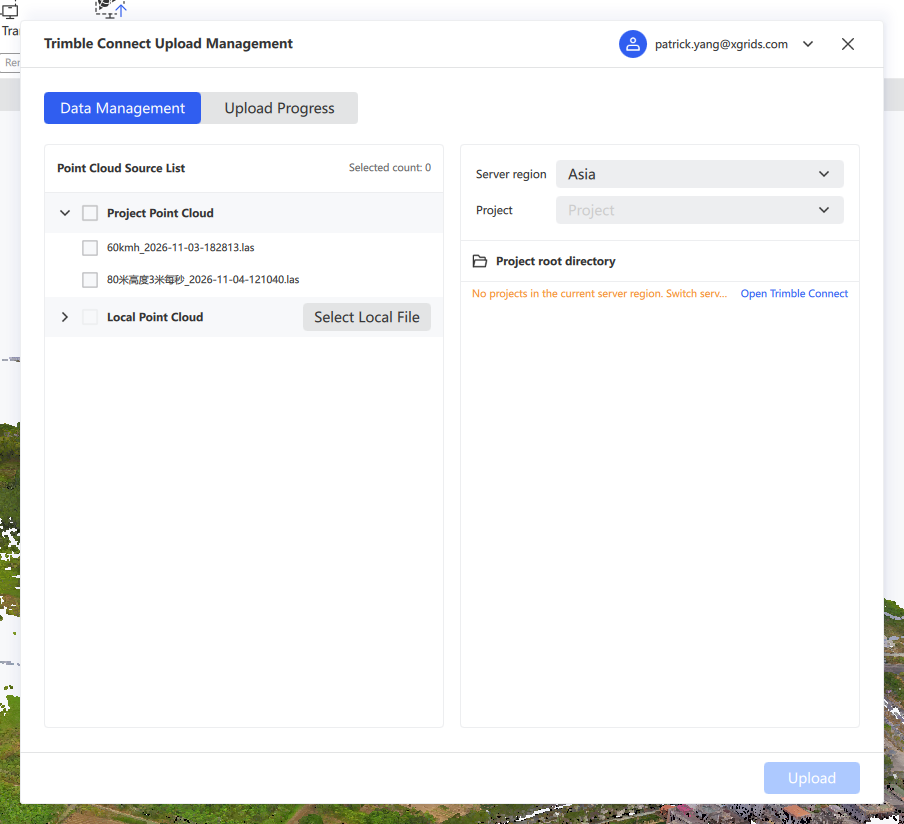
Select data and destination folder
  1. Track uploads in progress and completed uploads on the upload progress page.
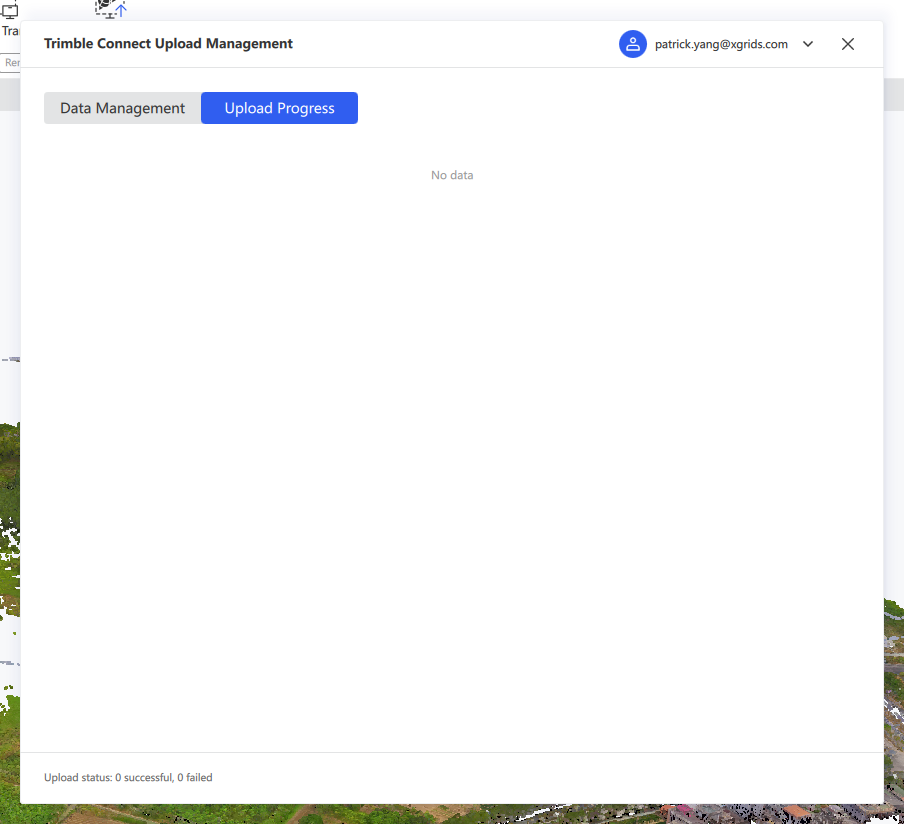
Upload progress