
Basic Operation
This chapter covers battery installation and charging, phone mount installation, buttons and indicator lights, data transfer, and firmware upgrade for the PortalCam.
Battery Installation and Charging
1. Battery installation
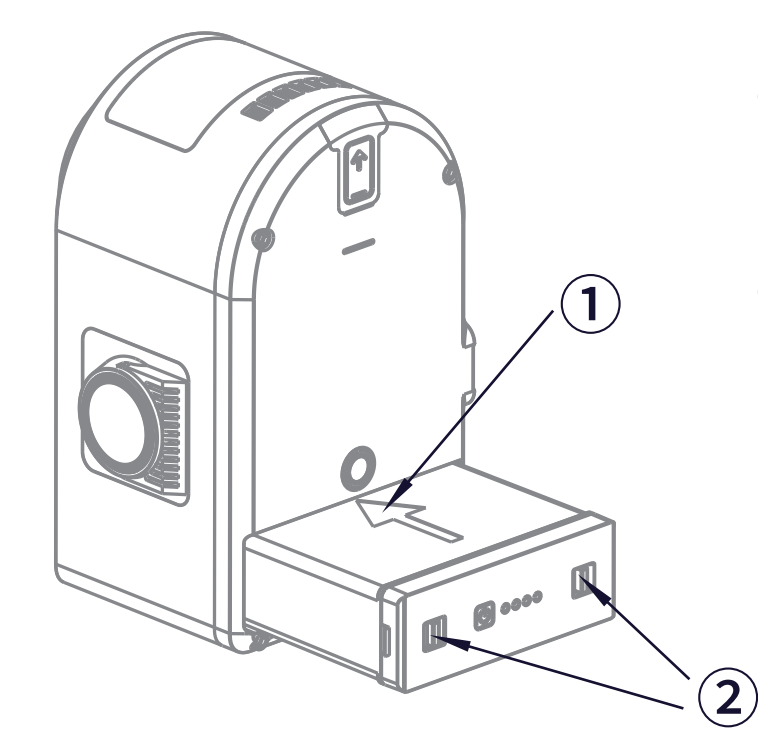
- As shown at label 1 above, insert the battery slowly with the marked-arrow side facing up.
- Push the battery down into the base of the device along the guide slot, and pinch the position shown at label 2 above with two fingers until it is fully inserted. If it is not seated, a red indicator appears at the position shown at label 2.
- To remove the battery, pinch the position shown at arrow 2 above; the battery pops out and can then be taken out.
2. Battery charging and indicator lights
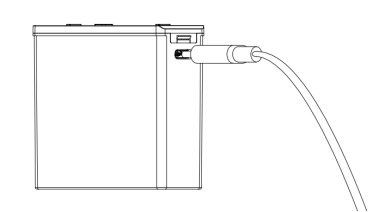
Use the supplied charging head and cable, connect to the Type-C port on the battery, and charging begins. Charging from 0% to 100% takes about 90 minutes. The recommended charging ambient temperature is 5°C–30°C.
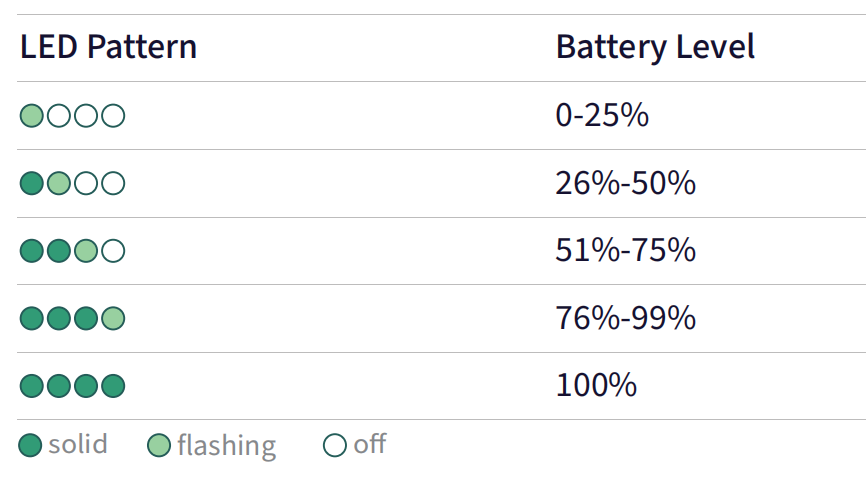
3. Battery indicator lights while charging
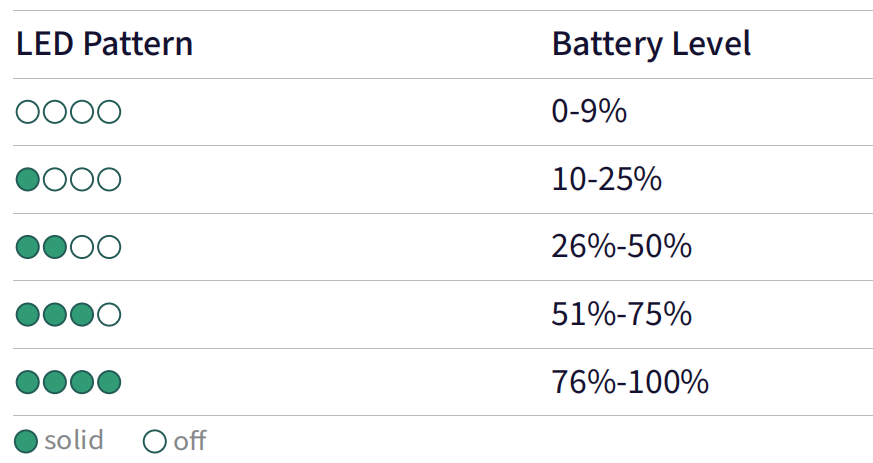
4. Battery indicator lights when not charging
5. Battery care notes
- Recharge the battery fully after everyday use.
- Recharge a fully charged but unused battery at least once every 3 months.
- Recharge a battery that is very low or fully depleted within 3 days.
Tip
Battery damage caused by not following the requirements above cannot be repaired and is not covered by the warranty. Maintain the battery in time to keep it healthy.
Phone Mount Installation
As shown below, insert the phone mount into the cold shoe slot on the rear cover of the device, with the arrow pointing down.
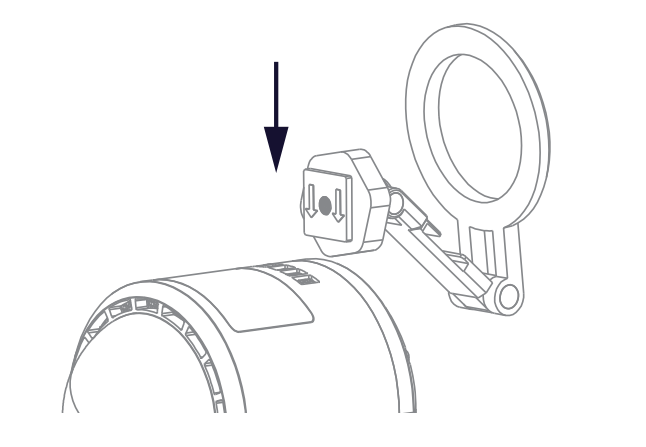
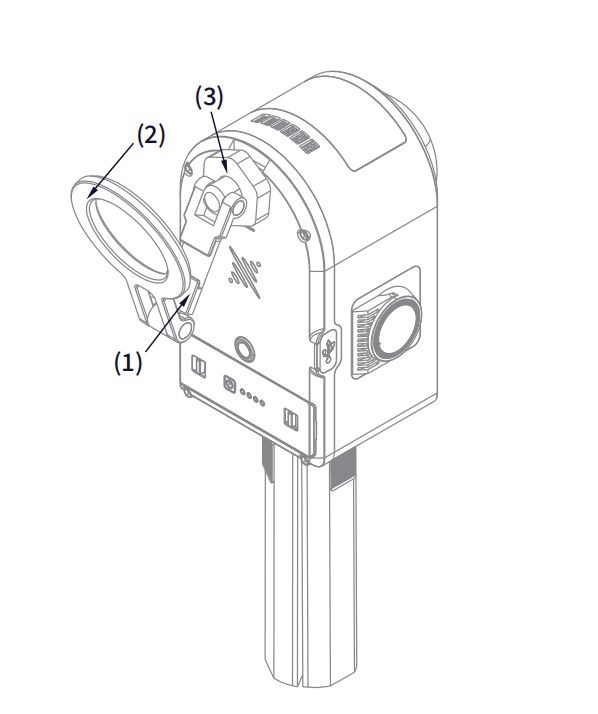
In the images above, arrow 1 shows the phone mount installed in the correct orientation, with the groove facing up; the ring at arrow 2 is the magnetic attachment point of the phone mount; arrow 3 shows the rotating joint. Tighten the knob to lock the phone mount in place.
Note
- If your phone has a magnetic ring on the back, it is not recommended to use a case when attaching it to the magnetic phone mount.
- If your phone has no magnetic ring on the back, or if a case is required, use a magnetic phone case.
Buttons and Indicator Lights
1. Device button
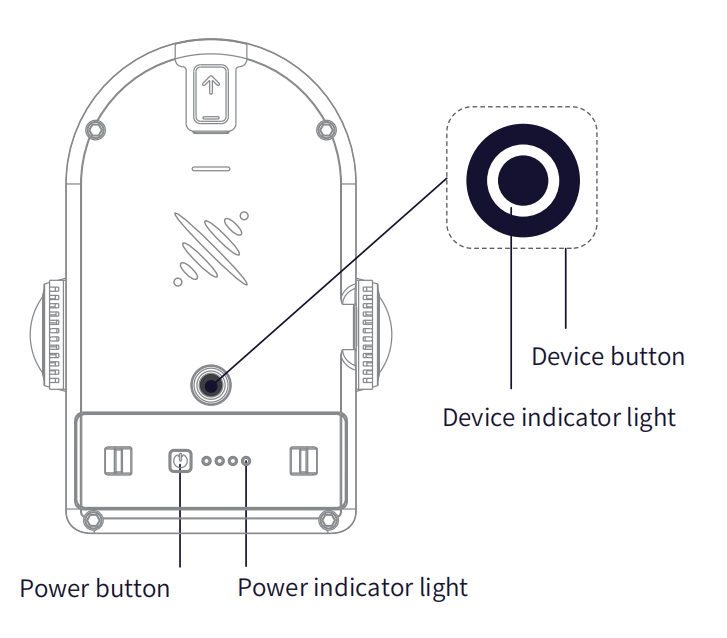
| Function | Button operation | Device status description |
|---|---|---|
| Power On | Press and hold the battery button for 2s | Press and hold the battery button for 2s, and release when the battery indicator lights start cycling from left to right. The device begins to power up and the battery indicator cycles 5 times. When the indicator changes from a slow-flashing blue light to a solid green light, the device enters standby mode. |
| Power Off | In standby, press and hold the battery button for 2s | When the device is in standby mode, press and hold the battery button for 2s and release when the battery indicator starts cycling from right to left. Once the indicator completes one cycle, power-off is complete. |
| Start Scanning | Double-click the device button | When the device is in standby mode, double-click the device button. The indicator changes from solid green to fast-flashing green for about 6–8s, then to slow-flashing green, which indicates scanning has started successfully and the device is in scanning mode. |
| Stop Scanning | Double-click the device button | When the device is in scanning mode, double-click the device button. The indicator changes from slow-flashing green to solid green, indicating that scanning has stopped successfully and the device has returned to standby mode. |
| Switch to USB mode | Single-click the button + white indicator light + single-click the button | When the device is in standby mode, single-click the device button; the indicator turns white for about 3 seconds. While the light is white, single-click again to switch to USB mode. If there is no further action within 3 seconds, the device stays in standby mode. When the device is in USB mode, single-click the device button; the indicator likewise turns white for about 3 seconds. While the light is white, single-click again to switch to standby mode. If there is no further action within 3 seconds, the device stays in USB mode. |
Note
- Before starting a scan, place the device on a flat surface; after starting, wait for the slow-flashing green light before moving the device to scan.
- The device takes about 25 seconds to power on and about 6 seconds to start scanning.
- During the stop-scanning process, a fast-flashing green light means the device is saving the scan file. Cutting power at this point may cause the file to be lost or saved incompletely.
- After scanning stops, the fast-flashing green light may last a while; the duration depends on the size of the scanned scene.
2. Indicator light descriptions
| Indicator light pattern | Meaning |
|---|---|
| Off | Device not started |
| Solid green | Standby mode |
| Fast-flashing green | Starting / stopping a scan |
| Slow-flashing green | Scanning mode |
| Slow-flashing blue | Powering on |
| Solid blue | USB mode |
| Solid yellow | Device not activated |
| Solid white | Switching between standby and USB mode |
| Solid red | Serious fault |
| Alternating red and green | Firmware upgrade (battery must be above 50%) |
Data Transfer
With the device in standby (solid green), use the supplied USB 3.0 cable to connect the device to a computer. After about 5 seconds, the device automatically enters USB mode (currently only desktops and laptops trigger USB mode automatically; phones and tablets need to switch to USB mode from the app or the device button). Once the computer recognizes the device, you can copy the data. When copying is done, unplug the USB cable; the device automatically exits USB mode and returns to standby.
Note
- USB mode turns off automatically after the device restarts.
- After USB mode is enabled, if the device has not been powered off or lost power and you want to continue scanning, you must turn off USB mode manually.
- Use the supplied USB 3.0 cable. Other cables may reduce copy speed, or cause a situation where copying works only when the connector is inserted one way and fails when reversed.
Firmware Upgrade
You can upgrade the device firmware as prompted by the app. There are two types of firmware upgrade: full-package and incremental. Incremental upgrades can be applied directly to the device from the app. If the app prompts that a full-package upgrade is needed, the process is as follows:
- Download the required full-package firmware from the official website (a full package is usually larger than 1 GB).
- Switch the device to USB mode and copy the firmware to the root directory of the device disk.
- Power off the device and restart it. After restarting, it automatically enters firmware upgrade mode.