XGRIDSDocs
  • 简体中文
  • English
  • 繁體中文
  • 日本語
  • Deutsch
  • Español
  • Italiano
  • Français
  • Русский
  • 简体中文
  • English
  • 繁體中文
  • 日本語
  • Deutsch
  • Español
  • Italiano
  • Français
  • Русский
  • PortalCam

    • Product Overview
    • Basic Operation
    • Using the LCC Scan App
    • Maintenance and Care
    • FAQ
  • Lixel K Series

    • Lixel K1

      • Product Overview
      • Basic Operation
      • Device Activation and Connection
      • Scanning Workflow
      • Acquire Point Cloud Data with Absolute Coordinate
      • Map Fusion
      • Route Planning Suggestions for Typical Scenes
      • Precautions
      • FAQ
    • Lixel K2

      • Product Overview
      • Basic Operation
      • Device Activation and Connection
      • Scanning Workflow
      • Acquire Point Cloud Data with Absolute Coordinate
      • Map Fusion
      • Route Planning Suggestions for Typical Scenes
      • Precautions
      • FAQ
  • Lixel L Series

    • Lixel L2 Pro

      • Product Overview
      • Basic Operation
      • Device Activation and Connection
      • Scanning Workflow
      • Acquire Point Cloud Data with Absolute Coordinate
      • Measure Point
      • Appendix
      • FAQ
  • Accessories

    • Stick Light

      • Installation Guide
      • Basic Operation
      • FAQ
  • Lixel Studio

    • Version and Copyright
    • Installation and Activation
    • Software Interface
    • File Operations
    • Project Processing
    • Tools
    • 2D Drawing
    • Applications
    • Settings
    • Device Connection
  • Lixel CyberColor

    • LCC Studio

      • Getting Started
      • Version and Updates
      • Download and Installation
      • Interface Overview and Navigation
      • Before Reconstruction
      • Model Reconstruction
      • Single Model Reconstruction
      • Map Fusion
      • Aerial-Ground Fusion
      • Aerial Reconstruction
      • My Models
      • Other Features
      • Settings and Account
      • Converter
      • Video Reconstruction
      • FAQ
    • LCC Scene Editor

      • Version & Updates
      • Account & Login
      • Product Overview & Home
      • Editor Interface
      • Scene Navigation Modes
      • File
      • Settings
      • Edit Operations
      • Window
      • Global Toolbar
      • Assets & Properties
      • Left Toolbar
      • Viewpoints
      • Portal
      • Skybox
      • Annotations
      • Measurement
      • Flythrough
      • Scene Report
      • 3D Layout
      • Mini-Map
      • Preview Mode (Viewer)
      • Help
      • FAQ
      • Spawn Point
    • LCC Model Editor

      • Version and Updates
      • User Guide
      • Overview and Interface
      • File Operations
      • Selectors
      • Editing Models
      • Measurement
      • Color Grading
      • Asset Management
      • Settings and Help
      • FAQ
    • Capture Guide

      • Overview
      • Capture Devices Overview
      • General Capture Principles
      • Indoor Scene Capture
      • Outdoor Scene Capture
      • Large-Scale Capture (Map Fusion)
      • Aerial-Ground Map Fusion Capture
      • Object Capture
      • People Capture
      • Video Reconstruction Capture
      • HD Enhancement
      • Control Points (Lixel P1)
      • FAQ and Troubleshooting
    • LCC Studio Linux

      • Product Overview
      • Architecture Guide
      • Installation and Deployment Guide
      • Container Startup Parameters Guide
      • CodeMeter Offline Licensing Deployment Guide
      • API Reference
      • Appendix - Developer Data Guide
      • Appendix - Error Code List
      • Single-Machine Multi-GPU Cluster Deployment QuickStart
    • Version History
  • Plugin & SDK

    • Unreal

      • Introduction
      • Quick Start - Windows
      • Quick Start - Linux
      • Quick Start - Quest3
      • Editions and Licensing
      • Rendering
      • Visual Settings
      • Normals and Lighting
      • Scene Editing
      • Performance Parameters
      • Performance Guide
      • Third-party and Engine Plugin Integration
      • Proxy Mesh
      • Loading Animation
      • Collision
      • Navigation System Support
      • Single Layer Water Support
      • Localization
      • FAQ
      • Troubleshooting
      • Logging and Diagnostics
      • Contact Us
      • API Reference

        • ALCCActorBase
        • ULCCComponentBase
        • ULCCComponent
        • ULCC2Component
        • SOG / SPZ / PLY Actors
        • ALCC2ProxyMesh
        • ALCCClippingVolume
        • ALCCSectionPlane
        • ULCCUtilLibrary
        • Enums
        • Structs
      • Changelog

        • v3.3.1
        • v3.0.0
        • v2.2.1
        • v1.0.0
        • v0.9.0
        • v0.8.0
        • v0.7.1
        • v0.6.1
        • v0.5.2
        • v0.4.1
        • v0.4.0
        • v0.3.0
        • v0.0.5
        • v0.0.4
        • v0.0.3
        • v0.0.2
        • v0.0.1
    • Web

      • Introduction
      • Rendering Performance Optimization Guide
      • Graphics Configuration
      • FAQ
      • API Reference

        • LCCRender::clearIndexDB
        • LCCRender::dispose
        • LCCRender::load
        • LCCRender::setCamera
        • LCCRender::unload
        • LCCRender::update
        • LCCObject::checkRenderNextFrame
        • LCCObject::clearRenderNextFrame
        • LCCObject::ecef2Prj
        • LCCObject::getBounds
        • LCCObject::getEnvInstancedMesh
        • LCCObject::getInstancedMesh
        • LCCObject::getLodInfos
        • LCCObject::getOriginPosition
        • LCCObject::getProjectionCoordinateSystemInfos
        • LCCObject::hasCollision
        • LCCObject::hasEnvironment
        • LCCObject::hasShcoef
        • LCCObject::intersectsCapsule
        • LCCObject::intersectsRayExt
        • LCCObject::intersectsRayFromOriginExt
        • LCCObject::intersectsSphere
        • LCCObject::lowerToBottom
        • LCCObject::prj2Ecef
        • LCCObject::raiseToTop
        • LCCObject::raycast
        • LCCObject::raycastFromOrigin
        • LCCObject::setAlpha
        • LCCObject::setClipBox
        • LCCObject::setClipPlane
        • LCCObject::setEndLod
        • LCCObject::setLodAutoLevelUp
        • LCCObject::setMaxDistance
        • LCCObject::setMaxNodeSplats
        • LCCObject::setMaxSplats
        • LCCObject::setOriginPosition
        • LCCObject::setPointsColor
        • LCCObject::setRenderState
        • LCCObject::setRotation
        • LCCObject::setScale
        • LCCObject::setSemantic
        • LCCObject::setSemanticColor
        • LCCObject::setSmooth
        • LCCObject::setStartLod
        • LCCObject::setTranslation
        • LCCObject::setVisible
        • LCCObject::togglePointsDisplayMode
        • LCCObject::useEnvironment
        • LCCObject::useShcoef
      • Changelog

        • v0.6.3
        • v0.6.2
        • v0.6.1
        • v0.6.0
        • v0.5.5
        • v0.5.4
        • v0.5.3
        • v0.5.2
        • v0.5.1
        • v0.5.0
        • v0.4.1
        • v0.4.0
        • v0.3.1
        • v0.3.0
        • v0.2.0

Graphics Configuration

Setting Windows to Use a Dedicated GPU

On Windows 10 (version 2004) or later, some applications in the Windows graphics performance preference settings have higher priority than the preferred settings in GPU vendor control panels (such as NVIDIA Control Panel or AMD Radeon Software). For example, even if an application is set to use the NVIDIA GPU in the NVIDIA Control Panel, the application may still use the integrated GPU if Windows defaults to the CPU's integrated graphics.

Note: Microsoft may continuously add applications to Windows in the background using the default GPU. To change the GPU settings for a specific application, it is recommended to configure both Windows settings and the GPU vendor control panel.

The following steps demonstrate how to set the preferred graphics GPU on Windows 10:

  1. Press Win + I to open Windows Settings, then select "System".
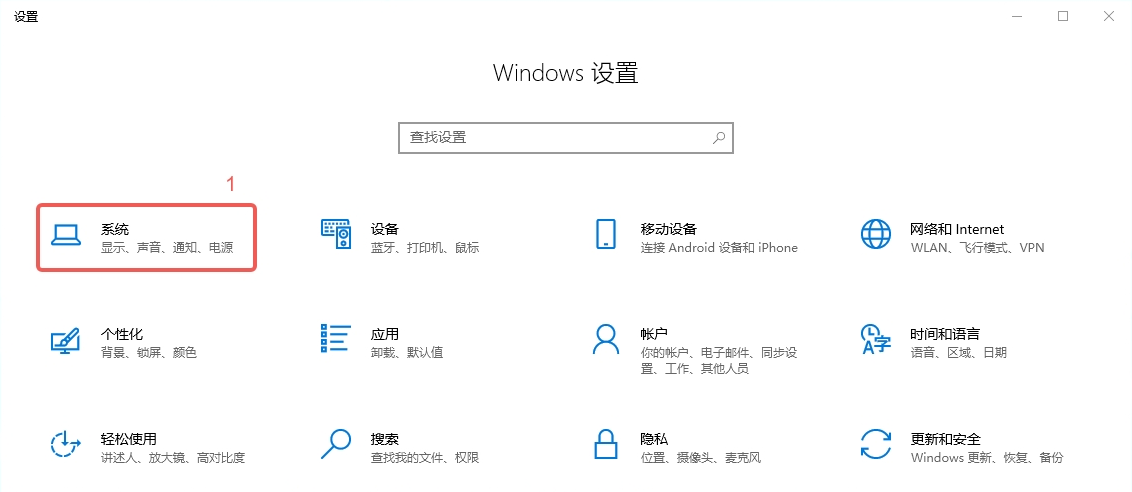
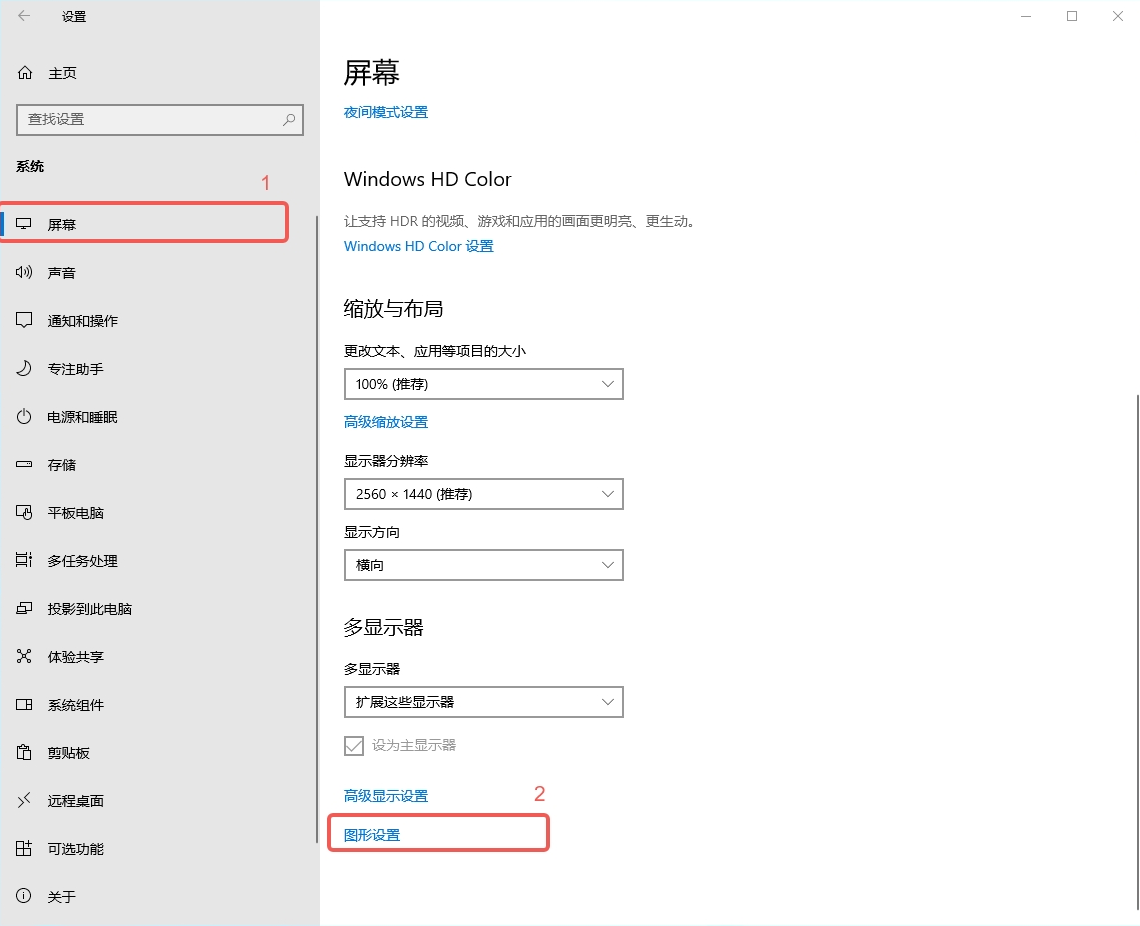
  1. Go to "System" → "Display", scroll down the right panel to the bottom, and find "Graphics settings".
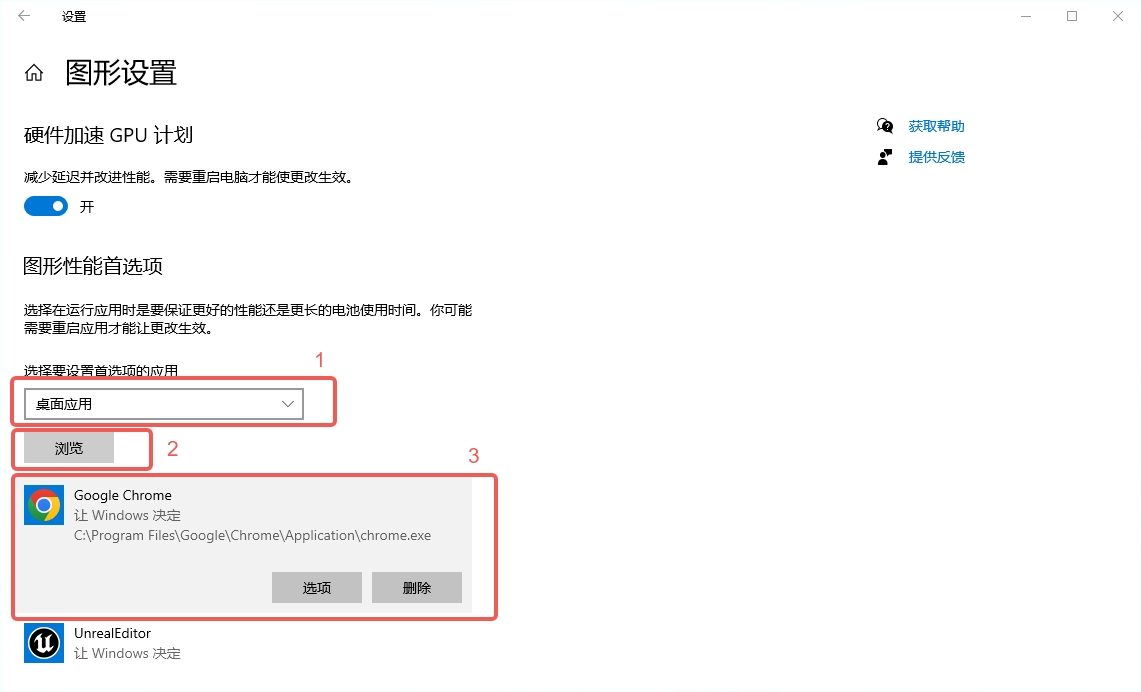
  1. In "Graphics settings", set "Choose an app to set preference" to "Desktop app", click the "Browse" button, find your browser (e.g., Chrome.exe) in the file system, and add it to the list.
  1. Select the added application, click "Options", choose "High performance" from the popup list, and click "Save".
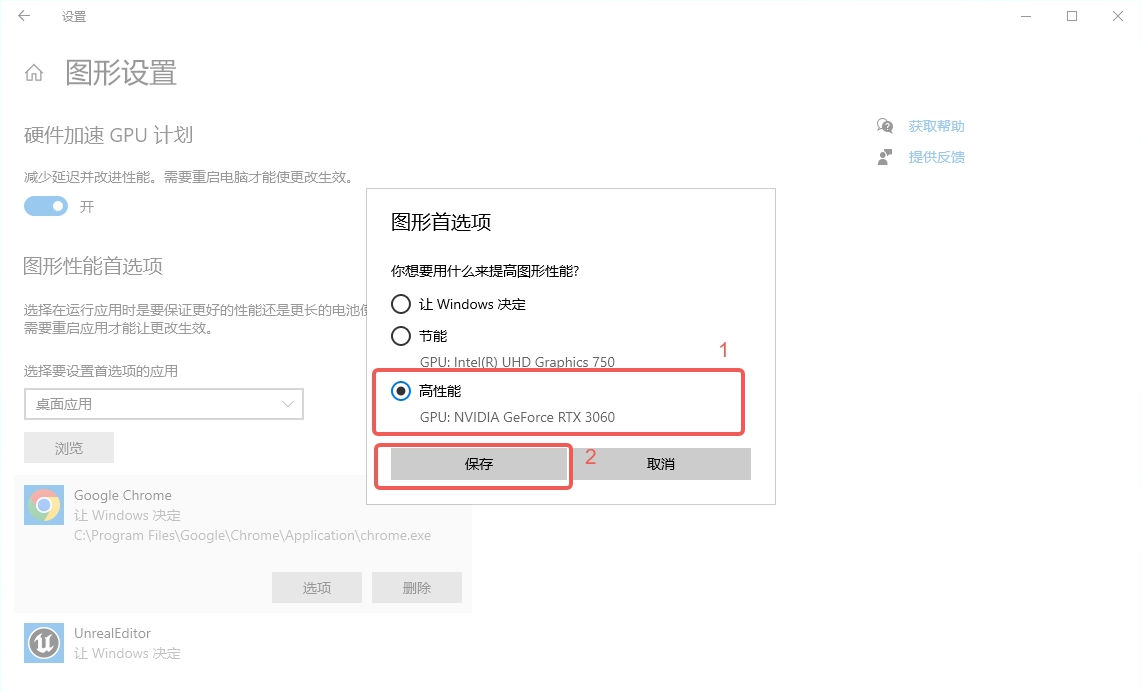
  1. Confirm that "High performance" (i.e., the dedicated GPU) is displayed below the application. The setup is complete.
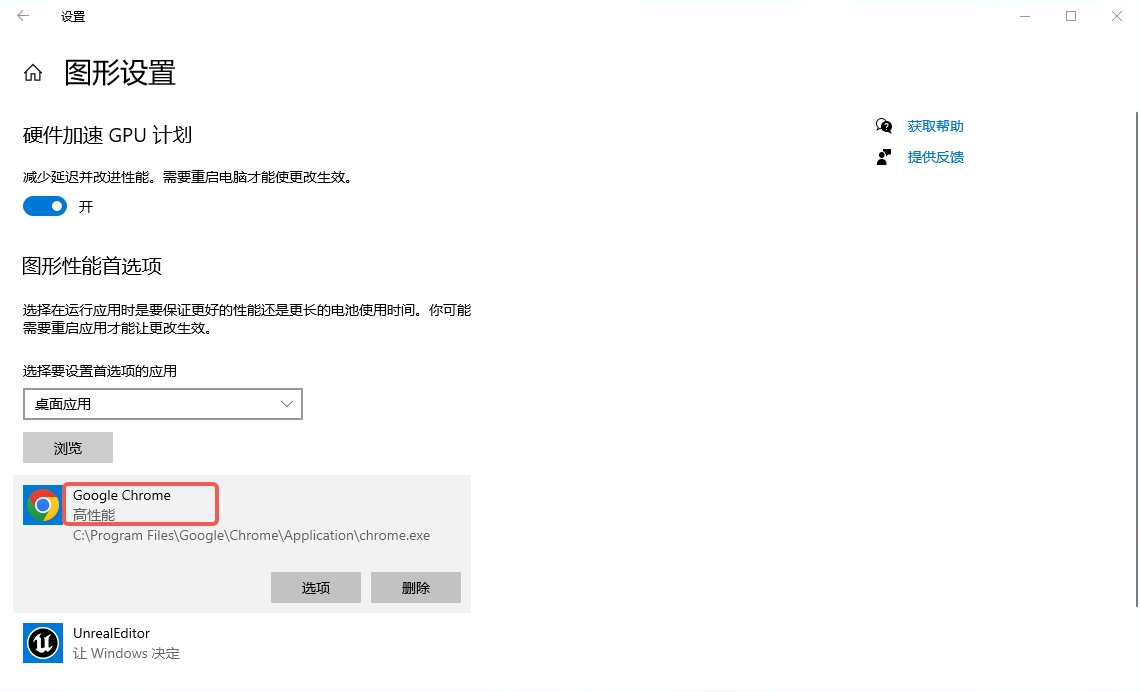
Note: Restart the browser after completing the settings to ensure the new configuration takes effect.

Prev
Rendering Performance Optimization Guide
Next
FAQ