
Providing Real Normals for 3DGS with a Proxy Mesh
Overview
ProxyMesh is a Pro edition feature of LCC4Unreal. It provides real depth and normal information through a placed proxy mesh and is the only normal mode with real shape shading. It applies to every format of the LCC2 pipeline (.lcc2 / .sog / .spz / .ply). For licensing, see Editions and Licensing.
Note: ProxyMesh requires a valid license. Without one it falls back to Fixed mode automatically.
What a Proxy Mesh Is
3DGS data has no surface normals of its own and writes nothing into the GBuffer, so it cannot take part in regular lighting calculations. The job of the proxy mesh is to provide geometry whose shape matches the 3DGS. The plugin takes depth, normals, and the material properties in the GBuffer from it and hands them to engine lighting and post-processing; the mesh itself never appears in the final image.
        3DGS data                    Proxy mesh
   (color, opacity)          (depth, normals, material properties)
           │                              │
           │                              ▼
           │                      Written into the GBuffer
           │                              │
           │              ┌───────────────┴───────────────┐
           │              ▼                               ▼
           │      Engine lighting                Post-processing that
           │   (directional, point, shadows)   depends on the GBuffer
           │              │                  (reflection, refraction, etc.)
           │              └───────────────┬───────────────┘
           ▼                              ▼
       Color source ──────────────▶  Composite final image
                                          │
                                          ▼
                              The proxy mesh itself is invisible
In other words: the color in the image comes from the 3DGS, and the lighting response comes from the proxy mesh.
The origin of the mesh is unrestricted. The plugin only reads its render result and does not care how it was produced. Common sources:
| Source | Description |
|---|---|
| Approximate mesh generated along with the 3DGS | Mesh output by the capture workflow; the closest shape match and the first choice |
| Mesh converted from the 3DGS | Mesh reconstructed from the 3DGS with a third-party tool |
| Hand-authored mesh | Modeled after the 3DGS shape in DCC software, suited to scenes that need precise control |
| Assembled from basic primitives | Rough volumes built from Cube, Plane, and other basic meshes, suited to regular shapes such as buildings and ground |
The only requirement is that the mesh matches the 3DGS shape in space. The closer the match, the more realistic the lighting. When the deviation is too large, the lighting direction no longer matches the shape visible in the image.
The mesh does not need high precision: simplified low-poly geometry is enough as long as the volumes and orientation are correct.
What the Material Does
The material properties of the proxy mesh are read along with the GBuffer, so they decide how the 3DGS surface responds to lighting.
For basic lighting only, a whitebox material is enough and no textures are needed. For effects that depend on material properties, use the matching PBR material at the corresponding location on the mesh, for example:
- Water reflection and refraction: use a water material with suitable metallic and roughness values at the water area
- Metal highlights: give matching Metallic and Roughness values at metal structures
- Rough surfaces: use high Roughness to suppress highlights that should not appear
When the material properties do not match the actual shape, the lighting result does not match the 3DGS appearance in the image, for example specular highlights on a wall that should be rough.
Quick Setup
Step 1: Place the ProxyMesh Actor
- Add an
ALCC2ProxyMeshActor from the LCC4Unreal plugin panel in the editor - Assign a StaticMesh to its
StaticMeshComponent(any source, see the section above) - Adjust the ProxyMesh position so it overlaps the 3DGS content in space
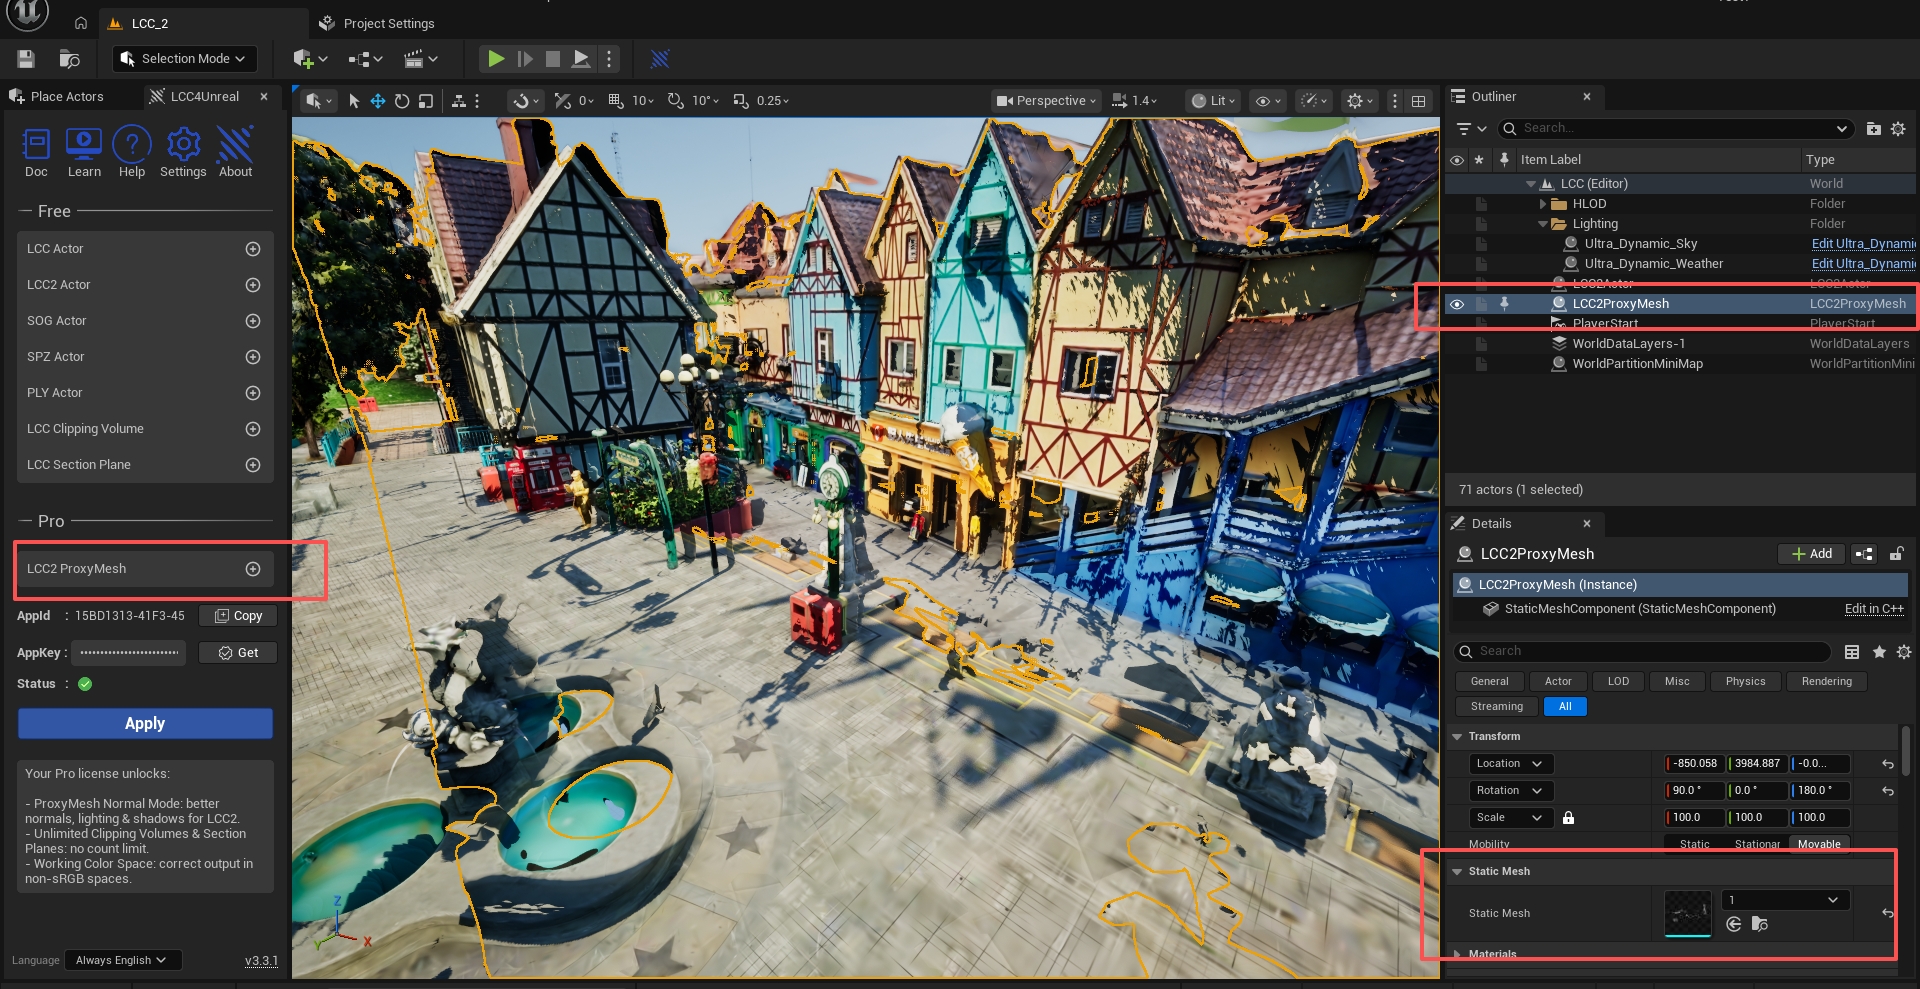
Placing an ALCC2ProxyMesh Actor in the scene
Step 2: Enable ProxyMesh Mode
- Select the Actor of the LCC2 pipeline (
ALCC2Actor/ASogActor/ASpzActor/APlyActor) - Find LightMode in the Details panel and change it to Lit
- Find the Lighting category of LCC2Component in the Details panel
- Set
NormalModetoProxyMesh
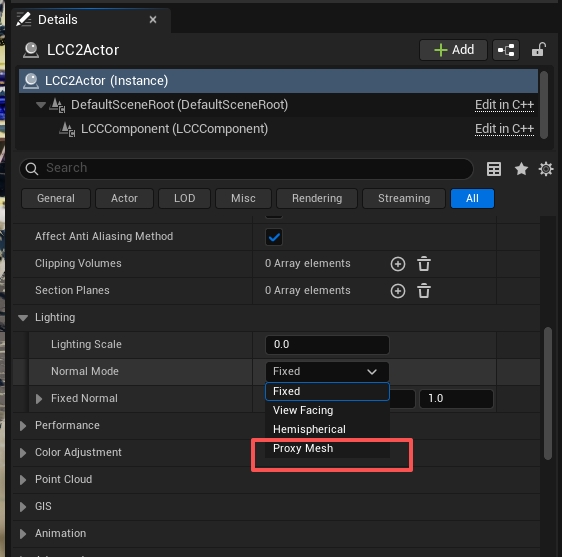
Enabling Lit and setting NormalMode to ProxyMesh
Step 3: Verify
- Change the lighting direction of the scene and watch whether the 3DGS produces self-shadowing
- Confirm the proxy mesh is hidden in the final image
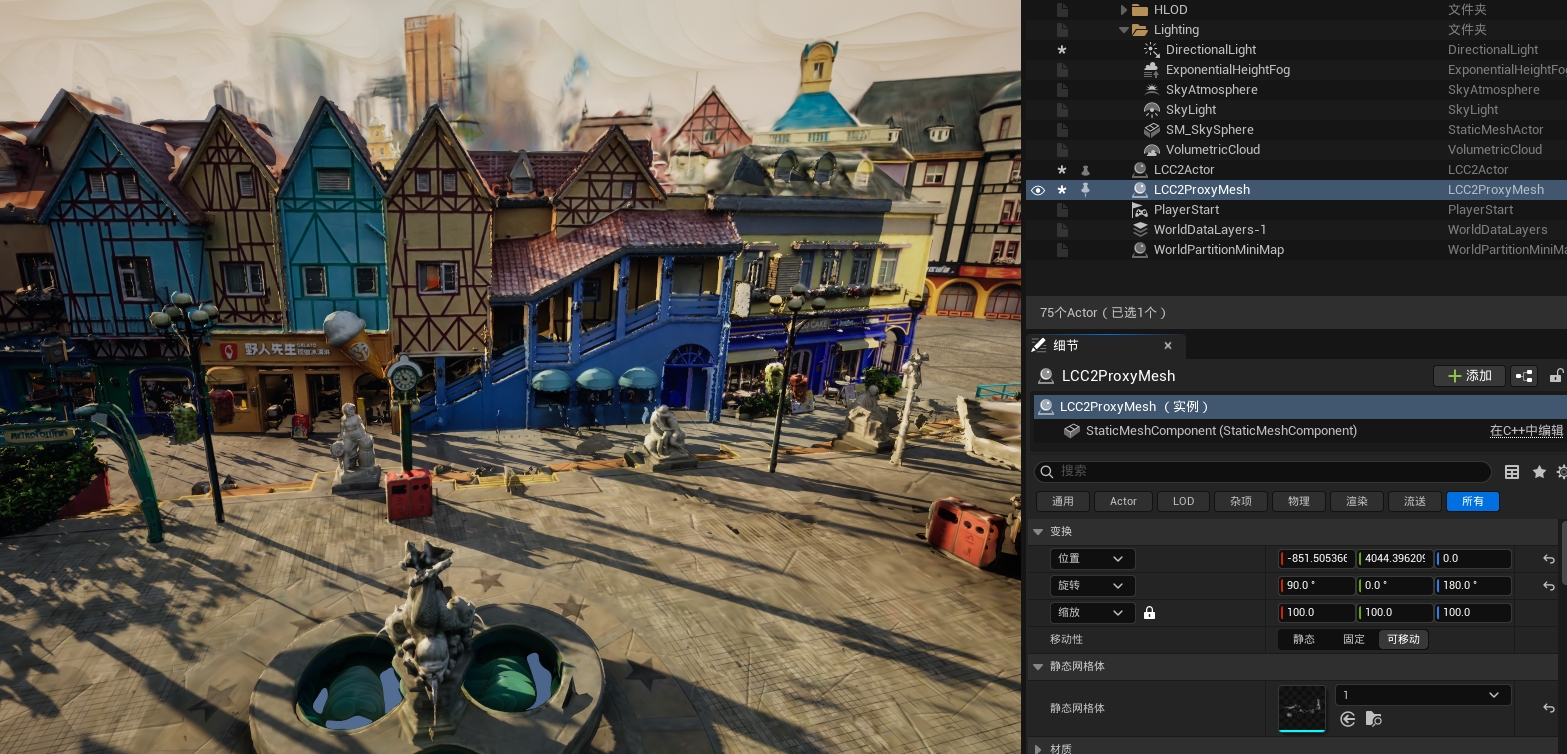
Lighting result after ProxyMesh provides real normals
ProxyMesh Usage Example
The ProxyMesh setup process and the lighting result
ALCC2ProxyMesh
The proxy Actor, paired with the Actors of the LCC2 pipeline when NormalMode = ProxyMesh.
Properties
| Property | Description |
|---|---|
| StaticMeshComponent | The static mesh that provides scene depth and normals |
Default Transform
- Scale (100, 100, 100): the mesh unit is meters by default, while UE uses centimeters
- Rotation (0, 180, 0): compensates for the mesh generation pipeline having the opposite forward axis to UE
Behavior
- Enables CustomDepth rendering automatically when the StaticMesh is valid
- Logs a warning and disables CustomDepth when the StaticMesh is empty
License Check
ProxyMesh mode requires a Pro edition license, see Editions and Licensing. Without a license it falls back to Fixed mode automatically, and the stored property value is not modified.
Runtime Switching
NormalMode can be changed at runtime from Blueprint or C++ and takes effect on the next frame.
Blueprint Usage
Spawning a ProxyMesh
SpawnActor->Class: ALCC2ProxyMesh
→ Set the StaticMesh of StaticMeshComponent
→ Adjust the position to align with the 3DGS content
Switching Modes
LCC2Component->NormalMode = ProxyMesh
Best Practices
- Mesh coverage: make sure the proxy mesh covers the same spatial area as the 3DGS content.
- Mesh precision: a simplified approximation of the scene geometry is enough, high poly counts are not needed.
- Multiple Actors: several
ALCC2ProxyMeshActors can be placed to cover different areas. - No explicit binding: the ProxyMesh does not need to be linked to a specific Actor, pairing happens automatically.
- Backward compatibility: projects that do not use ProxyMesh behave exactly as before the upgrade, with no extra cost.
Troubleshooting
ProxyMesh has no effect
- Confirm
NormalModeis set toProxyMesh - Confirm the license is valid
- Make sure the ProxyMesh Actor has a valid StaticMesh assigned
- Confirm the ProxyMesh overlaps the 3DGS content in space
Warning: "has a null StaticMesh"
Assign a StaticMesh to the ALCC2ProxyMesh Actor. The warning is throttled and issued only once per instance.
Whitebox color visible in the final image
- Make sure at least one LCC2Component is in ProxyMesh mode
- Adjust
LCC2.ProxyMeshDepthEpsilonwhen depth matching is too strict
Lighting result is incorrect
- Verify the proxy mesh normals are a reasonable approximation of the actual scene geometry
Shadows appear only nearby and are cut off in the distance
An engine issue. Select the ProxyMesh Actor, turn Far Shadow on the StaticMeshComponent off and back on to restore complete shadows.