
Render a 3DGS Scene on Linux
This document starts from installing Unreal Engine and covers how to install LCC4Unreal, create a C++ project, load LCC data, compile, run, and package a Linux application.
1. Recommended Hardware and Software Environment
| Item | Recommended |
|---|---|
| Operating system | Ubuntu 22.04 |
| CPU | Intel/AMD quad-core 2.5 GHz or higher; more cores recommended for source builds |
| Memory | 32 GB; 64 GB or more recommended for source builds |
| Graphics card | NVIDIA GeForce RTX 2080 or a higher-performance discrete card |
| Video memory | 8 GB or more |
| IDE | VS Code or Rider |
| Disk | 300 GB and above |
2. Choose an Unreal Engine Installation Method
Two Unreal Engine installation methods are available on Linux:
| Method | Characteristics | Suitable for |
|---|---|---|
| Prebuilt version (Installed Build) | Ready to use after download and full extraction; creating a C++ project is more straightforward | Preferred for beginners |
| Source build | Engine source can be modified; the first build takes a long time | Developers who need to modify the engine or plugin internals |
Prefer the prebuilt version when only LCC4Unreal is needed and the Unreal Engine source does not have to be modified.
Note: LCC4Unreal ships in prebuilt form and matches the official engine binaries. Do not modify the engine source, as a modified engine may be incompatible with the plugin, causing load failures or abnormal behavior.
2.1 Method A: Install the Unreal Engine Linux Prebuilt Version (recommended)
Open the official Epic Unreal Engine for Linux page;
Sign in with an Epic Games account;
Download the
.ziparchive of the required Unreal Engine version.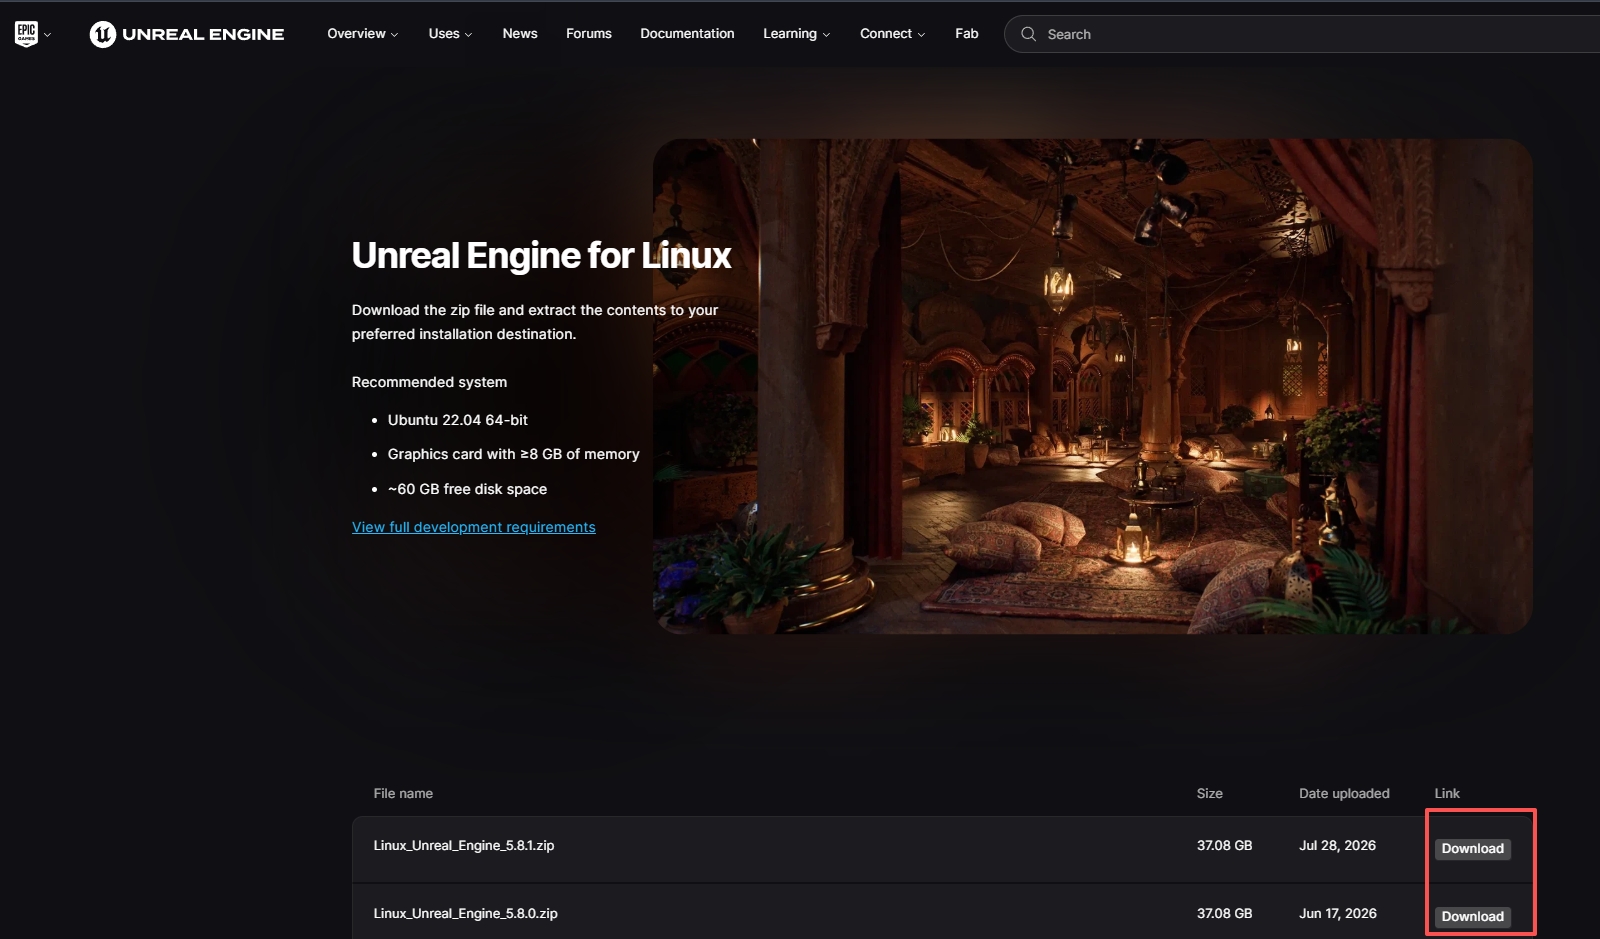
Select and download the required Unreal Engine Linux prebuilt package from the official Epic Games page
Create an engine directory in the file manager, for example:
/home/[USER]/Unreal/Engines/UnrealEngineExtract all files and directories from the archive into that engine root directory. Do not copy only the single
UnrealEditorfile, otherwise the engine is missing the other content required to run and build;Enter the engine root directory in the file manager, right-click an empty area, and select Open in Terminal. Subsequent commands must run in the correct engine directory.
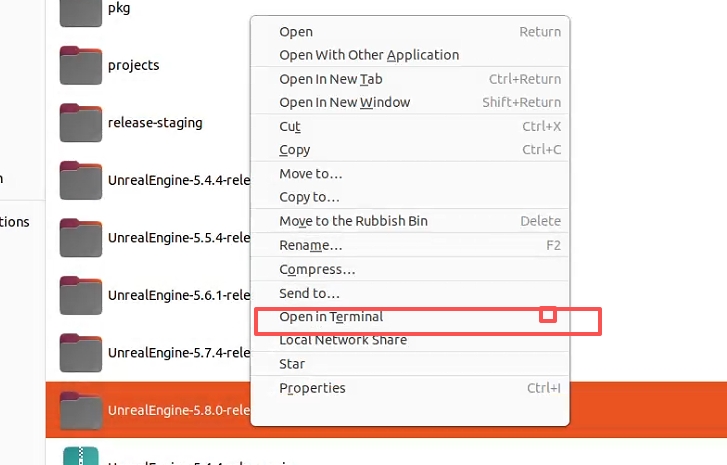
Enter the fully extracted Unreal Engine root directory and open a terminal from there
Start the Unreal Engine editor.
General form:
"/[UE_ROOT]/Engine/Binaries/Linux/UnrealEditor"
Example:
"/home/alice/Unreal/Engines/UnrealEngine/Engine/Binaries/Linux/UnrealEditor"
If a missing execute permission is reported:
chmod +x "/[UE_ROOT]/Engine/Binaries/Linux/UnrealEditor"
Example:
chmod +x "/home/alice/Unreal/Engines/UnrealEngine/Engine/Binaries/Linux/UnrealEditor"
2.1.1 Prepare the Toolchain for C++ Development
Following the Epic Games Linux development quick start, run the following in the Unreal Engine directory:
cd "/[UE_ROOT]/Engine/Build/BatchFiles/Linux"
./SetupToolchain.sh
Example:
cd "/home/alice/Unreal/Engines/UnrealEngine/Engine/Build/BatchFiles/Linux"
./SetupToolchain.sh
2.2 Method B: Build Unreal Engine from Source
Skip to section 4 if a source build of Unreal Engine already runs.
2.2.1 Get the Source
Get it from GitHub: https://github.com/EpicGames/UnrealEngine
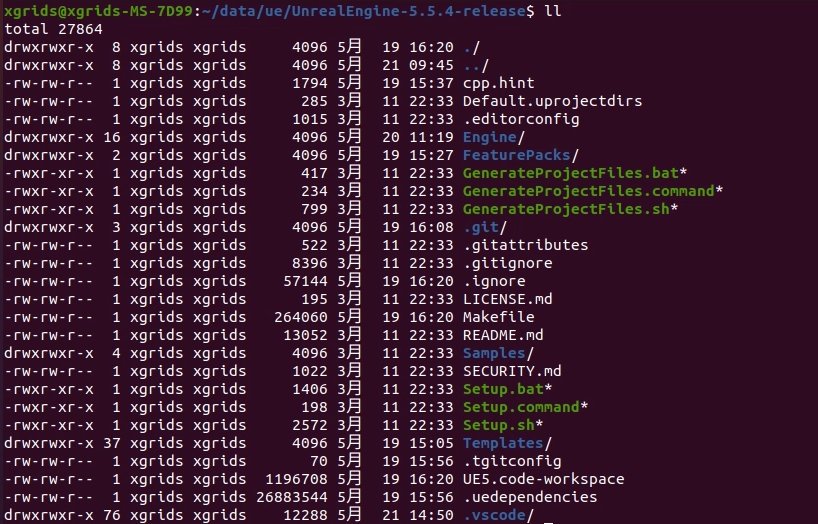
Visit the Epic Games Unreal Engine GitHub repository and get the source of the required version
2.2.2 Download Dependencies and the Native Toolchain
cd "/[UE_ROOT]"
./Setup.sh
Example:
cd "/home/alice/Unreal/Engines/UnrealEngine"
./Setup.sh

Use Setup.sh to download the dependencies required for a source build and the native Linux toolchain
Success criteria:
- The command returns normally at the end;
- No
fatalmessages and no unhandled download failures; - The matching Unreal Engine toolchain exists in
Engine/Extras/ThirdPartyNotUE/SDKs/HostLinux.
If the following appears:
fatal: not a git repository
the source origin, the current directory, or the Git metadata has a problem. Do not ignore it and continue compiling. Confirm the current terminal is in the correct Unreal Engine root directory first.
2.2.3 Generate Project Files
cd "/[UE_ROOT]"
./GenerateProjectFiles.sh
Example:
cd "/home/alice/Unreal/Engines/UnrealEngine"
./GenerateProjectFiles.sh
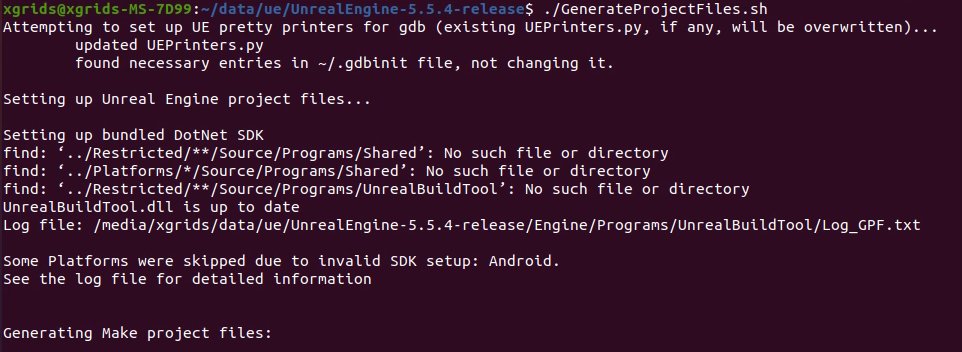
Generate project files and the Linux Makefile for the Unreal Engine source
2.2.4 Compile UnrealEditor
Limit the parallel job count on the first build to avoid running out of memory. make -j4 UnrealEditor works by default; with only 32 GB of memory, use make -j2 UnrealEditor instead; if the engine Makefile provides no separate target, use make -j4:
cd "/[UE_ROOT]"
make -j4 UnrealEditor

# Use this with only 32 GB of memory:
make -j2 UnrealEditor

# Use this when the Makefile provides no separate target:
make -j4
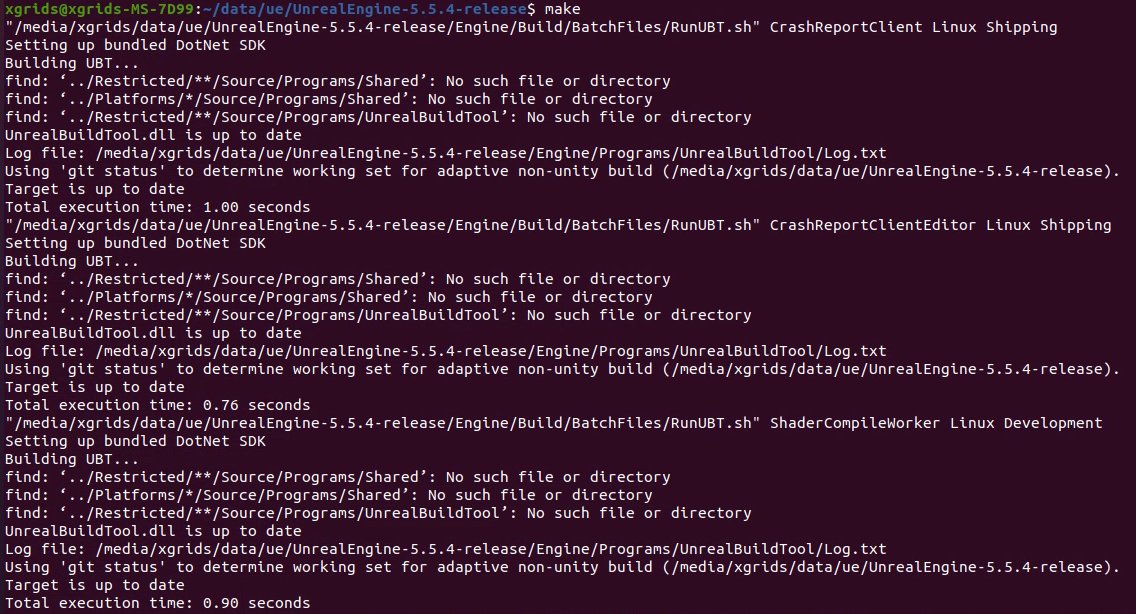
Limit the parallel job count and compile the source build of UnrealEditor
Hundreds or even thousands of actions on the first source build are normal. They belong to the engine itself, not to the source files of the blank project. Build time depends on CPU, memory, and disk.
Check whether it succeeded:
test -x "/[UE_ROOT]/Engine/Binaries/Linux/UnrealEditor" \
  && echo "Source build UnrealEditor is ready" \
  || echo "Build not finished"
Example:
test -x "/home/alice/Unreal/Engines/UnrealEngine/Engine/Binaries/Linux/UnrealEditor" \
  && echo "Source build UnrealEditor is ready" \
  || echo "Build not finished"
Start the project browser:
"/[UE_ROOT]/Engine/Binaries/Linux/UnrealEditor"
Example:
"/home/alice/Unreal/Engines/UnrealEngine/Engine/Binaries/Linux/UnrealEditor"
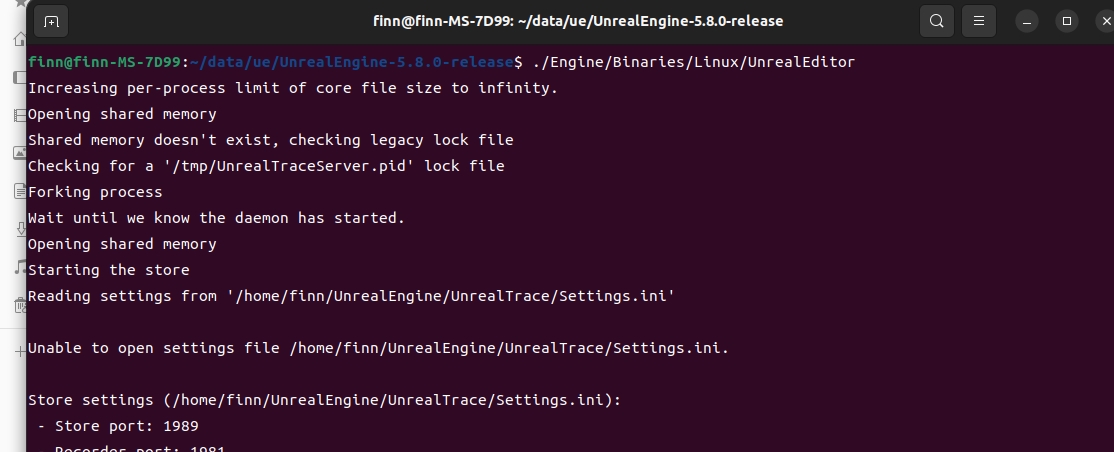
Start the Unreal Project Browser after the source build of UnrealEditor is compiled
3. Install and Configure VS Code
3.1 Install VS Code and C++ Development Tools
On Ubuntu, download and install from the official Visual Studio Code site, or use the package method supported by the distribution.
Before compiling C++ projects with VS Code, complete the Unreal Engine Linux toolchain installation from section 2 and prepare the basic C++ compilation and debugging tools. Install common tools such as build-essential, clang, lldb, and cmake according to the Ubuntu version and the team environment; the actual compiler version follows the requirements of the current Unreal Engine version and the toolchain installed by SetupToolchain.sh/Setup.sh.
The following VS Code extensions are recommended:
- C/C++: code browsing, completion, and debugging;
- C/C++ Extension Pack: additional common C++ development capabilities;
- CodeLLDB: LLDB debugging on Linux;
- Makefile Tools: view and run Makefile targets (optional).
The official Epic Games documentation can also be used as a reference: Setting up VS Code for Unreal Engine.
3.2 Generate and Open the VS Code Workspace
After a C++ project is created, the project directory normally contains .vscode/ and <ProjectName>.code-workspace. If they are missing, run:
"/[UE_ROOT]/GenerateProjectFiles.sh" \
  -vscode \
  -project="/[UE_PROJECTS_DIR]/[PROJECT_NAME]/[PROJECT_NAME].uproject" \
  -game \
  -engine
In VS Code, select File → Open Workspace from File... and open <ProjectName>.code-workspace. Do not open a single .cpp file only.
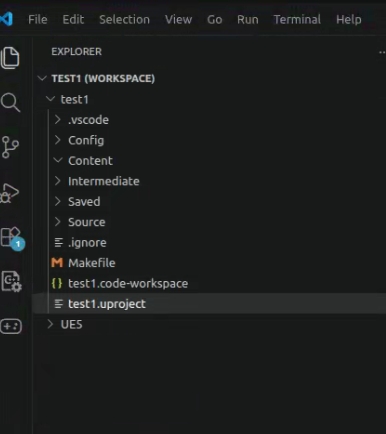
Open the generated .code-workspace to load the Unreal Engine C++ project configuration
4. Create a C++ Project
4.1 Start Unreal Engine
Run from the terminal:
"/[UE_ROOT]/Engine/Binaries/Linux/UnrealEditor"
Example:
"/home/alice/Unreal/Engines/UnrealEngine/Engine/Binaries/Linux/UnrealEditor"
4.2 Project Browser Settings
In the Unreal Project Browser:
Select Games;
Select Blank;
Set Project Defaults to C++;
Set Target Platform to Desktop;
For Quality Preset, select Scalable for a first test, or Maximum on a high-performance workstation;
Select Starter Content as needed;
Enter the project location:
/home/[USER]/Unreal/ProjectsEnter the project name:
[PROJECT_NAME]Click Create.
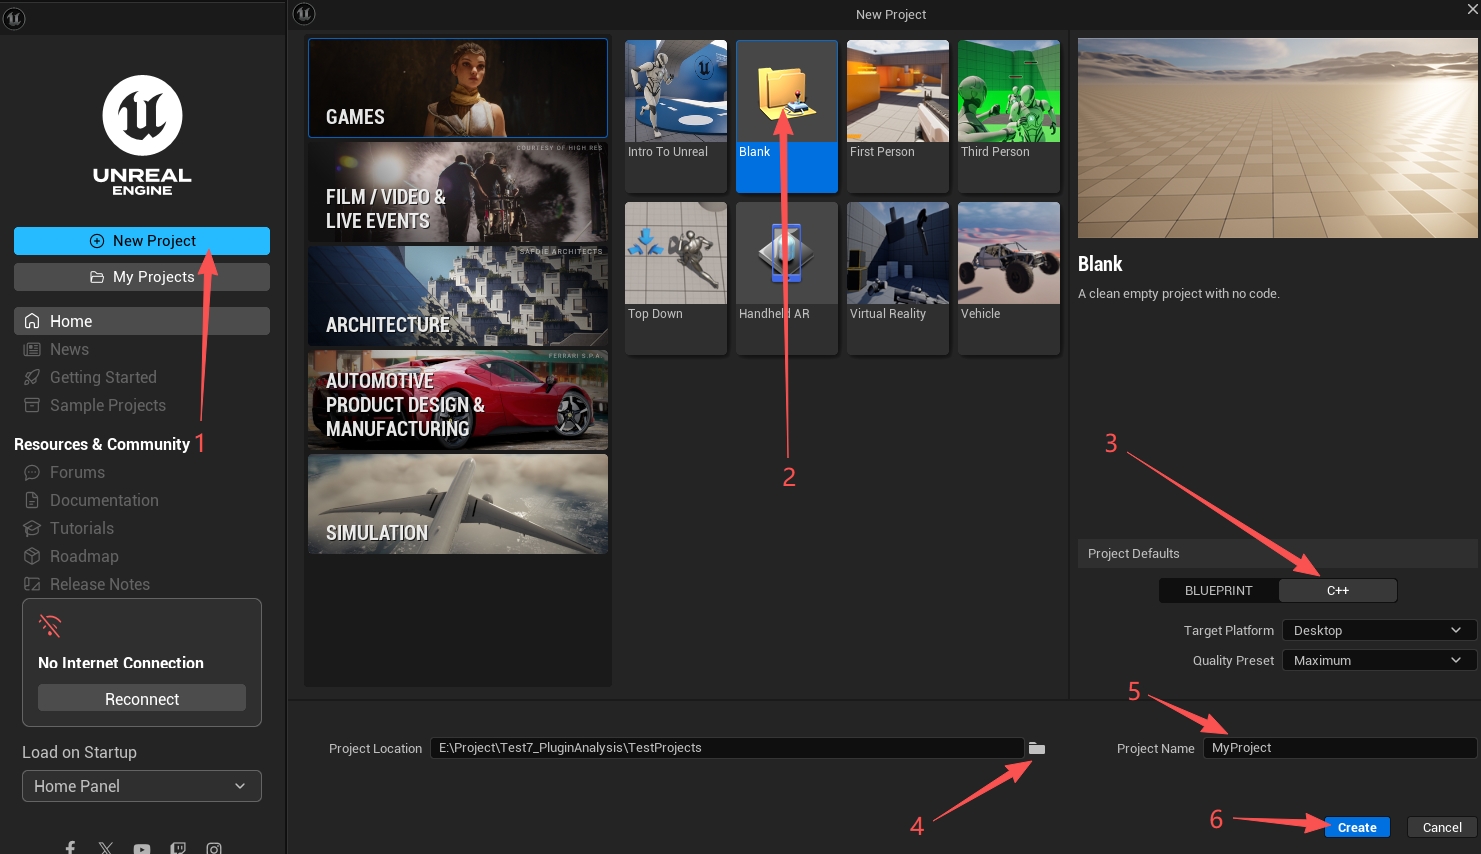
Select the Blank template in the Games category and set the project type to C++
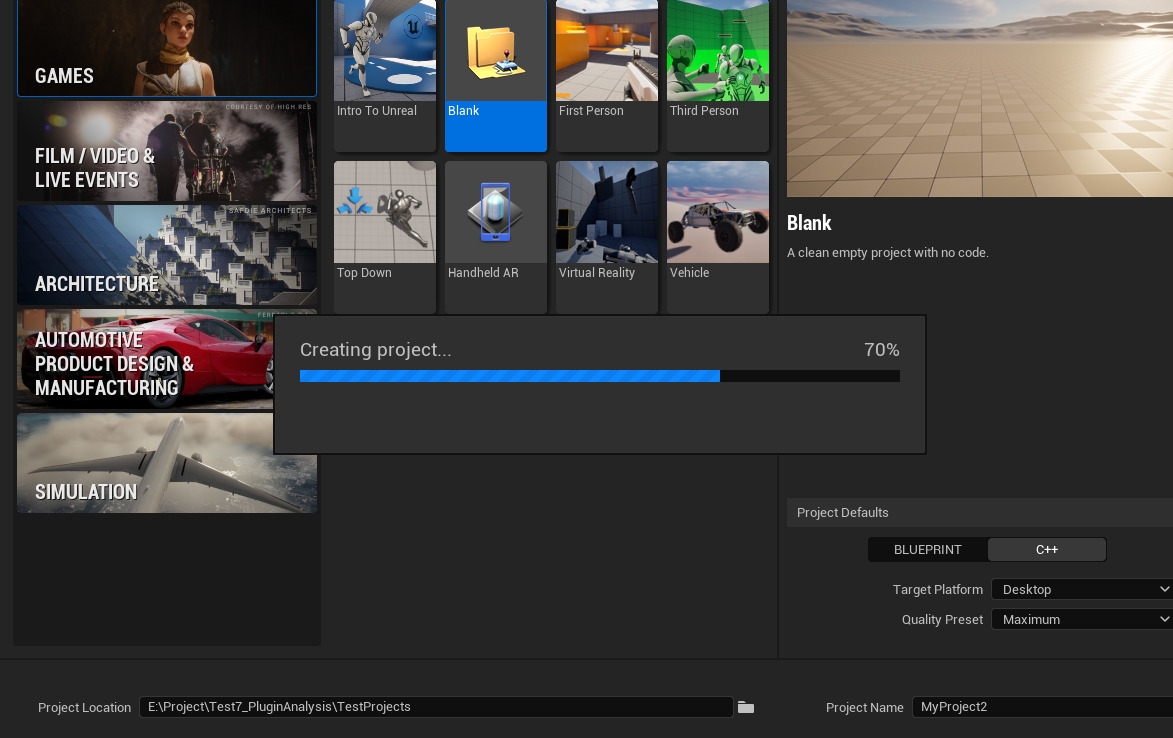
Set the project location, name, and platform options, then create the C++ project
For the project name and path, use only:
- English letters;
- Digits;
- Underscores.
Do not use Chinese characters, spaces, &, brackets, or other special characters.
4.3 Prebuilt and Source Builds Behave Differently Here
Case A: Prebuilt Version (Installed Build)
The usual flow is:
create project → auto-compile <ProjectName>Editor → open VS Code → open the new project editor
The old project browser window closes briefly, because Unreal Engine starts an editor process that loads the new .uproject.
Case B: Source Build
The usual flow is:
create project → generate Source/, Makefile, .vscode/ → close project browser → open VS Code
A source build of Unreal Engine may not build and open the new project automatically, and instead expects the developer to compile it first in the IDE or terminal. This is not a VS Code configuration error and does not mean project creation failed.
At this point the project normally contains only:
.vscode/
Config/
Content/
Intermediate/
Saved/
Source/
Makefile
[PROJECT_NAME].code-workspace
[PROJECT_NAME].uproject
Not yet present:
Binaries/Linux/
This means the project modules have not been compiled.
5. First Compile Without the Plugin
Compile the blank project once without LCC4Unreal installed to confirm Unreal Engine, the toolchain, and the project itself work.
5.1 Compile with VS Code (recommended)
- Generate and open
<ProjectName>.code-workspaceas described in section 3.2; - Open Run and Debug in the VS Code sidebar;
- Select
<ProjectName>Editor (Development)in the configuration list at the top; - Click the launch button to run the first compile;
- Wait for the build to finish and confirm there are no C++ compilation errors. A long first build is normal.
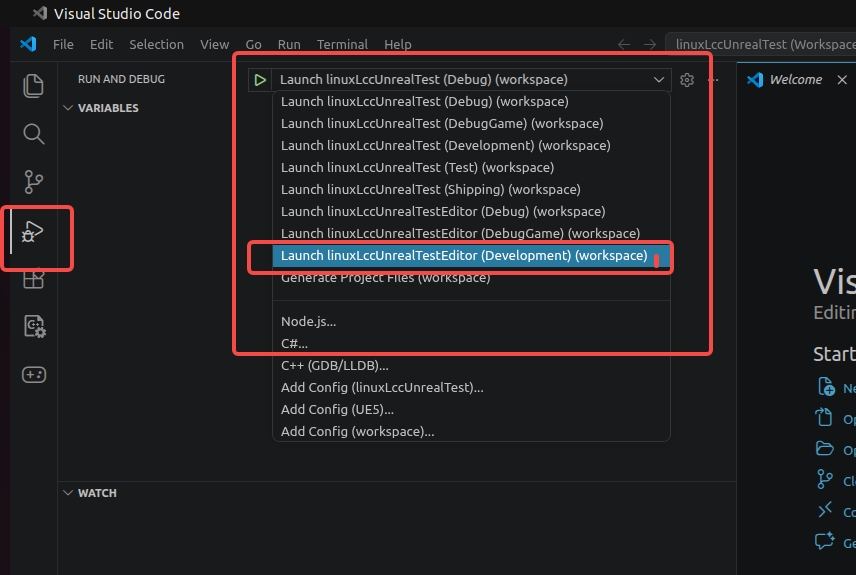
Select the <ProjectName>Editor (Development) configuration and complete the first C++ compile of the project
After a successful build, VS Code can launch the project editor directly.
5.2 Optional: Use the Project Makefile
cd "/[UE_PROJECTS_DIR]/[PROJECT_NAME]"
make "[PROJECT_NAME]Editor"
Example:
cd "/home/alice/Unreal/Projects/Test2"
make "Test2Editor"
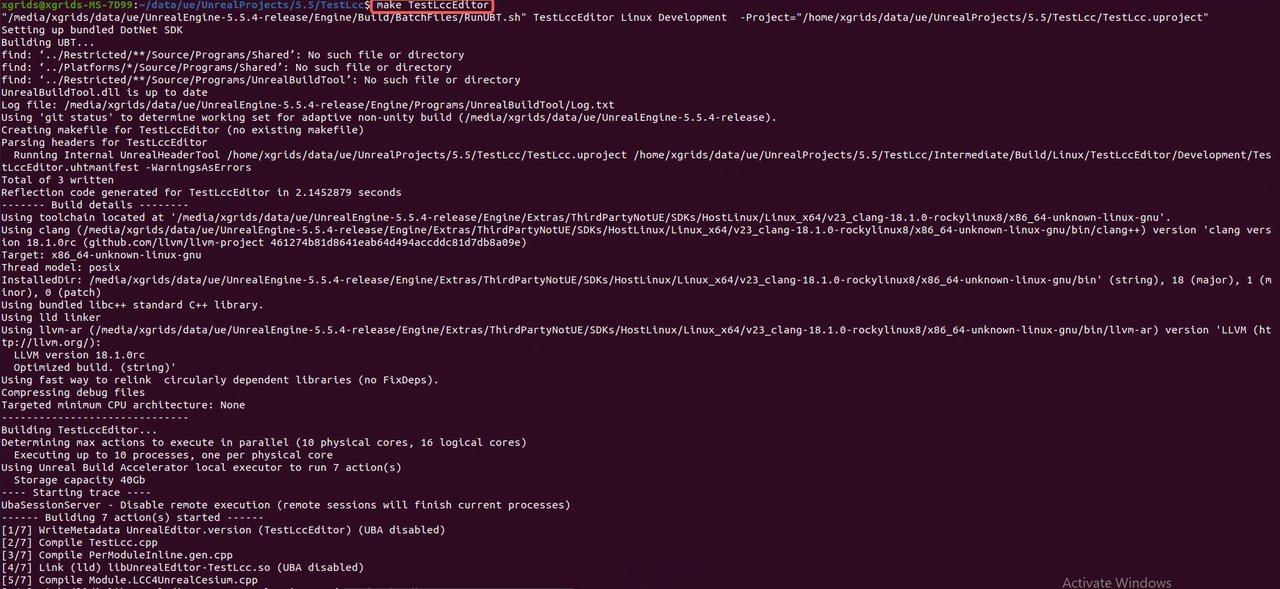
Compile the <ProjectName>Editor target through the project Makefile
5.3 Open the Project After a Successful Compile
Graphical method: find <ProjectName>.uproject in the file manager, right-click it, and select Open With Unreal Engine Editor. This method applies when the system already associates the target Unreal Engine version correctly.
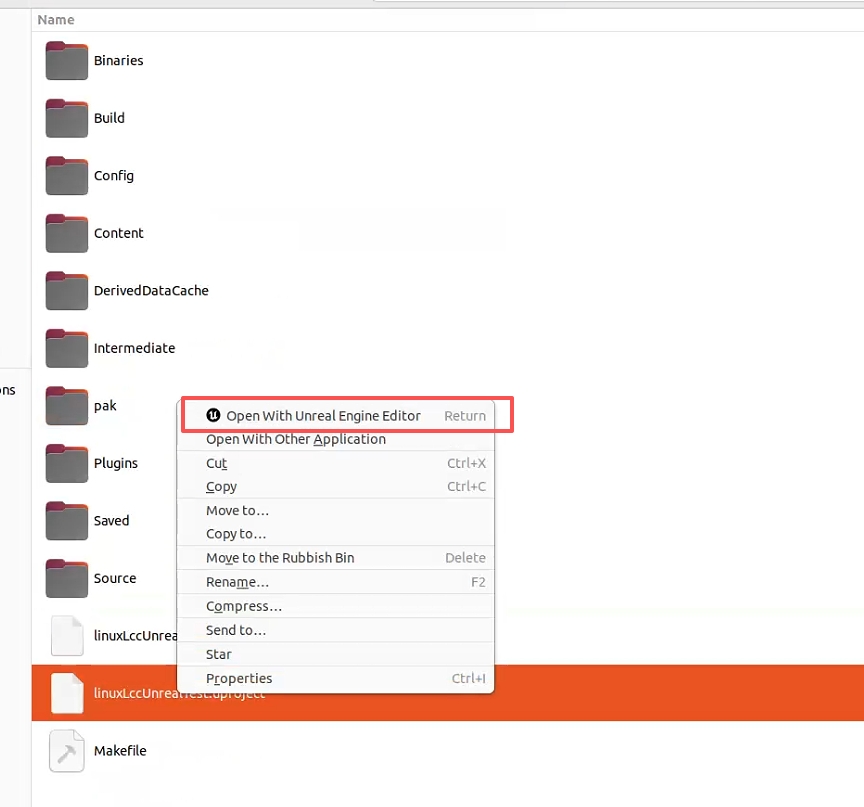
Right-click the project .uproject file and select to open it with Unreal Engine Editor
Command line method: specify the full paths of both UnrealEditor and the .uproject. This is the more reliable way to open a project when multiple Unreal Engine versions coexist:
"/[UE_ROOT]/Engine/Binaries/Linux/UnrealEditor" "/[UE_PROJECTS_DIR]/[PROJECT_NAME]/[PROJECT_NAME].uproject"
Example:
"/home/alice/Unreal/Engines/UnrealEngine/Engine/Binaries/Linux/UnrealEditor" "/home/alice/Unreal/Projects/Test2/Test2.uproject"
Once the project opens in the editor, close the editor and continue with the plugin installation.
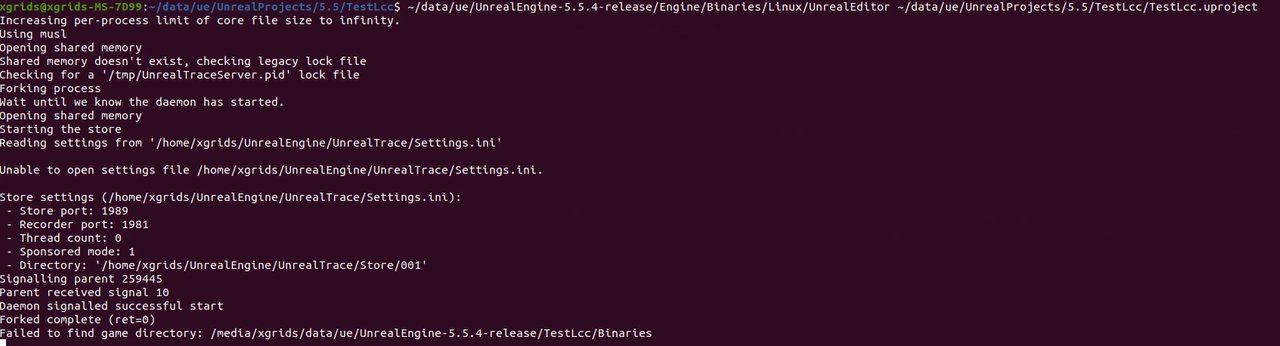
Load the project with the specified Unreal Engine version
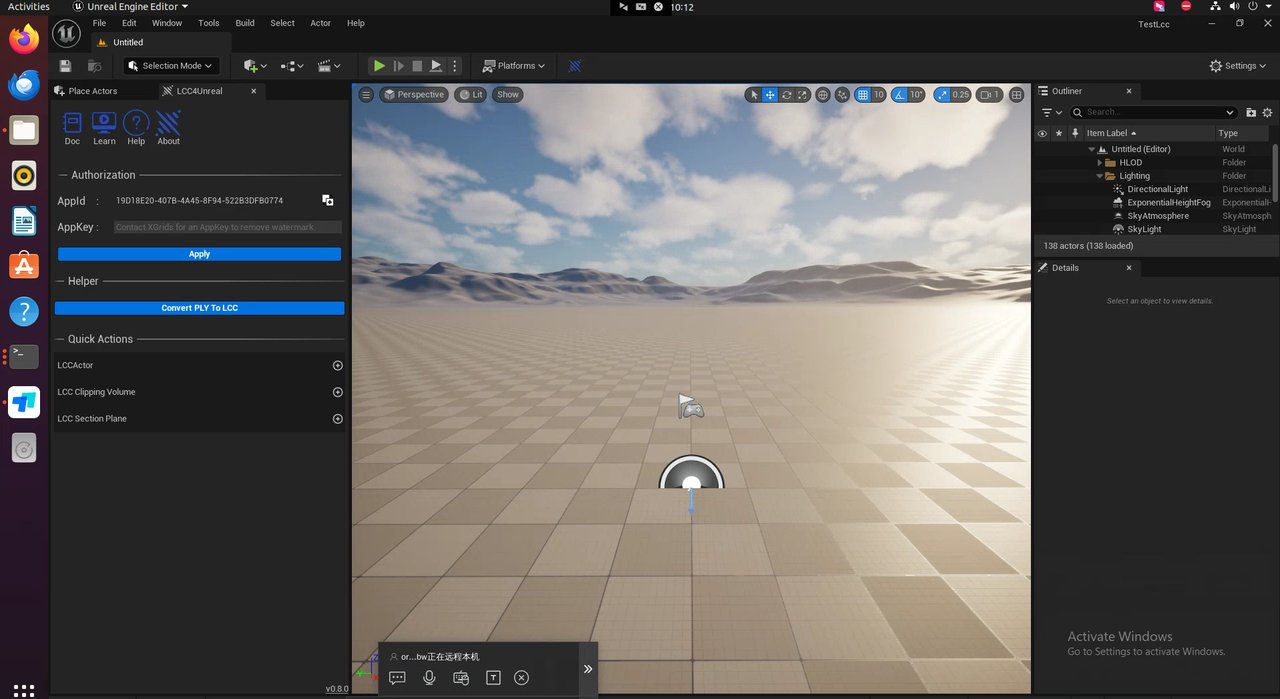
The blank C++ project compiles successfully and opens in the Unreal Engine editor
6. Install LCC4Unreal
The Linux version of the plugin is not currently available for download on the developer platform and must be requested by email. Send a request to sdk@xgrids.com with the following template:
- Company name:
- Use case: intended use of the plugin
- Engine version: which Unreal Engine version is needed
- How you found us: where you learned about the plugin
6.1 Close Related Programs
Before copying the plugin:
- Save the project;
- Close the Unreal Engine editor;
- Wait for the UnrealEditor background process to exit;
- VS Code can stay open, but do not build the project at the same time.
Check whether UnrealEditor is still running:
pgrep -a UnrealEditor
No output means the editor has exited.
6.2 Copy the Complete Plugin into the Project
Create a
Pluginsdirectory in the project root:mkdir -p "/[UE_PROJECTS_DIR]/[PROJECT_NAME]/Plugins"Example: mkdir -p "/home/alice/Unreal/Projects/Test2/Plugins"
Extract the downloaded plugin package and copy the complete
LCC4Unrealfolder into the project. The final directory must be:[PROJECT_ROOT]/Plugins/LCC4Unreal/Do not copy only
Binaries,Content, or individual files, and do not create a duplicated nested directory such asPlugins/LCC4Unreal/LCC4Unreal/.Confirm the plugin descriptor file exists. The directory must contain:
[PROJECT_ROOT]/Plugins/LCC4Unreal/LCC4Unreal.upluginIf the actual
.upluginfile name changes between release packages, confirm it sits directly underPlugins/LCC4Unreal/and not one level deeper.
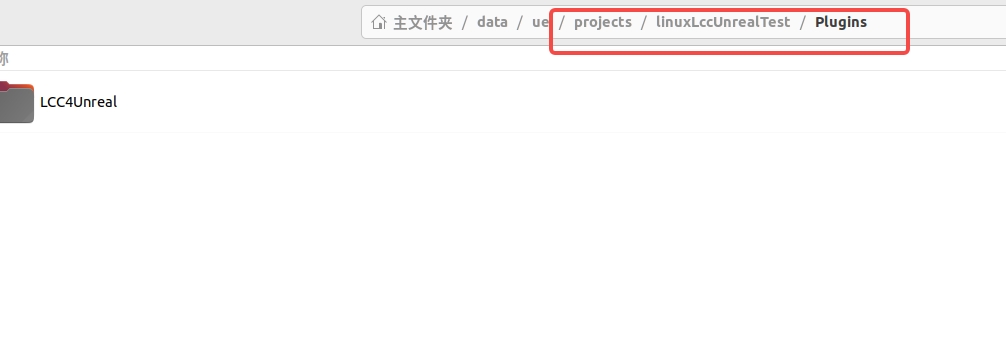
Copy the complete LCC4Unreal folder to [PROJECT_ROOT]/Plugins/LCC4Unreal and check the .uplugin file
6.3 Restart the Project
"/[UE_ROOT]/Engine/Binaries/Linux/UnrealEditor" "/[UE_PROJECTS_DIR]/[PROJECT_NAME]/[PROJECT_NAME].uproject"
Example:
"/home/alice/Unreal/Engines/UnrealEngine/Engine/Binaries/Linux/UnrealEditor" "/home/alice/Unreal/Projects/Test2/Test2.uproject"
This command specifies both which Unreal Engine to use and which project to open. When multiple Unreal Engine versions coexist, it is more reliable than double-clicking the .uproject and does not require registering one version as the global default.
6.4 What to Do When a Rebuild Prompt Appears
The prompt looks like:
The following modules are missing or built with a different engine version.
Would you like to rebuild them now?
It means the project dynamic libraries do not exist or do not match the current Unreal Engine version.
- Select Yes/Rebuild when the full Unreal Engine root path in the command is confirmed correct;
- Finishing quickly and opening the editor normally indicates an incremental build of the project modules;
- If the prompt appears every time, check whether a different engine is used each time, whether
Binaries/Linuxis writable, and whether the system time is correct; - In a multi-engine environment, dismiss the prompt first and then build explicitly with the
Build.shcommand in section 13.
7. Choose the Right Actor for the Data Format
Different data formats require the matching Actor:
| Data format | Actor to search for in Unreal Engine | C++ class name |
|---|---|---|
.lcc2 | LCC2Actor | ALCC2Actor |
.lcc | LCC Actor | ALCCActor |
.sog | SogActor | ASogActor |
.spz | SpzActor | ASpzActor |
.ply | PlyActor | APlyActor |
The steps below use .lcc2 data and LCC2Actor as the example. For other formats, use the matching Actor from the table.
7.1 Add LCC2Actor and Load Data
Click to add
LCC2Actorin the LCC4Unreal panel.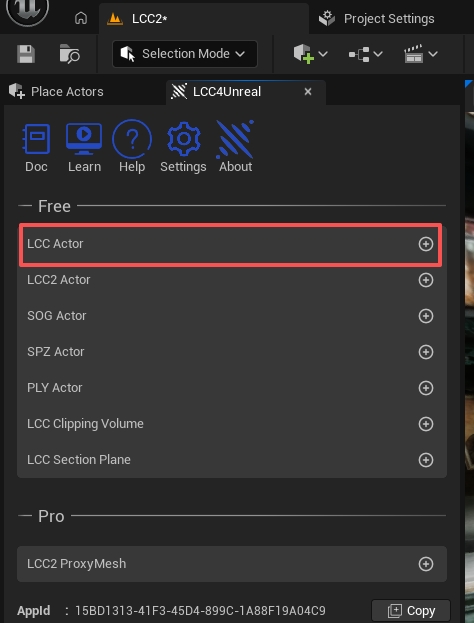
Add LCC2Actor in the LCC4Unreal panel to match the .lcc2 data format
Select
LCC2Actorin the World Outliner;Find Actions in the Details panel;
Click Load;
Select the
.lcc2data file.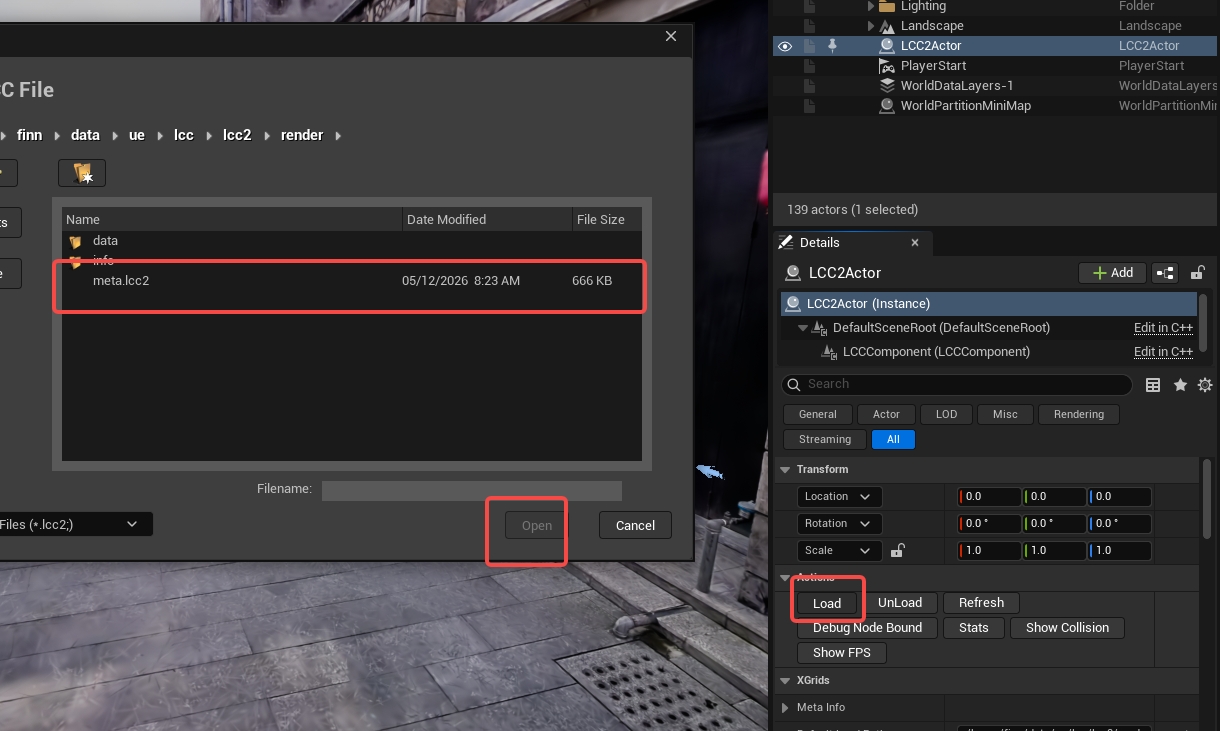
Load the .lcc2 data file from the Details panel of LCC2Actor
Wait for the data to finish loading.
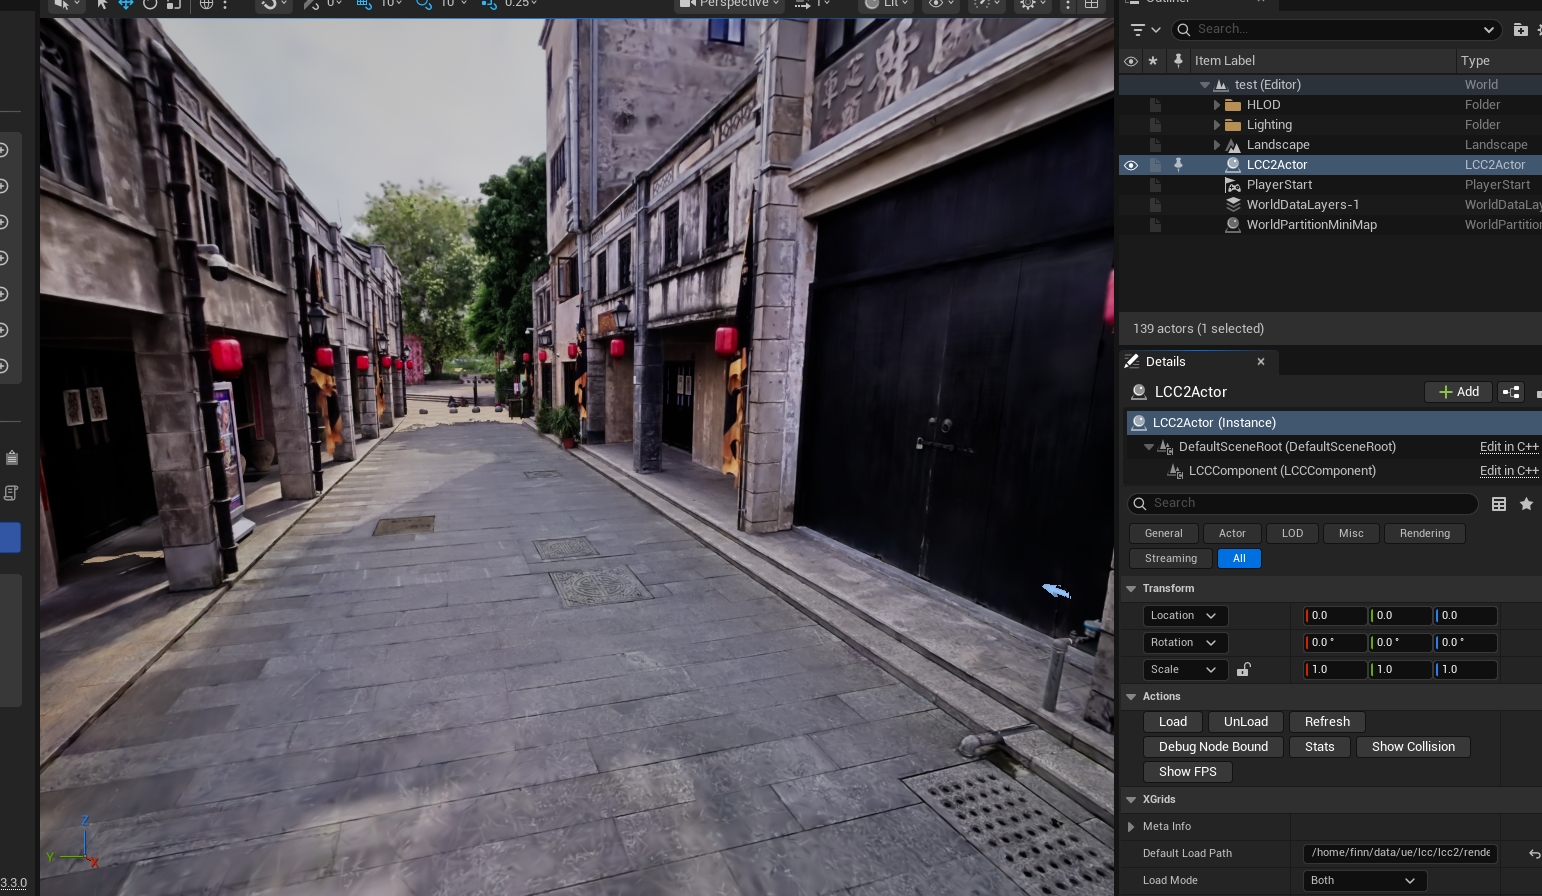
The .lcc2 data appears in the Unreal Engine viewport once loading finishes
The editor may become temporarily unresponsive while loading large data. Watch memory, video memory, and the Output Log instead of force-closing it immediately.
8. Include Non-Asset LCC Data in Packaging
.lcc2, .lcc, .sog, .spz, and .ply are normally not Unreal Engine .uasset files. Placing the files in Content alone does not include them in the installation package.
Recommended directory:
/[UE_PROJECTS_DIR]/[PROJECT_NAME]/Content/LCCData/
Open:
Edit → Project Settings → Packaging
Find:
Additional Non-Asset Directories To Copy
Add:
LCCData
Two non-asset directory settings are available under Packaging:
| Setting | Data form | Use case |
|---|---|---|
Additional Non-Asset Directories To Copy | Copied into the packaged output as plain files | Data stays visible and replaceable in the output directory |
Additional Non-Asset Directories To Package | Packed into the pak file | Data ships inside the pak instead of being exposed as separate files |
Note: when using
Additional Non-Asset Directories To Packageto pack data into the pak file, collision data cannot be loaded correctly. This is a known issue in the current version and will be fixed in the next release. UseAdditional Non-Asset Directories To Copywhen collision is needed.The value to enter is a top-level directory name under Content (e.g.
LCCData), not a file path. Do not includeContent/prefix or specific file names.
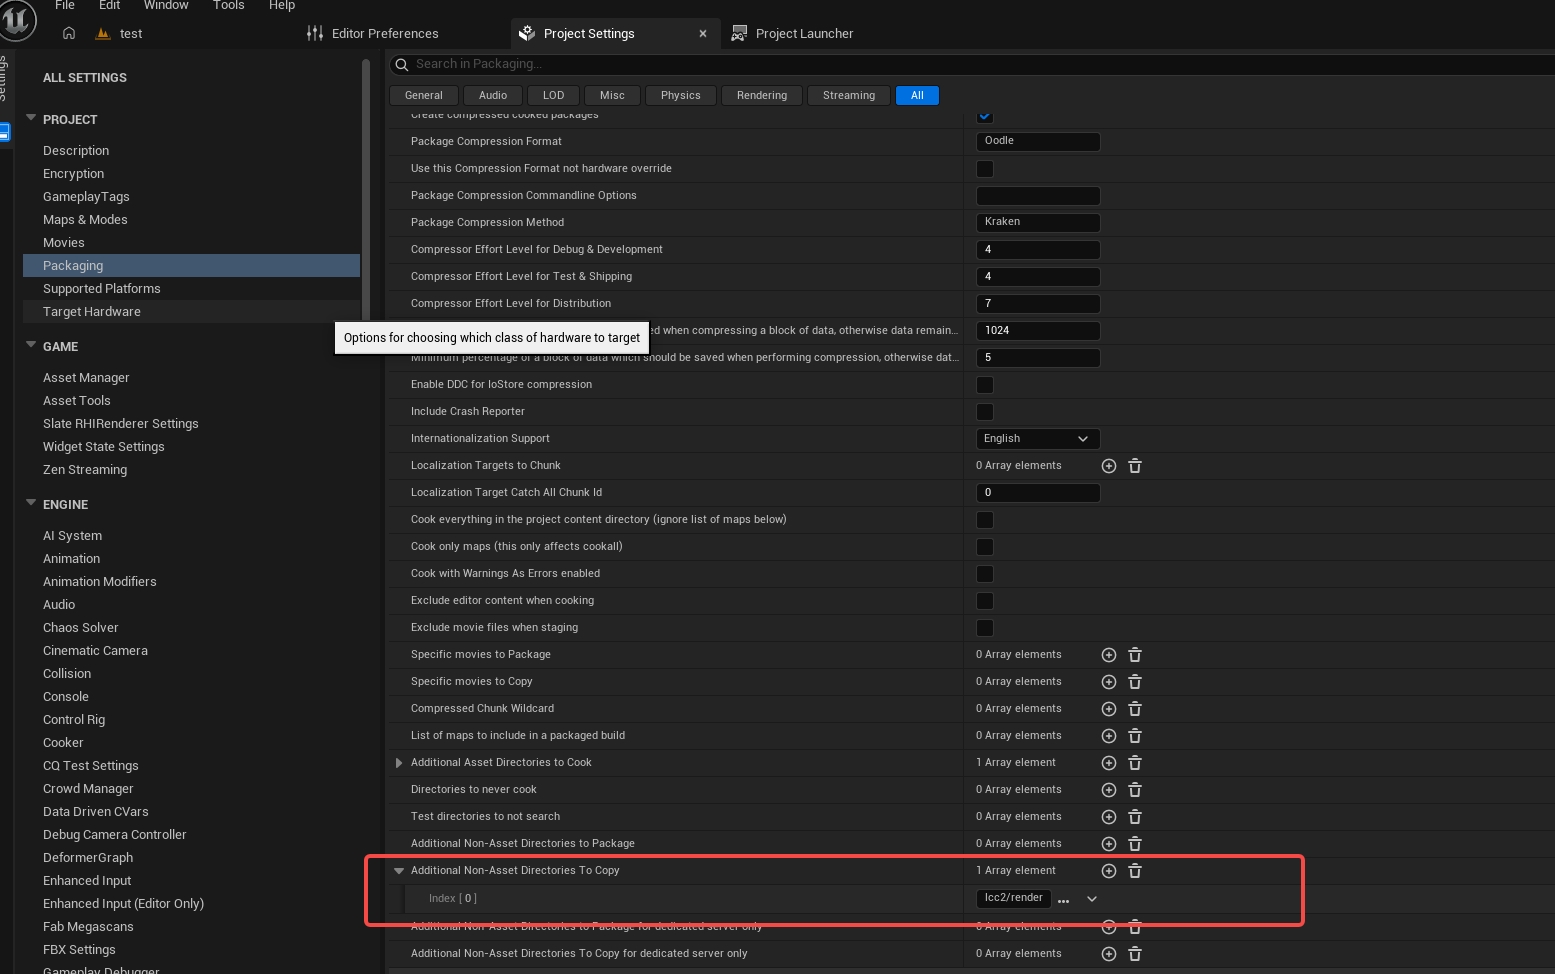
Configure Content/LCCData as a non-asset directory copied during packaging
Then make sure the relative path loaded by the LCC Actor or LCC2Actor matches the packaged directory.
8.1 Set the Startup Map
Open:
Edit → Project Settings → Maps & Modes
Under Default Maps, set Game Default Map to the target level that contains the LCC Actor/LCC2Actor and the configured data path. Save the level and the project configuration afterwards, so the packaged application does not start in a blank map.
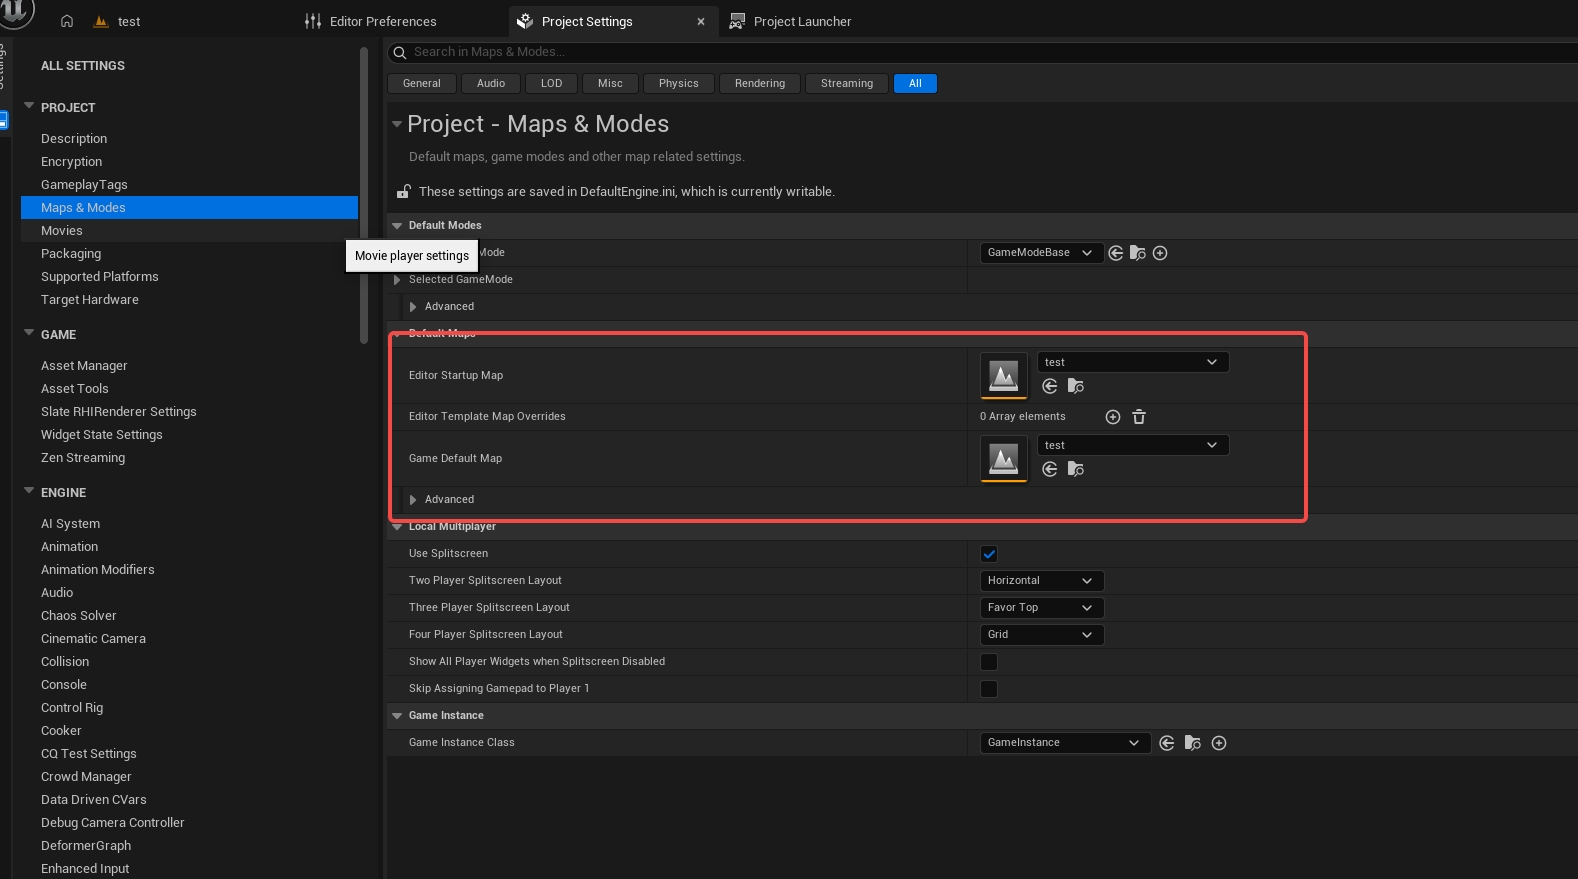
Set the Game Default Map used at startup of the packaged application under Default Maps in Maps & Modes
9. Pre-Packaging Checklist
Confirm each item before packaging:
- [ ] The correct Unreal Engine version is used;
- [ ] The LCC4Unreal plugin package matches the Unreal Engine version and the Linux architecture;
- [ ]
<ProjectName>Editor Linux Developmentcompiles successfully; - [ ] The plugin is enabled;
- [ ] The Pro license is valid (required only when Pro edition features are used, see Editions and Licensing);
- [ ] The LCC data is visible in editor Play;
- [ ]
Game Default Mapis set; - [ ] The data to package is added to Additional Non-Asset Directories To Copy;
- [ ] The disk has enough space;
- [ ] The output directory is writable;
- [ ] All levels and assets are saved;
- [ ] Build a Development package first, then try Shipping after it succeeds.
10. Package for Linux with Project Launcher
10.1 Open Project Launcher
In the Unreal Engine editor, select:
Platforms → Project Launcher
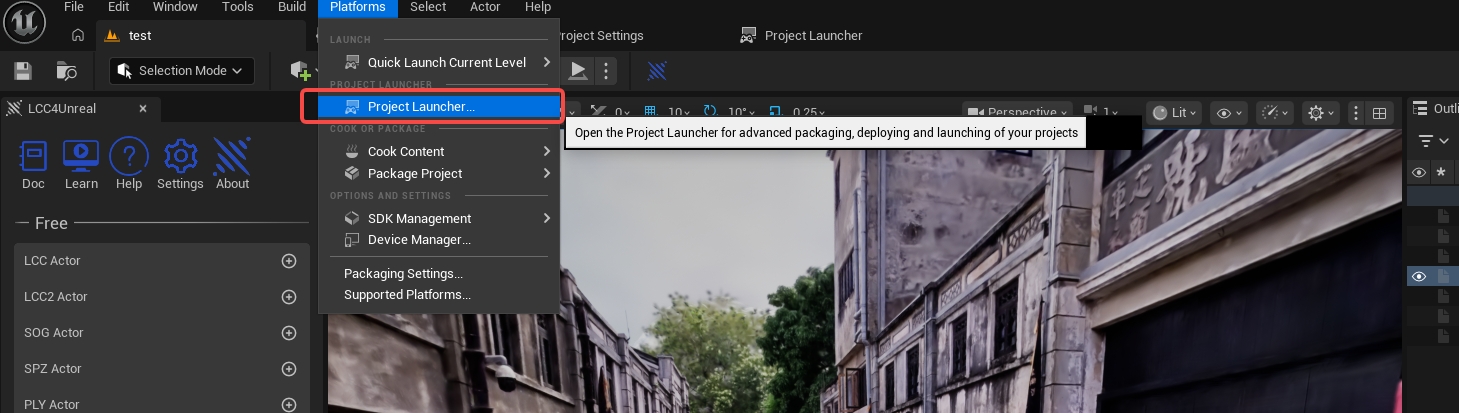
Open Project Launcher from the Platforms menu
Click:
Add → Create Custom Profile

Create the Linux packaging profile through Add → Create Custom Profile
10.2 Configure the Profile
In the custom profile, select Linux as the target platform and set the content packaging scheme to Pak file;
Enable archiving of the build result and select a writable archive directory. That directory is where the distributable version is actually saved after packaging.
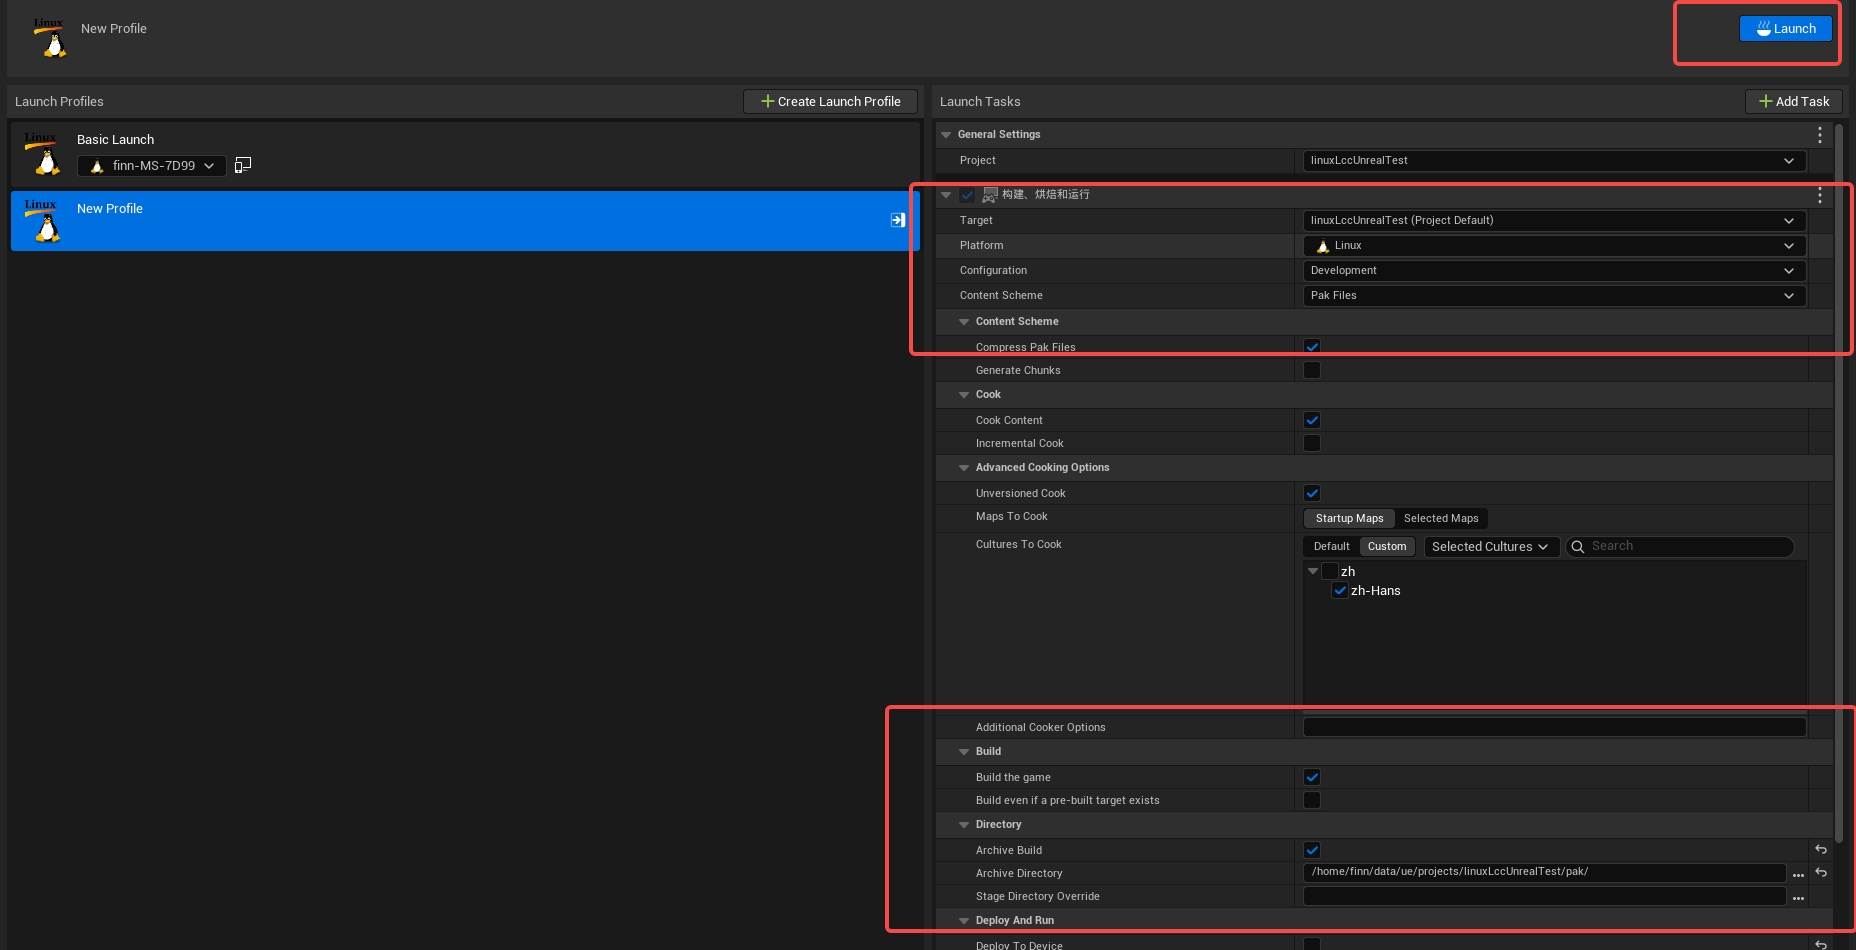
Set the target platform to Linux, select Pak file, enable archiving, and specify the packaging output directory
Click the launch icon to the right of the custom profile.
Packaging normally includes:
Build → Cook → Stage → Package → Archive
The first packaging run is slower than an incremental one. Do not force-stop it because it stays at one percentage for a short while. On success, output similar to the following appears:
BUILD SUCCESSFUL
10.3 If It Keeps Showing "Querying"
Check the following in order:
- Wait for Unreal Engine to finish platform and SDK detection;
- Open Window → Developer Tools → Output Log;
- Search for
Turnkey,SDK,Linux,Error; - Confirm the current host is Linux and the target platform is also Linux;
- Confirm the dependencies and toolchain of a source build of Unreal Engine were installed by
Setup.sh; - Confirm
SetupToolchain.shwas run for the prebuilt version; - Close duplicated Project Launcher windows and reopen it;
- Do not build the same project in another terminal at the same time.
11. Package from the Command Line (optional)
Once graphical packaging is stable, RunUAT can be used:
mkdir -p "/[UE_PROJECTS_DIR]/[PROJECT_NAME]/Packaged"

"/[UE_ROOT]/Engine/Build/BatchFiles/RunUAT.sh" BuildCookRun \
  -project="/[UE_PROJECTS_DIR]/[PROJECT_NAME]/[PROJECT_NAME].uproject" \
  -noP4 \
  -targetplatform=Linux \
  -clientconfig=Development \
  -build \
  -cook \
  -stage \
  -pak \
  -archive \
  -archivedirectory="/[UE_PROJECTS_DIR]/[PROJECT_NAME]/Packaged"
Example:
mkdir -p "/home/alice/Unreal/Projects/Test2/Packaged"

"/home/alice/Unreal/Engines/UnrealEngine/Engine/Build/BatchFiles/RunUAT.sh" BuildCookRun \
  -project="/home/alice/Unreal/Projects/Test2/Test2.uproject" \
  -noP4 \
  -targetplatform=Linux \
  -clientconfig=Development \
  -build \
  -cook \
  -stage \
  -pak \
  -archive \
  -archivedirectory="/home/alice/Unreal/Projects/Test2/Packaged"
With -archive and -archivedirectory, look for the final runnable version in the specified archive directory instead of assuming it sits in Saved/StagedBuilds/Linux.
If the project uses specific maps, add map restrictions according to the project settings and the command parameters of the current Unreal Engine. Beginners should use Project Launcher first, to avoid incomplete packages caused by missing command parameters.
12. Run the Packaged Result
12.1 Run the Archived Result
If archiving was enabled in Project Launcher, or RunUAT used -archive -archivedirectory="...", go to the archive directory that was actually configured. Different Unreal Engine versions may create an additional Linux subdirectory there, so locate the project launch script first and then run it:
cd "/[ARCHIVE_DIR]"
find . -maxdepth 3 -type f -name "*.sh" -print

chmod +x "./[SUBDIR]/[PROJECT_NAME].sh"
"./[SUBDIR]/[PROJECT_NAME].sh"
Example (archived result in Packaged/Linux):
cd "/home/alice/Unreal/Projects/Test2/Packaged"
find . -maxdepth 3 -type f -name "*.sh" -print
chmod +x "./Linux/Test2.sh"
"./Linux/Test2.sh"
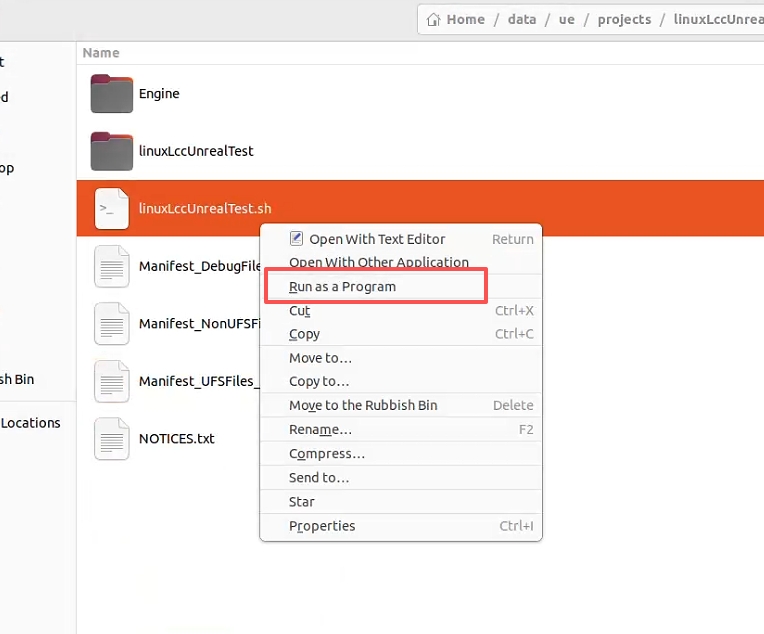
Enter the archive directory configured in Project Launcher or RunUAT and launch the project script
12.2 Run the Unarchived Staged Output
Run from the following directory only when archiving was not performed and the staged result needs to be checked directly:
cd "/[UE_PROJECTS_DIR]/[PROJECT_NAME]/Saved/StagedBuilds/Linux"
chmod +x "./[PROJECT_NAME].sh"
"./[PROJECT_NAME].sh"
Example:
cd "/home/alice/Unreal/Projects/Test2/Saved/StagedBuilds/Linux"
chmod +x "./Test2.sh"
"./Test2.sh"
Check after running:
- It starts;
- The default map is correct;
- The LCC data is visible;
- No lingering processes remain after the application is closed.
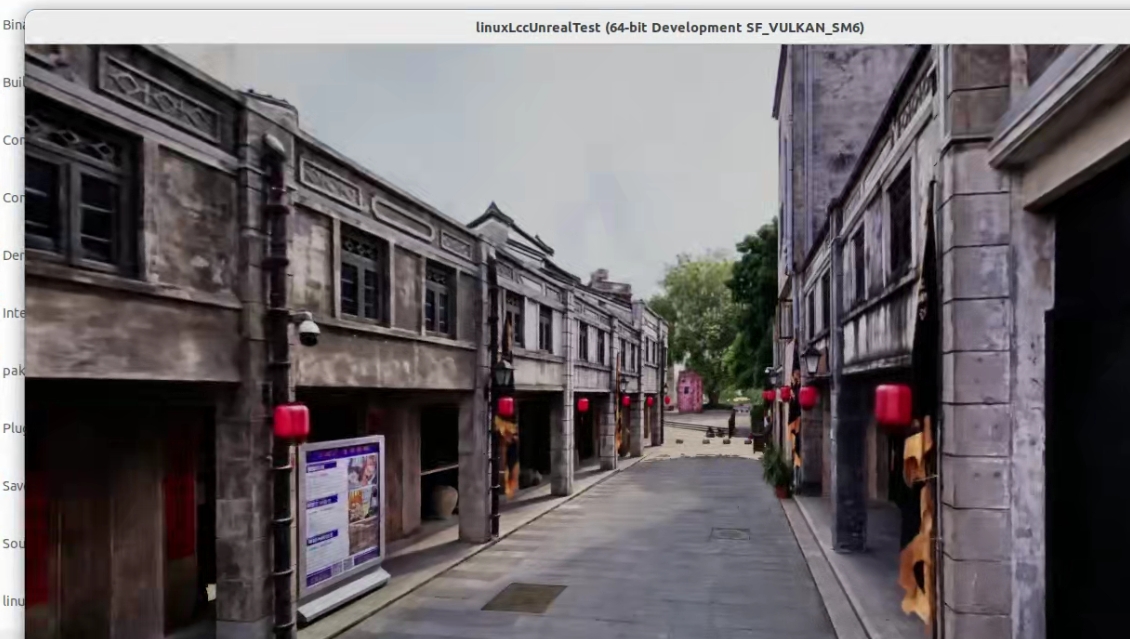
Launch the packaged Linux application and verify the default map, the LCC data, and the licensed features
13. Command Reference
[UE_ROOT], [UE_PROJECTS_DIR], [PROJECT_NAME], and [ARCHIVE_DIR] in the commands below are placeholders. Replace them with the actual full paths and names before running.
Start the project browser:
"/[UE_ROOT]/Engine/Binaries/Linux/UnrealEditor"
Example:
"/home/alice/Unreal/Engines/UnrealEngine/Engine/Binaries/Linux/UnrealEditor"
Generate VS Code project files:
"/[UE_ROOT]/GenerateProjectFiles.sh" \
  -vscode \
  -project="/[UE_PROJECTS_DIR]/[PROJECT_NAME]/[PROJECT_NAME].uproject" \
  -game \
  -engine
Example:
"/home/alice/Unreal/Engines/UnrealEngine/GenerateProjectFiles.sh" \
  -vscode \
  -project="/home/alice/Unreal/Projects/Test2/Test2.uproject" \
  -game \
  -engine
Compile the project Editor target:
"/[UE_ROOT]/Engine/Build/BatchFiles/Linux/Build.sh" \
  "[PROJECT_NAME]Editor" Linux Development \
  -Project="/[UE_PROJECTS_DIR]/[PROJECT_NAME]/[PROJECT_NAME].uproject" \
  -WaitMutex
Example:
"/home/alice/Unreal/Engines/UnrealEngine/Engine/Build/BatchFiles/Linux/Build.sh" \
  "Test2Editor" Linux Development \
  -Project="/home/alice/Unreal/Projects/Test2/Test2.uproject" \
  -WaitMutex
Open a specific project with a specific Unreal Engine:
"/[UE_ROOT]/Engine/Binaries/Linux/UnrealEditor" "/[UE_PROJECTS_DIR]/[PROJECT_NAME]/[PROJECT_NAME].uproject"
Example:
"/home/alice/Unreal/Engines/UnrealEngine/Engine/Binaries/Linux/UnrealEditor" "/home/alice/Unreal/Projects/Test2/Test2.uproject"
Run the archived result:
cd "/[ARCHIVE_DIR]"
find . -maxdepth 3 -type f -name "*.sh" -print
chmod +x "./[SUBDIR]/[PROJECT_NAME].sh"
"./[SUBDIR]/[PROJECT_NAME].sh"
Run the unarchived staged output:
cd "/[UE_PROJECTS_DIR]/[PROJECT_NAME]/Saved/StagedBuilds/Linux"
chmod +x "./[PROJECT_NAME].sh"
"./[PROJECT_NAME].sh"
Example (unarchived staged output):
cd "/home/alice/Unreal/Projects/Test2/Saved/StagedBuilds/Linux"
chmod +x "./Test2.sh"
"./Test2.sh"