
Generating a Navigation Mesh in a 3DGS Scene
Navigation System Support
Scope
This document targets scenes that build navigation from LCC collision data, so it applies only to ALCCActor and ALCC2Actor: only the .lcc and .lcc2 formats ship collision data, see Collision.
.sog, .spz, and .ply contain no collision data, so walkable areas have to be built manually with Blocking Volumes or an approximate mesh. Such geometry consists of standard UE objects, and navigation is configured through the official Unreal Engine workflow, which does not involve the specifics of this document.
Overview
The Navigation System of Unreal Engine provides walkable areas for AI characters through a NavMesh. NavMesh generation relies on geometry in the scene that can affect navigation and has valid collision.
LCC collision is loaded dynamically in chunks: only the collision chunks within a certain range around the camera are loaded, and they are swapped in and out as the camera moves (for the mechanism, see Collision: Loading Mechanism). This directly determines the navigation configuration strategy:
- Swapping collision chunks in and out at runtime triggers NavMesh rebuilds and causes stutter
- The collision of the target area should therefore be fully loaded in one pass before building navigation in
Staticmode
For LCC scenes, Static is the recommended Runtime Generation. Dynamic keeps responding to collision changes and rebuilding the NavMesh, which combined with chunk-loaded collision triggers rebuilds frequently and causes noticeable CPU cost and stutter in large scenes.
Prerequisites
| Condition | Description |
|---|---|
| The data contains a collision file | .lcc requires collision.lci (collision.bin in older versions); .lcc2 requires the .ply files under data/mesh/. See Collision: Prerequisites |
| Collision is enabled | bEnableCollision = true on the Actor |
| Collision data is loaded | Select player collision or visibility collision in view mode to see the loaded collision bodies |
| The Actor can affect navigation | CanEverAffectNavigation = true on the Actor |
| The collision load range is large enough | Max Load Collision Distance(m) covers the target area where navigation is needed, 300 meters by default |
| The NavMesh build bounds are large enough | A NavMeshBoundsVolume is placed in the scene and covers the target area where AI moves |
The collision load distance and
NavMeshBoundsVolumecontrol different ranges: the former decides which areas have collision data, the latter decides within which bounds the engine builds the NavMesh. Both must cover the target area for a usable NavMesh to be generated there.
Steps
1. Enable and Check LCC Collision
Select ALCCActor or ALCC2Actor and enable Enable Collision (bEnableCollision) in the Details panel, or enable it from code:
LCCComponent->SetLCCCollisionEnable(true);
At the same time confirm CanEverAffectNavigation = true on the Actor so its collision can take part in the navigation build.
After loading the LCC data, select player collision or visibility collision in view mode and check whether collision bodies have appeared in the target area. Collision uses asynchronous physics baking, so it may still take a few seconds after the 3DGS image starts rendering.
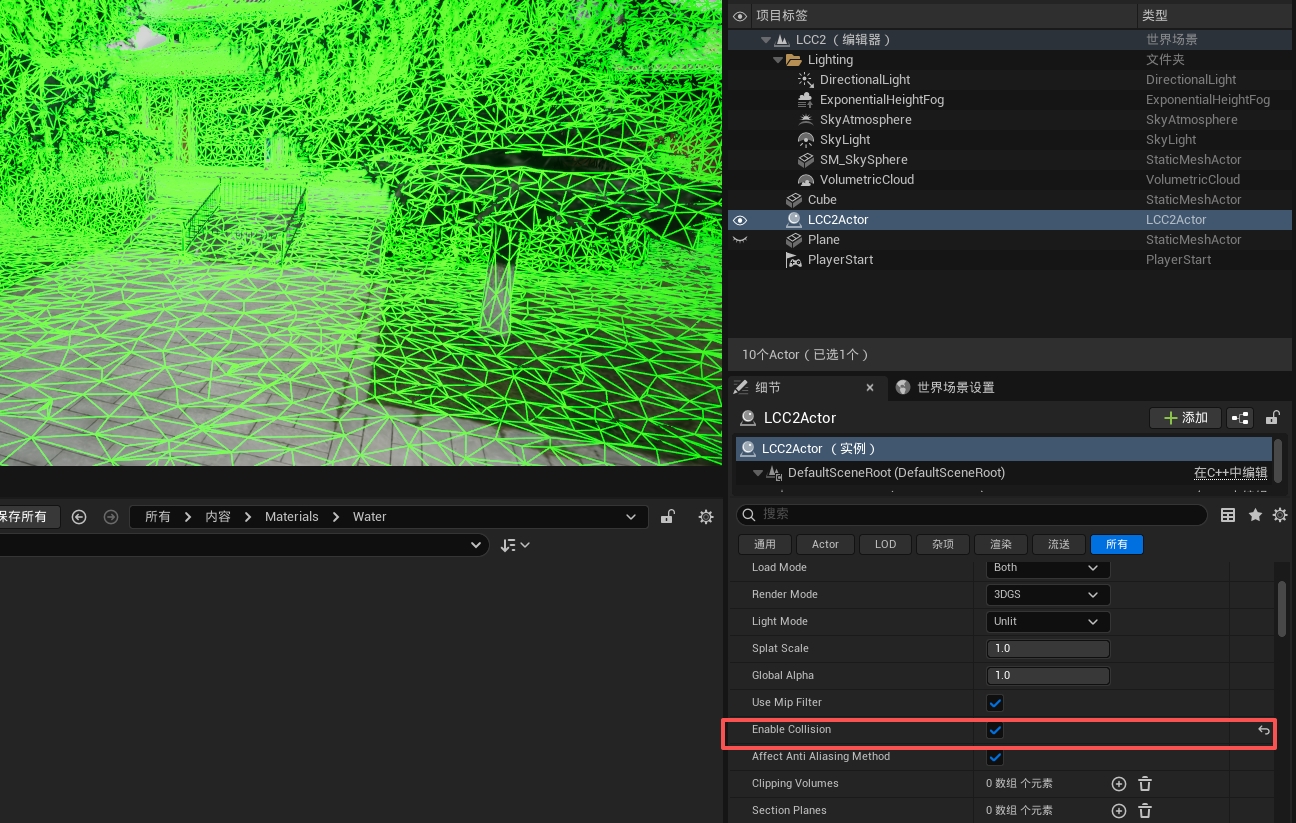
Using the player collision or visibility collision mode to confirm the LCC collision bodies in the target navigation area are loaded
2. Configure the Collision Load Range
LCC collision is loaded only within the range given by Max Load Collision Distance(m), 300 meters by default.
When used with navigation, raise this value to cover the whole AI activity area so all collision loads in one pass. Otherwise collision chunks keep being swapped in and out as the camera moves at runtime, which continually triggers NavMesh rebuilds and causes noticeable stutter. With a large enough range there are no collision changes at runtime, so navigation is never rebuilt.
The cost is a longer load time at startup and higher memory usage. Use Collision Data Usage in stat xgrids to confirm whether the memory after a full load is acceptable, see Collision: Loading All Collision at Once.
Do not change Runtime Generation to Dynamic to work around an insufficient collision distance. Dynamic does not extend the collision load range, and areas beyond that distance still have no collision available for the navigation build.
3. Place and Adjust the NavMeshBoundsVolume
Place a NavMeshBoundsVolume in the scene, then move and scale it so it covers the complete area where AI should move.
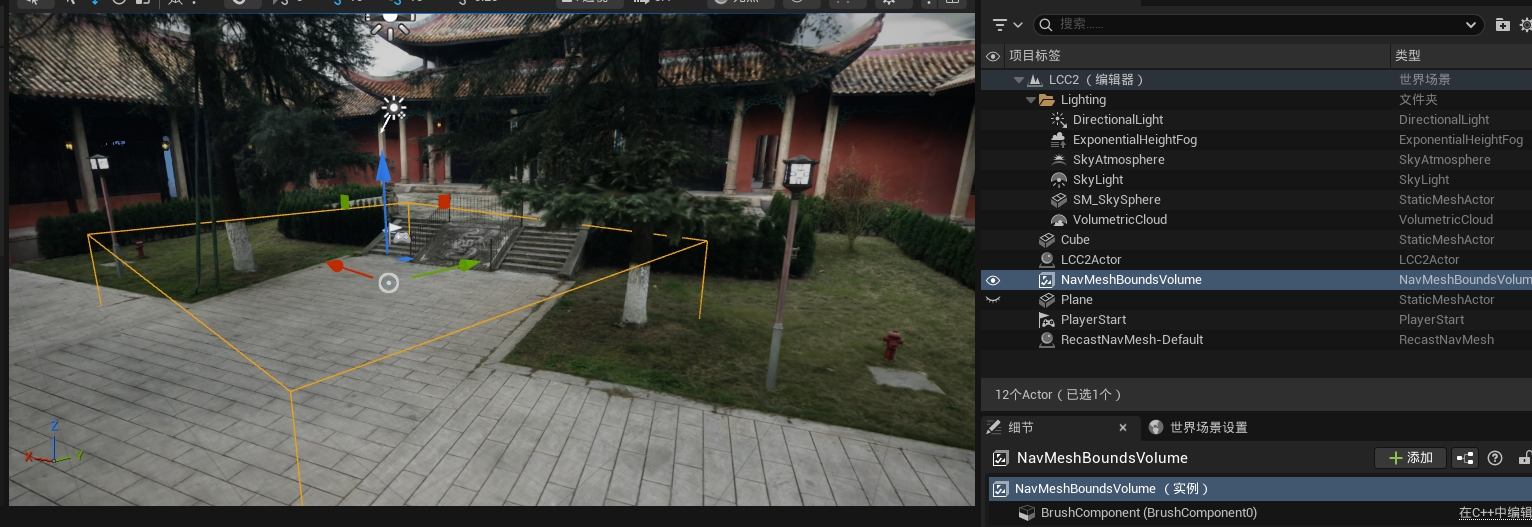
Placing and scaling the NavMeshBoundsVolume so the navigation build bounds cover the complete AI activity area
Confirm again that both ranges meet the requirement:
- Max Load Collision Distance(m): decides whether loaded LCC collision exists in the target area.
- NavMeshBoundsVolume: decides within which bounds Unreal Engine builds the NavMesh.
Extending only one of the two does not solve the area the other one fails to cover.
4. Configure the Navigation System
| Setting | Recommended value | Description |
|---|---|---|
| Runtime Generation | Static | The preferred setting. Navigation is generated only when built in the editor, avoiding the performance cost of continuous rebuilds at runtime |
| Cell Size | Default | The smaller the value, the more accurate the NavMesh, but the higher the build time, memory, and runtime cost |
When to Use Dynamic
Consider Dynamic only when the NavMesh really has to rebuild automatically as geometry changes at runtime, for example an interactive scene where walkable areas change during play.
Be especially careful with Dynamic together with LCC collision: collision itself is loaded dynamically in chunks, and every swap of a collision chunk counts as a geometry change and triggers a navigation rebuild, which can produce continuous CPU cost and stutter in large scenes. When Dynamic is really needed, also raise the collision load range to cover the whole activity area so no collision changes occur at runtime.
Do not enable Dynamic merely to extend the collision distance or the navigation coverage.
5. Wait for Collision and Build the Static NavMesh
With the recommended Static mode, follow this order:
- Load the LCC data and confirm the 3DGS image is displayed.
- Wait for the asynchronous collision baking to finish.
- Use the player collision or visibility collision mode to confirm the collision in the target area is loaded.
- Confirm both Collision Load Max Distance and
NavMeshBoundsVolumecover the target area. - Run Build → Build Paths from the main menu of Unreal Engine.
- Wait for the navigation build to finish.
- Save the level and the navigation data.
Verification and Troubleshooting
Press P to show the NavMesh in the viewport:
- Green areas: a walkable NavMesh is generated;
- No green area: no NavMesh is generated at that location, check in the order below.
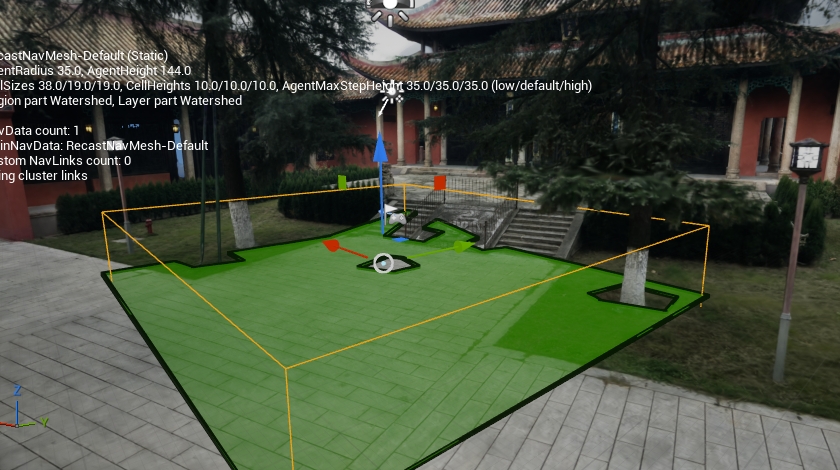
Pressing P to verify the NavMesh; green coverage means walkable navigation data is generated in that area
When there is no green NavMesh at the target location, check in order:
- Whether the data contains collision: confirm
.lccor.lcc2is used and the matching collision file exists in the data directory; single-file formats contain no collision and cannot use this workflow. - Whether collision is enabled and loaded: confirm
bEnableCollision = trueandCanEverAffectNavigation = true, and that the collision bodies at the target location are visible in the player collision or visibility collision mode. - Whether the collision load range is large enough: when the target location is beyond the load range, raise
Max Load Collision Distance(m)and wait for collision to be ready again. - Whether the NavMeshBoundsVolume covers the target location: move or scale the Volume so the navigation build bounds fully cover the target area.
- Whether the Static NavMesh was rebuilt: once collision and the ranges are confirmed, run Build → Build Paths, wait for it to finish, and save the level and the navigation data.
- Press P again to check the green coverage.
When all of the above are correct but generation still fails, check the Output Log further for Navigation, Recast, and collision related errors, and confirm the current level is saved.