XGRIDSDocs
  • 简体中文
  • English
  • 繁體中文
  • 日本語
  • Deutsch
  • Español
  • Italiano
  • 简体中文
  • English
  • 繁體中文
  • 日本語
  • Deutsch
  • Español
  • Italiano
  • PortalCam

    • Product Overview
    • Basic Operation
    • Using the LCC Scan App
    • Maintenance and Care
    • FAQ
  • Lixel K Series

    • Lixel K1

      • Product Overview
      • Basic Operation
      • Device Activation and Connection
      • Scanning Workflow
      • Acquire Point Cloud Data with Absolute Coordinate
      • Map Fusion
      • Route Planning Suggestions for Typical Scenes
      • Precautions
      • FAQ
    • Lixel K2

      • Product Overview
      • Basic Operation
      • Device Activation and Connection
      • Scanning Workflow
      • Acquire Point Cloud Data with Absolute Coordinate
      • Map Fusion
      • Route Planning Suggestions for Typical Scenes
      • Precautions
      • FAQ
  • Lixel L Series

    • Lixel L2 Pro

      • Product Overview
      • Basic Operation
      • Device Activation and Connection
      • Scanning Workflow
      • Acquire Point Cloud Data with Absolute Coordinate
      • Measure Point
      • Appendix
      • FAQ
  • Lixel Studio

    • Version and Copyright
    • Installation and Activation
    • Software Interface
    • File Operations
    • Project Processing
    • Tools
    • 2D Drawing
    • Applications
    • Settings
    • Device Connection
    • FAQ
  • Lixel CyberColor

    • LCC Studio

      • Getting Started
      • Version and Updates
      • Download and Installation
      • Interface Overview and Navigation
      • Pre-Reconstruction Work
      • Model Reconstruction
      • Single Model Reconstruction
      • Map Fusion
      • Aerial-Ground Map Fusion
      • Aerial Reconstruction
      • My Models
      • Other Features
      • Settings and Account
      • Video Reconstruction
      • FAQ
    • LCC Scene Editor

      • Version and Updates
      • Account and Sign In
      • Product Overview and Home
      • Editor Interface
      • Three Navigation Modes
      • File
      • Settings
      • Edit
      • Window
      • Global Toolbar
      • Assets and Properties
      • Left Toolbar
      • Viewpoint
      • Skybox
      • Annotation
      • Measurement
      • Flythrough
      • Scene Report
      • 3D Layout
      • Preview Mode (Viewer)
      • Help
      • FAQ
    • LCC Model Editor

      • Version and Updates
      • User Guide
      • Overview and Interface
      • File Operations
      • Selectors
      • Editing Models
      • Measurement
      • Color Grading
      • Asset Management
      • Settings and Help
      • FAQ
    • Version History

3D Layout

The 3D Layout tool supports viewing and secondary editing of indoor scenes that had Space Recognition enabled during model reconstruction.

Note:

  • Only indoor scenes with Space Recognition enabled during model reconstruction can use the 3D Layout feature
  • You must have 3D Layout permissions to access this feature
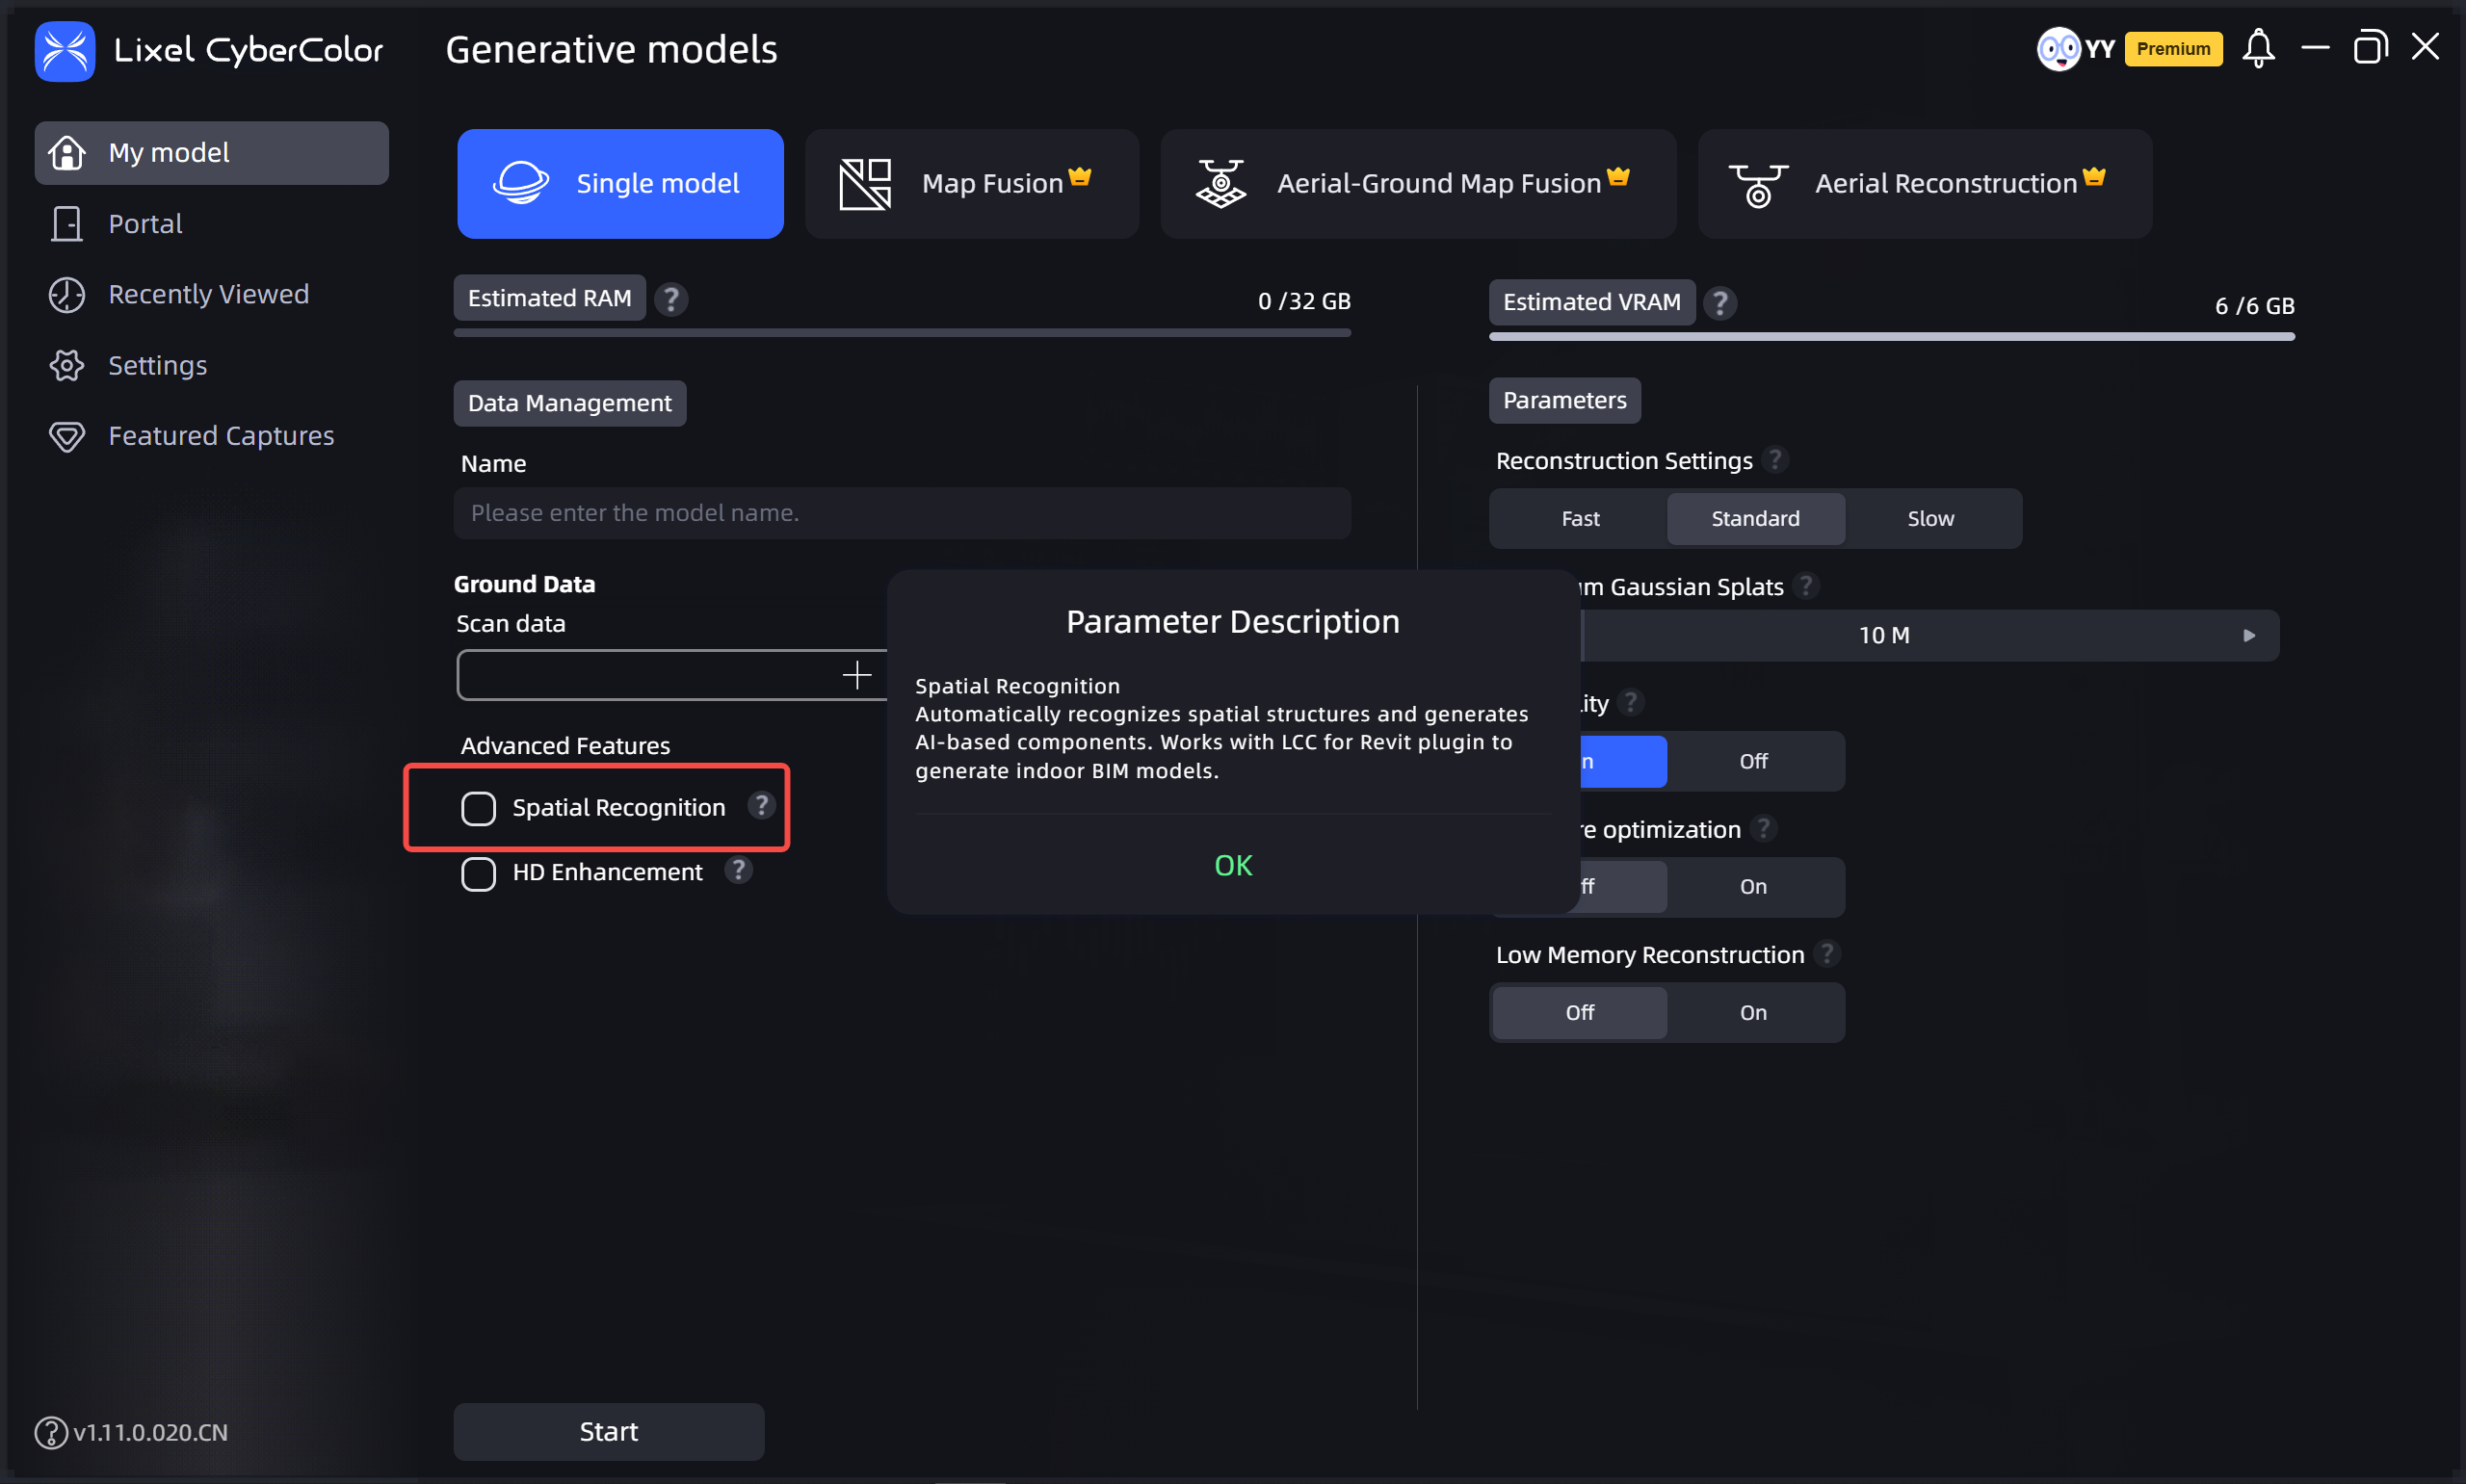
Enable Space Recognition

Enable Space Recognition

Getting Started

First-time use requires manual import:

  1. File → Import → Floor plan file directory → Select the semantic-result folder in the project directory
  2. Click OK
  3. In Scene mode, click the "3D Layout" button in the toolbar to enter the interface
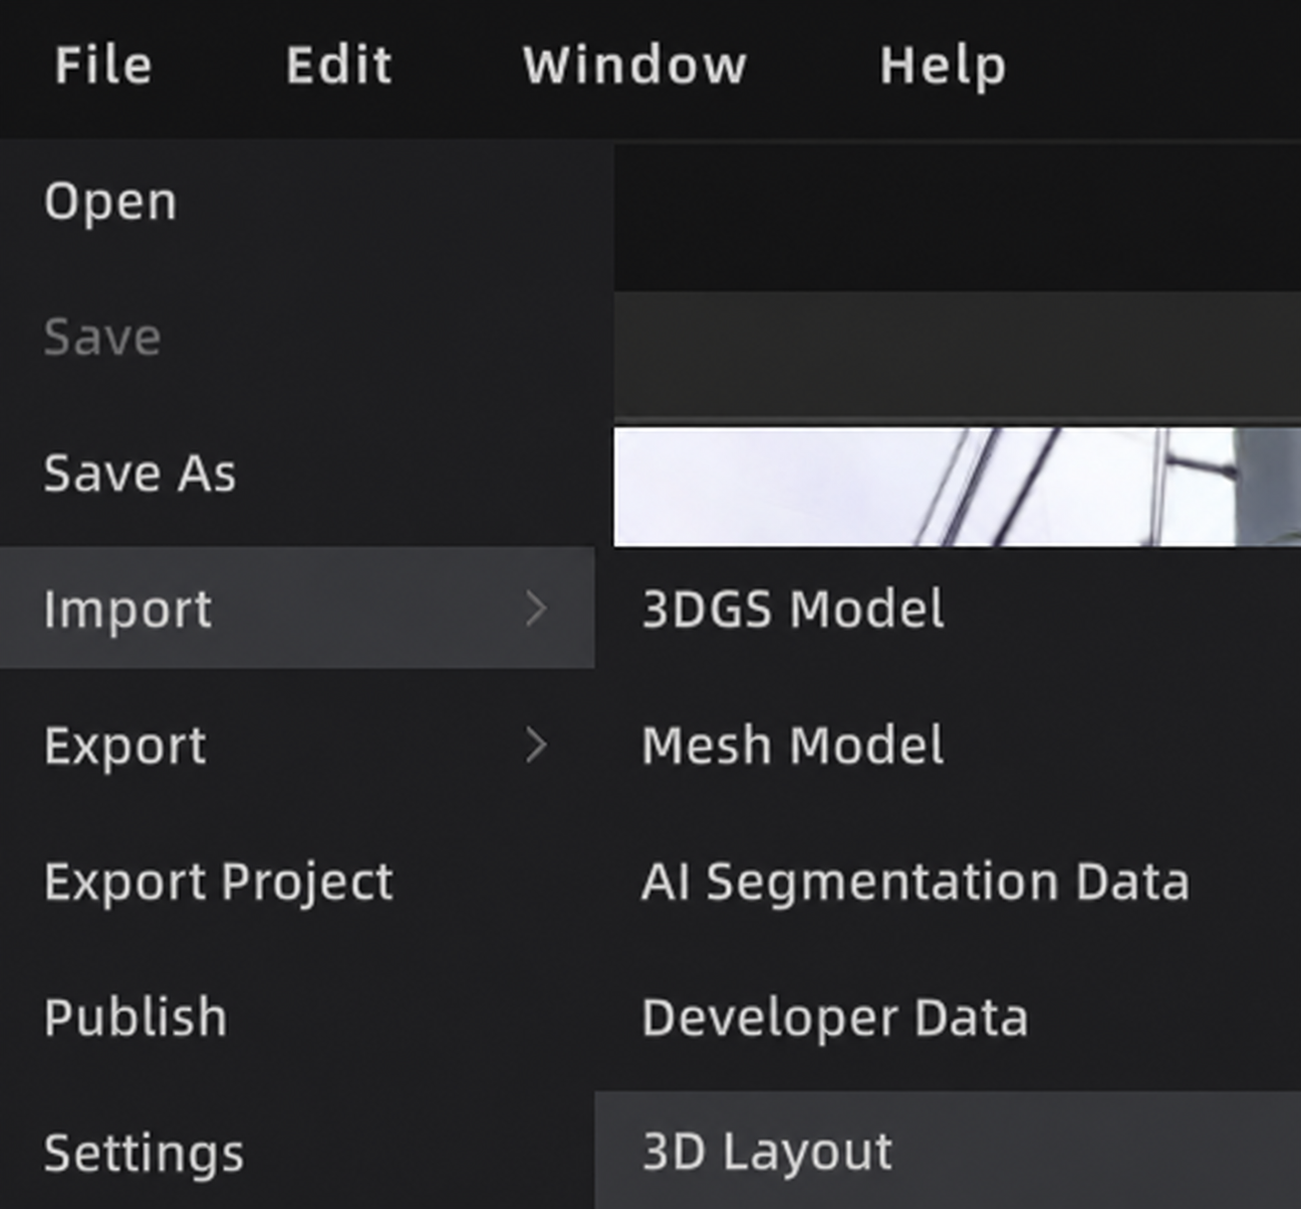
Import floor plan file
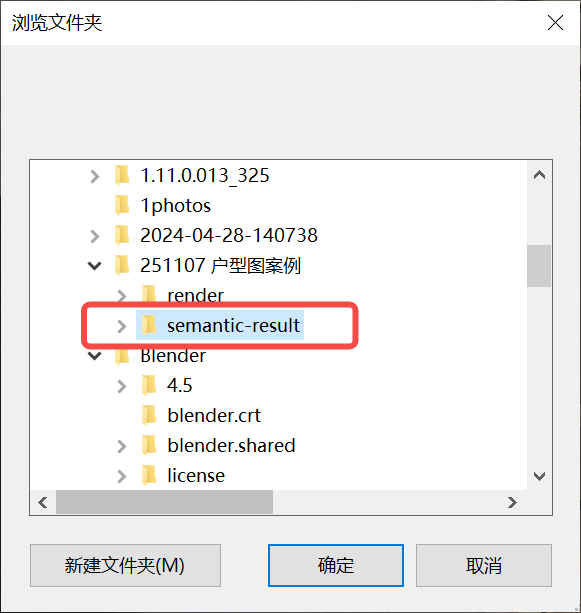
Import floor plan file

Select floor plan directory

Select floor plan directory

Interface and Tools

  • The right side contains the 3D Layout canvas, supporting zoom, pan, and drag browsing
  • The canvas supports 2D/3D view switching and 2D view overlay
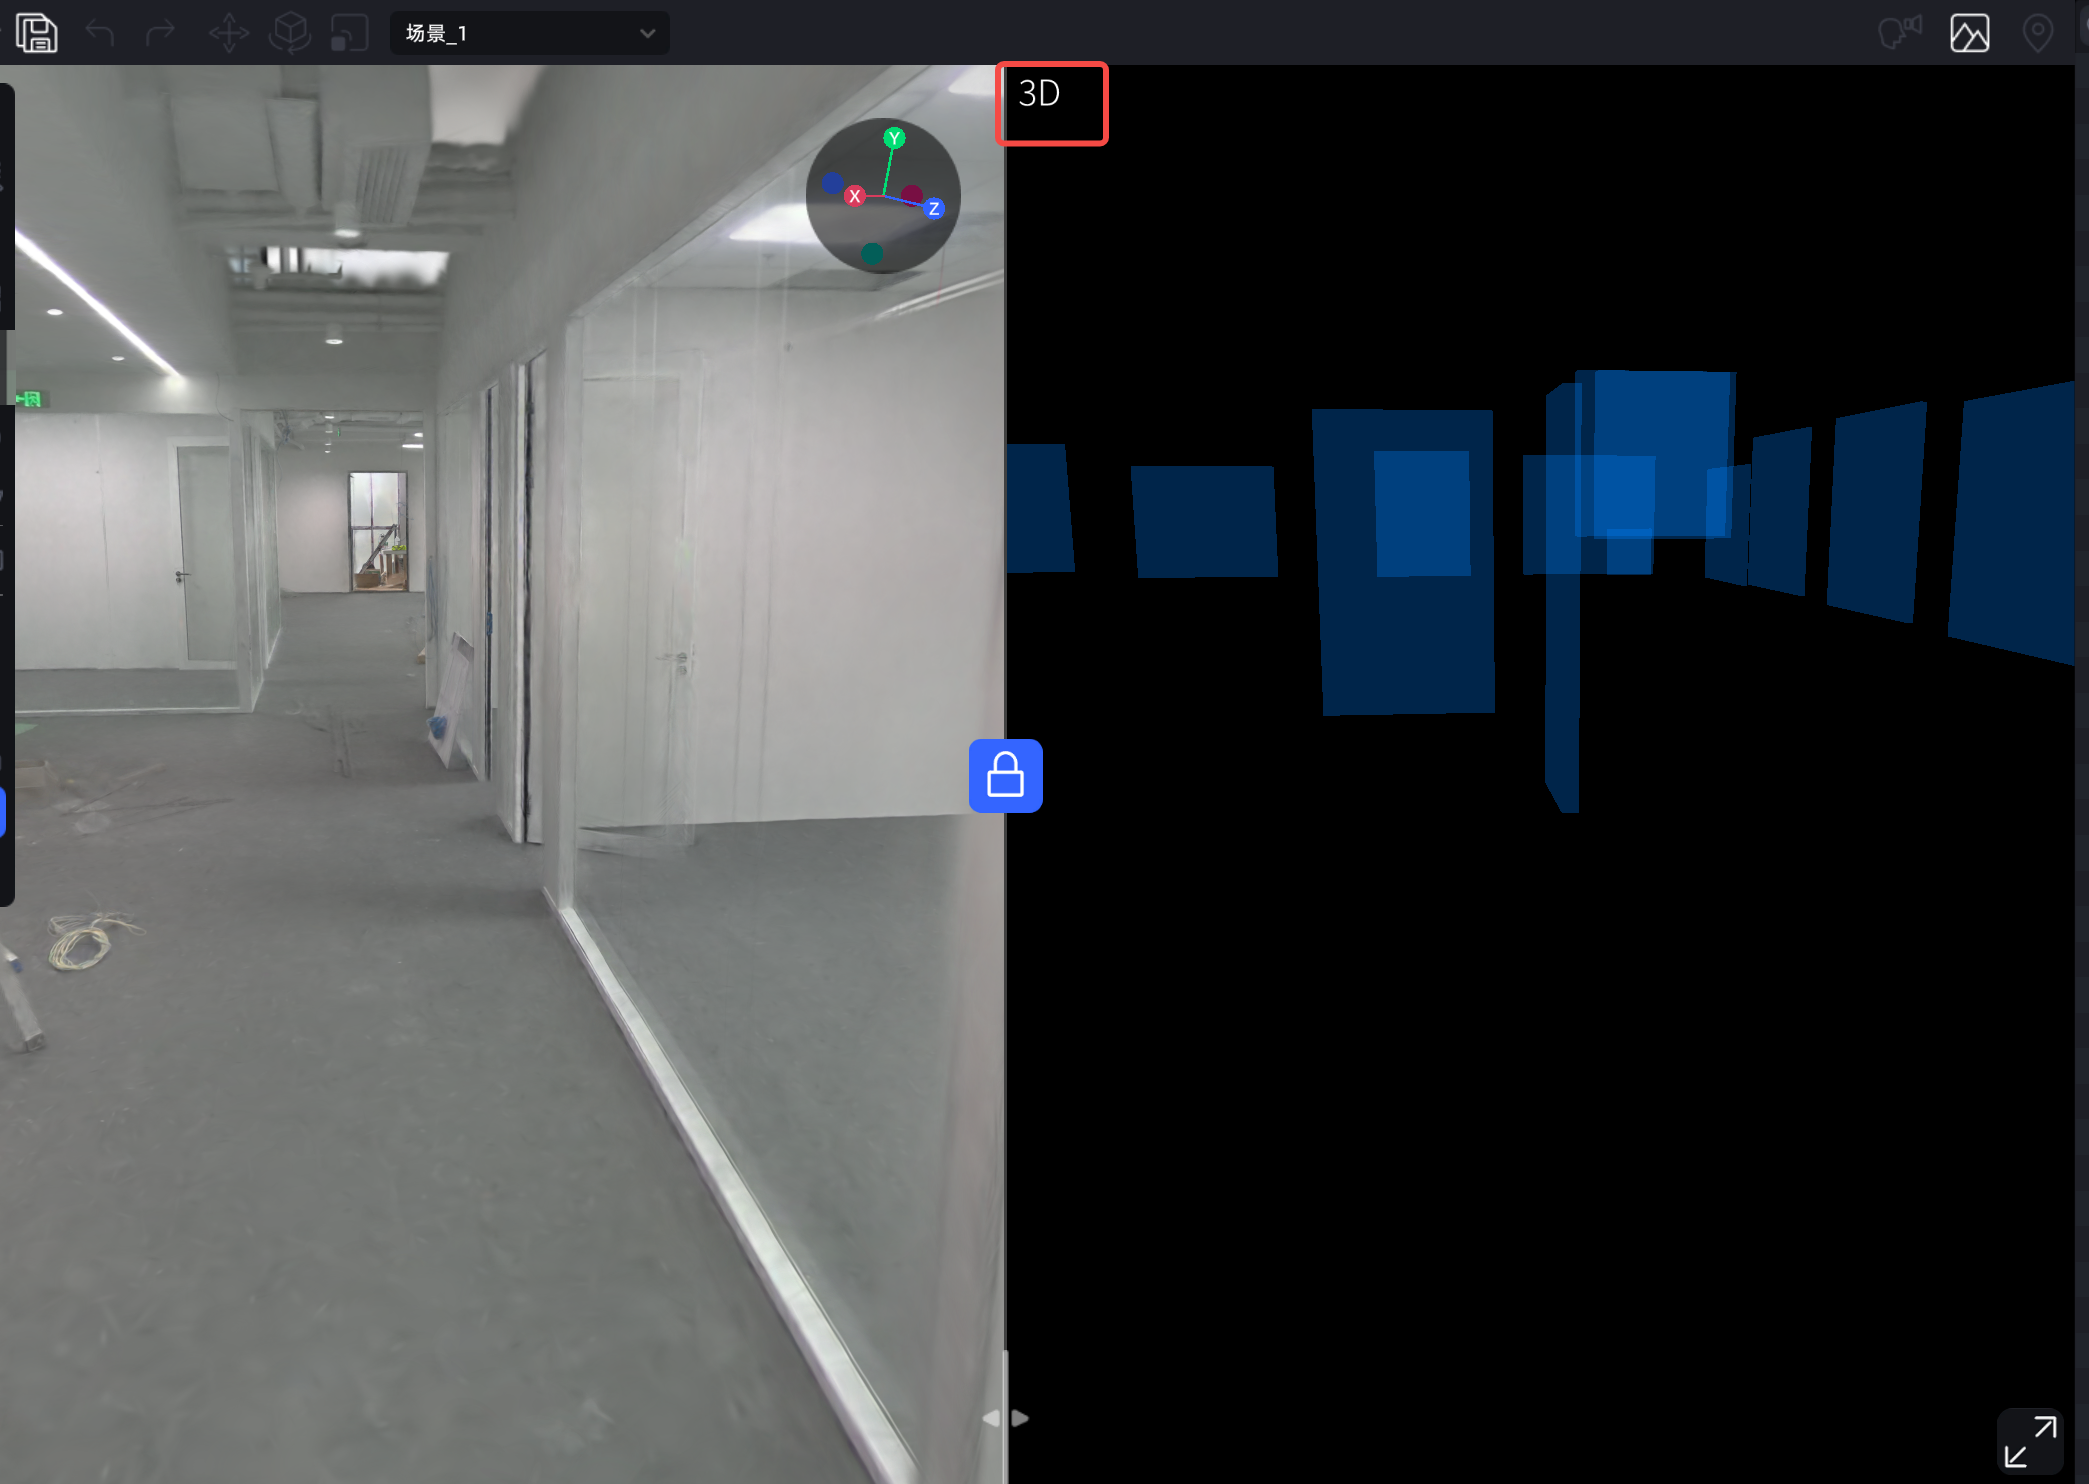
2D/3D view switch
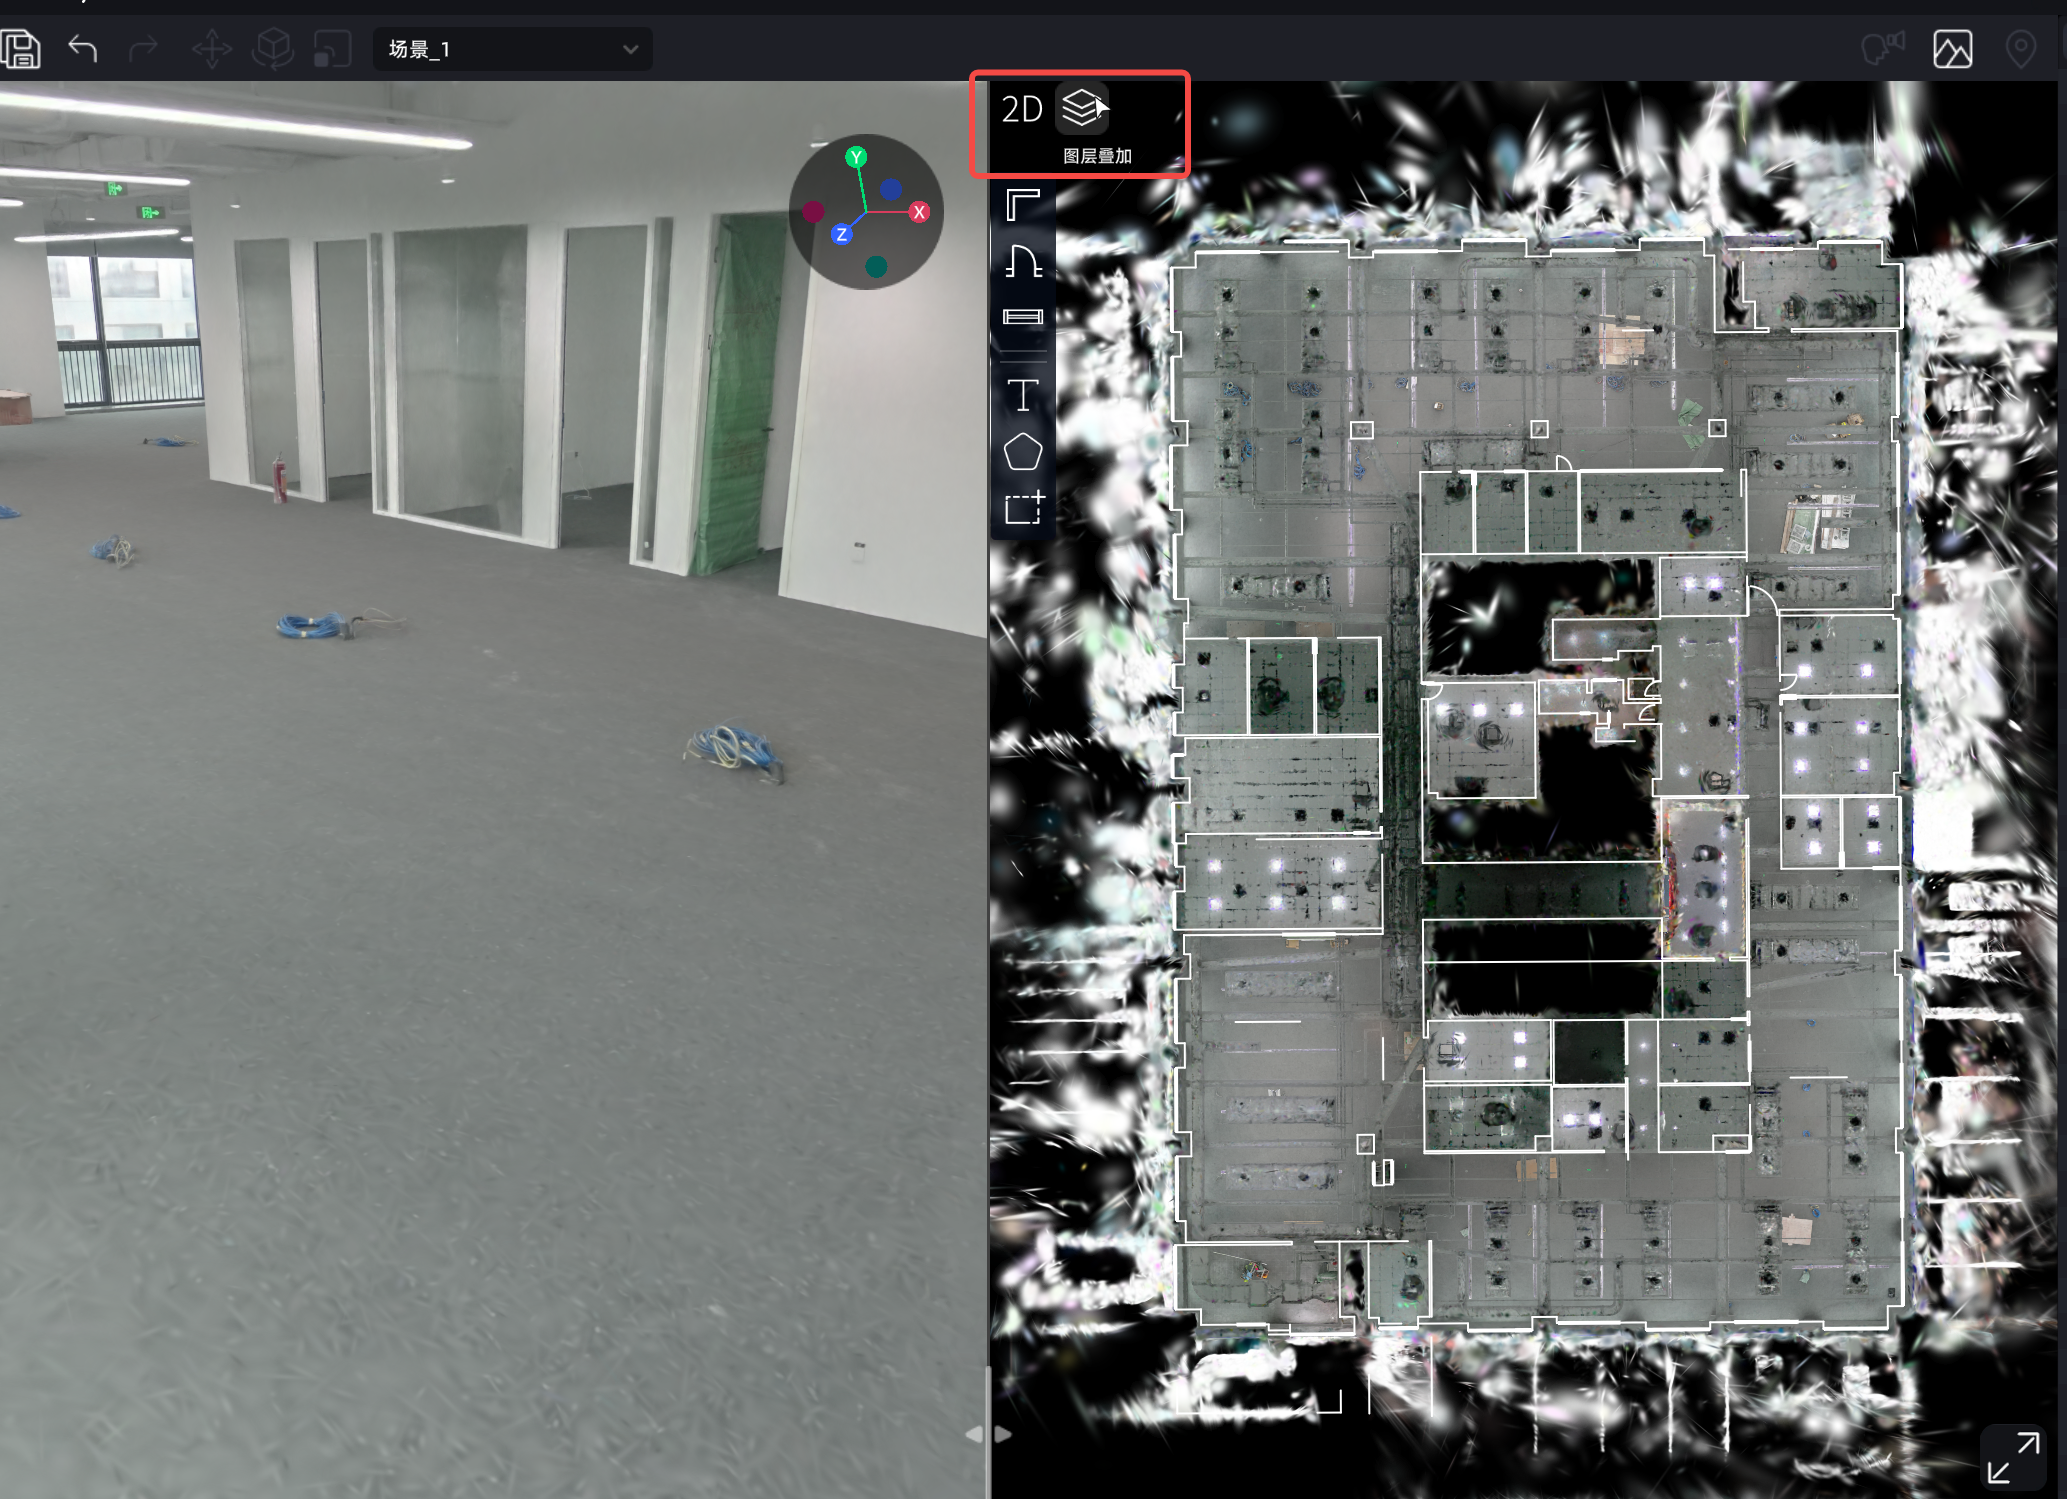
2D/3D view switch

2D view overlay

2D view overlay

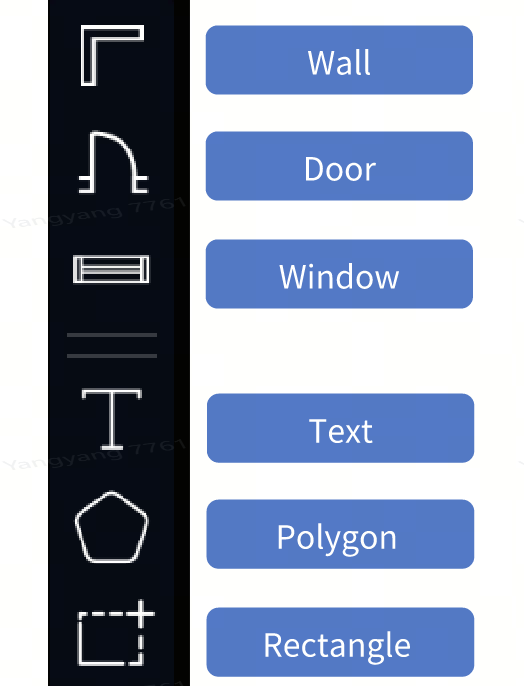
Drawing Tools

Drawing toolbar

Drawing toolbar

Wall

Click "Wall" → Place start point → Adjust by moving → Place end point → Right-click to finish
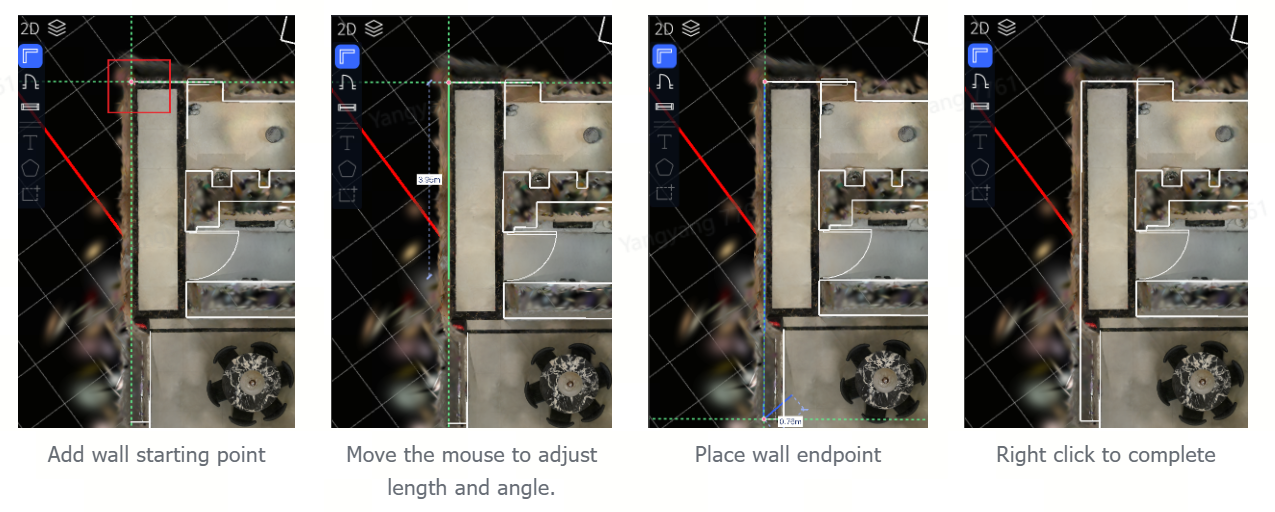
Place wall start point

Door

Click "Door" → Place pivot point → Adjust width → Confirm door end point → Adjust orientation
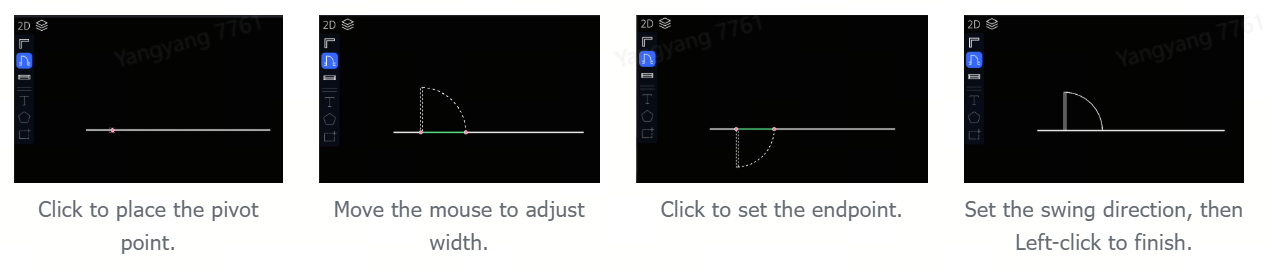
Place door pivot point

Window

Click "Window" → Place start point → Adjust width → Confirm end point
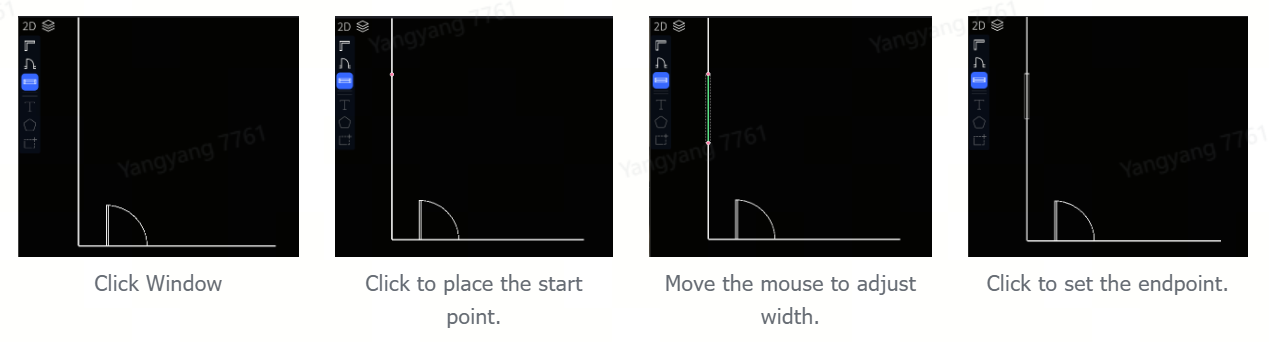
Click Window

Text Annotation

Click "T" → Place text box → Double-click to activate → Enter text → Click empty area to finish
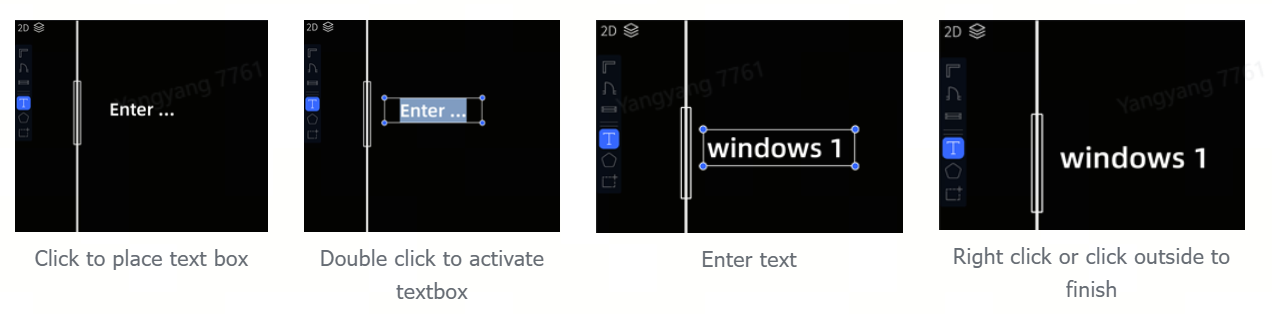
Place text box

Draw Polygon

Click "Draw Polygon" → Click to place drawing points → Double-click to finish
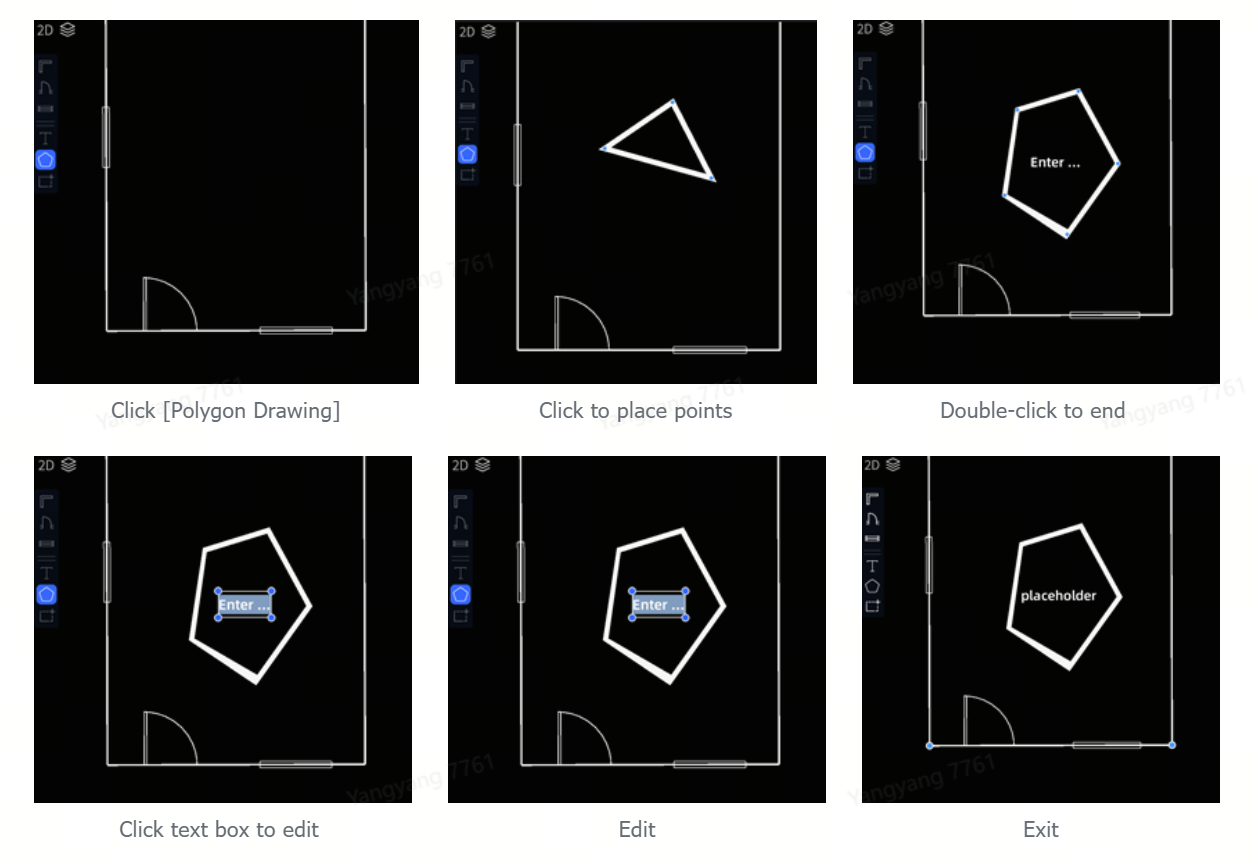
Click Draw Polygon

Rectangle Drawing

Click "Rectangle" → Drag mouse to draw → Release mouse to finish
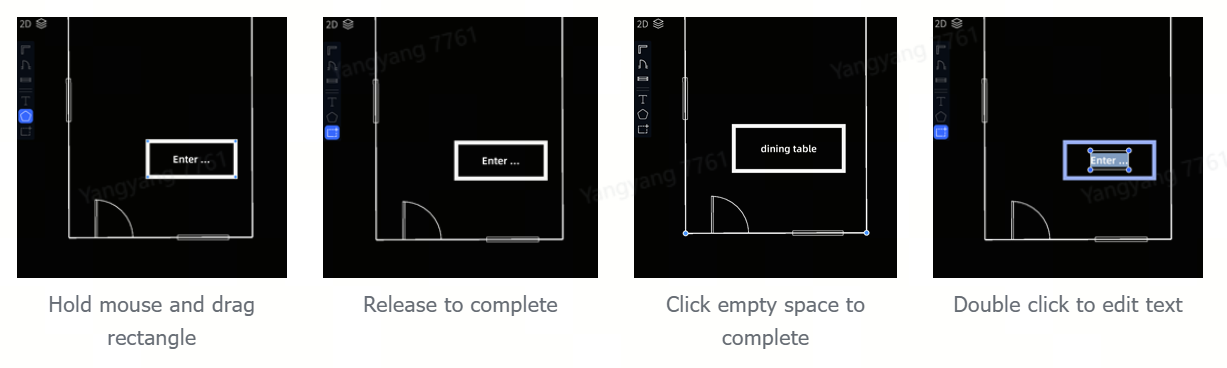
Drag to draw rectangle

Quick View Operations

Provides quick actions such as straighten and rotate 90° for rapidly adjusting the canvas orientation in 2D view.

3D Layout Export

Right-click the 3D Layout in the Assets list → Export. Exports as an OBJ format 3D model file or a JPEG image.

  • Supported export formats: JPEG / OBJ
  • Hidden assets are not exported

Asset Management

After importing 3D Layout data, the recognized asset components (walls, doors, windows, etc.) are automatically grouped by type.

Asset Operations

Asset group operations (right-click):

  • Delete
  • Export OBJ
  • Export JPEG

Individual asset operations (right-click):

  • Duplicate
  • Delete
  • Rename

Shortcuts:

  • Shift + click: Add to selection
  • Ctrl + click: Remove from selection
  • Select then press Delete: Delete selected assets
Prev
Scene Report
Next
Preview Mode (Viewer)